Help with Camshaft Oil Seal replacement

ScottyShy

XS650 Member
Messages
28
Reaction score
0
Points
1
Location
Nashville, TN
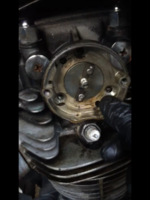
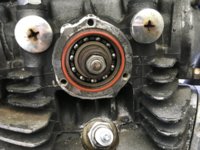
I'm trying to replace my oil seals to fix an oil leak coming from my left side camshaft cover where my electronic ignition is. I took off the outer cover and the ignition plate but I can't seem to get the inner casing off. I'm wondering if the engine needs to be at TDC or something because it seems like it's catching on something. It's loose and seems like it should pop off, but I don't want to pull and damage something. The right side came completely apart, no problem

Any hints are appreciated.
 

Attachments

  • IMG_0136.PNG
    IMG_0136.PNG
    811.3 KB · Views: 475
Hmm.. I'm not sure how that part comes off. Do you think i have to unscrew the bolt on the other side?
 

Attachments

  • 51301698844__4E28B464-13AA-41E1-8538-DC22E28D7743.JPG
    51301698844__4E28B464-13AA-41E1-8538-DC22E28D7743.JPG
    254.9 KB · Views: 842
Last edited:
Yes, there's a threaded rod running through the cam I think. But it probably needs to be aligned properly for the timing to be correct. I would place the motor at TDC or on the timing "fire" mark then snap a pic of the timing plate so you can put it back in the same spot.

One more thing, when you install the new seal(s), press it into the housing as far as possible, so it almost hangs out the back. It has to be in deep for the seal lips to get onto the cam and do their thing. It should look like this, inset into the housing .....

CamSealInset.jpg
 
Awesome, thanks for the help. I'm still waiting on the new seals to come in.

Do you happen to know where i can replace the O-rings that go back there? I can't find them on Mikes.
 
If they are the originals, they will be red in color which indicates they're silicone. If they're not deformed and/or all flattened out, you can just re-use them. They hold up pretty good it seems. The replacements that come in many of the gasket sets (Athena for one) are black in color. That indicates they're either the plain jane Buna-N rubber or Viton rubber. This is a pretty high heat area and I think it needs the better silicone o-rings. I say this because I had my housings off a few years after my rebuild and those black Athena o-rings were all mashed flat. I think the heat got to them and made them deform under pressure. I put them back on anyway but the housings leaked. I ended up putting some old original red silicone ones I saved back on and they sealed.

The specified metric size for these is 2.3mm thick x 45mm I.D. There is an American size you could try, 3/32" thick x 1 13/16" I.D. .....

https://www.mcmaster.com/#1283n149/=171xuap
 
As 5twins says, take a photo. That Boyer magnetic rotor needs to be removed by unscrewing the nut on the right. Before removing the nut I would make a very fine scratch on the rotor and another on the housing with the crank set at TDC so you can re-align latter. The engine will need to be retuned when you re-assemble, for this you will need a strobe light. If you do not have the original Boyer Bransden setup and tune instructions then visit their website. Re-tuning for the Boyer is not difficult, just a bit fiddly getting the magnetic rotor nut re-tightened without it slipping away from TDC.

Note: On rebuild those white paint spots on the rotor magnets will align with a hole in the pickup coil PCB. When you have re-tuned with the strobe those spots may or may not align perfectly with the PCB hole.
 
Back
Top