Homemade and Unique Tools

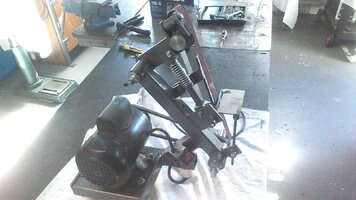
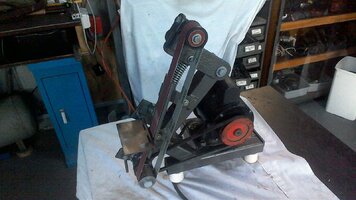
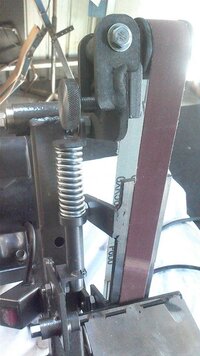
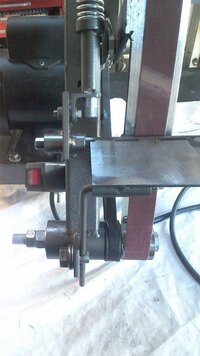
Not strictly bike related, but, I decided I needed a little brother to my bigger belt sander. Originally I made it to take two belts, but found the motor I used didn't have enough power to run two belts, so I re made it for just the one. One day, if I ever find a bigger motor, I'll convert it to a twin belt. Saves mucking around changing belts all the time. I chose this size belt because the belts are available in an almost unlimited variety of grits.
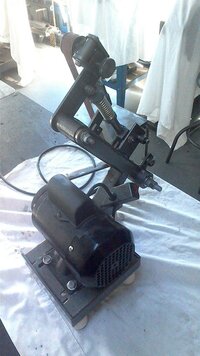
Hardest bit was getting all the wires inside the switch housing. After all that work though, it hardly ever gets used. More of a shop ornament I suppose.
 

Attachments

  • grind1.jpg
    grind1.jpg
    180.3 KB · Views: 110
  • grind2.jpg
    grind2.jpg
    173.3 KB · Views: 117
  • grind5.jpg
    grind5.jpg
    79.8 KB · Views: 109
  • grind3.jpg
    grind3.jpg
    84.8 KB · Views: 104
  • grind4.jpg
    grind4.jpg
    78.2 KB · Views: 108
bg35.jpg


bg36.jpg


bg29.jpg


Not sure why I never posted this, but it's a 2x72 belt grinder built partially from plans I found on the innerwebz and modified to suit what I had laying around.

It's powered by a 2hp treadmill motor which was A) free and B) gives me speed control via the 'tronics from the same treadmill. (Best use for a treadmill I've found in years...)

I have since upgraded to a set of bespoke pulleys as the poly ones weren't sufficiently crowned and were a beeyotch to keep the belt centered. I also have two more sets of motors and controls stashed from freebie yard sale treadmills.

BTW, the treadmill walking belts can be cut up and make excellent toolbox drawer liners...
 
Last edited:
View attachment 219155

View attachment 219156

View attachment 219157

Not sure why I never posted this, but it's a 2x72 belt grinder built partially from plans I found on the innerwebz and modified to suit what I had laying around.

It's powered by a 2hp treadmill motor which was A) free and B) gives me speed control via the 'tronics from the same treadmill. (Best use for a treadmill I've found in years...)

I have since upgraded to a set of bespoke pulleys as the poly ones weren't sufficiently crowned and were a beeyotch to keep the belt centered. I also have two more sets of motors and controls stashed from freebie yard sale treadmills.

BTW, the treadmill walking belts can be cut up and make excellent toolbox drawer liners...
A good use for the clothes rack. What does the misses say?😂
 
She hated that treadmill, was a Chineseum Wallaby Mart cheapo.

OTOH, I spent over $1000 on a replacement gym quality treadmill that she actually uses in the Winter when we can't (don't want to...) get out and walk. We generally do two miles a day, weather permitting.
 
So, I had the welder out again and made myself another "lil' helper", lol. I've found that when cleaning and polishing rims, one of the hardest parts is holding the rim upright while you work on it. So I needed some sort of rim holder that would do this, and here's what I came up with .....

UprightWithoutRim.jpg


Basically, it's just a piece of plywood attached to an angle iron frame, with a couple angles attached for the rim to sit in .....

UprightWithoutRim3.jpg


UprightWithoutRim4.jpg


The angles the rim sits on have small blocks of hardwood attached that fit up into the rim's dropped center, effectively locking it in place and keeping it from sliding off the angle. They are mounted with one bolt and rotate to match the curve of different size rims .....

RimAngleAndBlock.jpg


To hold the rim on, a couple of bungees are wrapped around it, simple, quick and easy to remove and install .....

UprightWithRim.jpg


Bungee.jpg


All the connection points use nylock nuts so I can tighten them enough to take the play out but leave them just loose enough so they rotate, and they'll hold that adjustment. All except the middle "pivot" on the angle braces, those got wing nuts .....

PivotPoints.jpg


NylockPivot.jpg


WingNutPivot.jpg


Loosening the wing nuts allows me to fold the stand down, to give better and easier access to the side of the rim .....

FoldedWithRim.jpg


FoldedWithRim3.jpg


This should make renovating these old rims much easier now.
 
Last edited:
So, I had the welder out again and made myself another "lil' helper", lol. I've found that when cleaning and polishing rims, one of the hardest parts is holding the rim upright while you work on it. So I needed some sort of rim holder that would do this, and here's what I came up with .....


View attachment 231179

Basically, it's just a piece of plywood attached to an angle iron frame, with a couple angles attached for the rim to sit in .....

View attachment 231180

View attachment 231181

The angles the rim sits on have small blocks of hardwood attached that fit up into the rim's dropped center, effectively locking it in place and keeping it from sliding off the angle. They are mounted with one bolt and rotate to match the curve of different size rims .....

View attachment 231182

To hold the rim on, a couple of bungees are wrapped around it, simple, quick and easy to remove and install .....

View attachment 231183

View attachment 231187

All the connection points use nylock nuts so I can tighten them enough to take the play out but leave them just loose enough so they rotate, and they'll hold that adjustment. All except the middle "pivot" on the angle braces, those got wing nuts .....

View attachment 231188

View attachment 231189

View attachment 231190

Loosening the wing nuts allows me to fold the stand down, to give better and easier access to the side of the rim .....


View attachment 231191

View attachment 231192

This should make renovating these old rims much easier now.
As always, very nicely done!
 
So, I had the welder out again and made myself another "lil' helper", lol. I've found that when cleaning and polishing rims, one of the hardest parts is holding the rim upright while you work on it. So I needed some sort of rim holder that would do this, and here's what I came up with

Another well designed and useful tool for your shop. Nice! 😃
 
Several years ago, I constructed a very simple and re-useable device for lubricating control cables. I've tried the "pressure lube" devices that clamp onto the cable and are fed by a straw from an aerosol can of lubricant - and have been somewhat disappointed in the results. So, here's my solution. I cut a one inch long piece of 5/16" automotive fuel hose - nothing special - just the generic fuel hose you can get at the local auto parts store, and a two inch long piece of clear vinyl tubing 1/2" i.d. x 5/8" o.d. - available from the local hardware store. Using a utility knife, I cut a slit down one side of the fuel hose to allow it to be slipped over the ferrule end of the cable without having to thread the cable through it.
DSCN2585.JPG
DSCN2582.JPG

To use this device, I just place the fuel hose over the ferrule end of the cable and then work the clear tubing down over it to about 1/2" depth. After placing the cable in a vertical position (clothespin holding it in place suspended between vise jaws, I fill the resulting reservoir with my preferred lubricant and let gravity and capillarity do the work. The fuel hose fits the clutch cable on the 650 perfectly - nothing leaks past, as the clear tubing fits the fuel hose tightly enough to squeeze it closed around the cable housing. To lube a throttle cable, I just wrap a bit of vinyl electrical tape around the cable ferrule to enlarge the diameter of the housing - only takes about 1 1/2 wraps of tape to get there.

DSCN2588.JPG
DSCN2590.JPG


I place a catch pan on the floor under the other end of the cable to catch the fluid as it flushes through. Cables will continue to drain a bit after they are re-installed on the bike. The throttle cable, due to its loose internal fit, drains for a LONG time after re-installation and can drip oil onto the engine case for months (I just park the bike with a rag on top of the case for a while and regularly wipe off the excess oil at the exposed end of the cable until it quits draining). My lubricant of choice is Mobil 1 20w50 synthetic motor oil - seems to last dang near forever and cable action is silky smooth.
 
Last edited:
Pretty basic this one, getting ready to do some fibreglass work. The material supplier wanted $21 for a laminate roller. I looked at the photo and saw it was just a bit of 10mm threaded rod line bored and mounted on a mini roller handle. A short while later in the shed I now have one.
AAAAA.jpg
 
Several years ago, I constructed a very simple and re-useable device for lubricating control cables. I've tried the "pressure lube" devices that clamp onto the cable and are fed by a straw from an aerosol can of lubricant - and have been somewhat disappointed in the results. So, here's my solution. I cut a one inch long piece of 5/16" automotive fuel hose - nothing special - just the generic fuel hose you can get at the local auto parts store, and a two inch long piece of clear vinyl tubing 1/2" i.d. x 5/8" o.d. - available from the local hardware store. Using a utility knife, I cut a slit down one side of the fuel hose to allow it to be slipped over the ferrule end of the cable without having to thread the cable through it.
View attachment 234196View attachment 234199
To use this device, I just place the fuel hose over the ferrule end of the cable and then work the clear tubing down over it to about 1/2" depth. After placing the cable in a vertical position (clothespin holding it in place suspended between vise jaws, I fill the resulting reservoir with my preferred lubricant and let gravity and capillarity do the work. The fuel hose fits the clutch cable on the 650 perfectly - nothing leaks past, as the clear tubing fits the fuel hose tightly enough to squeeze it closed around the cable housing. To lube a throttle cable, I just wrap a bit of vinyl electrical tape around the cable ferrule to bring the enlarge the diameter of the housing - only takes about 1 1/2 wraps of tape to get there.

View attachment 234202View attachment 234203

I place a catch pan on the floor under the other end of the cable to catch the fluid as it flushes through. Cables will continue to drain a bit after they are re-installed on the bike. The throttle cable, due to its loose internal fit, drains for a LONG time after re-installation and can drip oil onto the engine case for months (I just park the bike with a rag on top of the case for a while and regularly wipe off the excess oil at the exposed end of the cable until it quits draining). My lubricant of choice is Mobil 1 20w50 synthetic motor oil - seems to last dang near forever and cable action is silky smooth.

Now THAT is a cool idea - ahhhhhm swipin' it!
 
Pretty basic this one, getting ready to do some fibreglass work. The material supplier wanted $21 for a laminate roller. I looked at the photo and saw it was just a bit of 10mm threaded rod line bored and mounted on a mini roller handle. A short while later in the shed I now have one.
View attachment 237050

This is cool too - but I don't work with fibreglas due to the itchiness of it.

Nice idea though Signal!

Pete
 
Last edited:
View attachment 237245
I found this tool I made in a drawer in my tool box. I'm sure that it's motorcycle-related, but I can't remember what I made it for, and I have no idea what it's supposed to do...
Hi Dogbunny,
dunno what your widget was meant to do but the similar one I made was a dipstick for checking my XS11's oil level.
( note that instead of a dipstick an XS11 has a porthole to see the oil level but you can't see the effin' thing if there's a sidecar in the way)
 
View attachment 237245
I found this tool I made in a drawer in my tool box. I'm sure that it's motorcycle-related, but I can't remember what I made it for, and I have no idea what it's supposed to do...
Looks like the tool I have to measure the rear axle alignment of my 1992 Sportster.
Rear axle alignment tool[2].jpg

There is a factory drilled hole the pointed end goes in and the oring is used to compare the right and left sides to a small center hole in the axle.
 
Looks like the tool I have to measure the rear axle alignment of my 1992 Sportster.View attachment 237256
There is a factory drilled hole the pointed end goes in and the oring is used to compare the right and left sides to a small center hole in the axle.
Yep, that's it exactly.
It's been years since my Sportster ran. Fixable, but just one more low-priority project. Been so long, that obviously, I'm beginning to forget it's workings...
 
I noticed Bluzplayer and I have the same valve spring compressor from reading his D porting flow bench thread.
To be honest when I first used it as bought it was a lemon. after a few mods longer handle, extended depth and a cage to allow easy access to the collets it a pleasure to use.
It very easy to install heavy duty springs in XS heads now.
 

Attachments

  • 20230328_084311.jpg
    20230328_084311.jpg
    363.7 KB · Views: 38
  • 20230328_084510.jpg
    20230328_084510.jpg
    451.5 KB · Views: 37
  • 20230328_084446.jpg
    20230328_084446.jpg
    245.4 KB · Views: 36
Back
Top