When I did mine, I made a custom screwdriver to pry up the crimp on the bezel. I simply took a small flathead, ground the tip to about half the thickness and then gave it a slight bend to give the tip a curve. The bend is needed for leverage to work that crimp up without extensively damaging it.

-
Enjoy XS650.com? Consider making a donation to help support the site.
XS650.com receives a small share of sales from some links on this page, but direct donations have a much greater impact on keeping this site going.
You are using an out of date browser. It may not display this or other websites correctly.
You should upgrade or use an alternative browser.
You should upgrade or use an alternative browser.
How to re face your gauges
- Thread starter Mailman
- Start date
Re re-read and I think I'm going with LEAVE IT ALONE.
 I understand that completely! It’s ridiculously hard to do.
Turned an aluminum holder so uncrimping doesn't distort the trim ring. Tools from previous "special" gauge work did the trick.

Mailman's Spoon trick to remove the pointer, perfect.

scrape black glue from around back of the ring holes in the gauge face, remove plastic lens then push ring down on socket to remove out the back.
Mailman's Spoon trick to remove the pointer, perfect.
scrape black glue from around back of the ring holes in the gauge face, remove plastic lens then push ring down on socket to remove out the back.
Last edited:
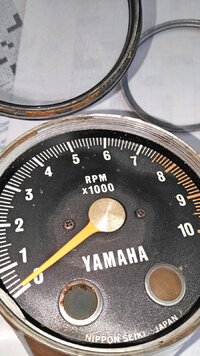
First decal on. It's "pretty good' but hope the installed quality goes up a bit before I get to the 70 gauges.... Removed old paint 320 then 600 both with water/dish soap, then a bit of buffing compound, got the plastic smooth. I managed to get some little piece of something under the decal but I'm prolly the only one will notice.

Glued the little rings and colored plastic jewels back on with a bit of black plastic bumper epoxy and a toothpick.
Just want to give props again to the mailman and way @Twomanyx1bs for their pioneering work here!! it's so much easier to reach the goal when standing on the shoulders of giants.
Using the soldering iron to heat it trick, the reset extension screwed right off the shaft (LH thread, unscrews clockwise) with no damage!

The two spoon trick to pop the needle a winner tip!
Made up another tool, just a 20 penny nail heated red, flattened, bent and filed. After using the thin edge pry to get the uncrimp started, the thicker more rounded second tool gets the crimp fully opened with minimal scallops or kinks in the edge. Patience weed toker, Rome wasn't built in a day and several trips around slowly unbending the 90 crimp is key.
The aluminum holder is nice but a large hose clamp with a layer of electrical tape on it serves the same purpose.


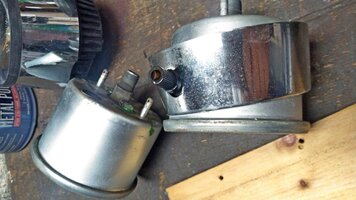
The chrome covers on these 72 gauges cleaned up nicely after a dip in metal rescue and some time on a cotton buff with the finest compound i have.


No doubt there will be a couple more breathless updates. LOL.
Glued the little rings and colored plastic jewels back on with a bit of black plastic bumper epoxy and a toothpick.
Just want to give props again to the mailman and way @Twomanyx1bs for their pioneering work here!! it's so much easier to reach the goal when standing on the shoulders of giants.
Using the soldering iron to heat it trick, the reset extension screwed right off the shaft (LH thread, unscrews clockwise) with no damage!
The two spoon trick to pop the needle a winner tip!
Made up another tool, just a 20 penny nail heated red, flattened, bent and filed. After using the thin edge pry to get the uncrimp started, the thicker more rounded second tool gets the crimp fully opened with minimal scallops or kinks in the edge. Patience weed toker, Rome wasn't built in a day and several trips around slowly unbending the 90 crimp is key.
The aluminum holder is nice but a large hose clamp with a layer of electrical tape on it serves the same purpose.
The chrome covers on these 72 gauges cleaned up nicely after a dip in metal rescue and some time on a cotton buff with the finest compound i have.
No doubt there will be a couple more breathless updates. LOL.
Attachments
Last edited:
This is a great thread on real-world living with these old bikes - which is not just about engine rebuilds and finding the best silencers.
First decal on. It's "pretty good' but hope the installed quality goes up a bit before I get to the 70 gauges..
Great work Gary!
 It’s very satisfying to complete such a delicate job. I’m curious ,are those the decals that have to go on wet, from Diablo, like I used? They are a little trickier to install.
Didn’t you also order a set of dial faces from that company in England? I believe they are superior and much more forgiving, and since they are stiffer and go on dry, they show no imperfections.
Yeah I'm using the diablo sets on these 72 gauges, even with water spritz there's not much time room to move them around. The 70 will get the fancy shmantzy set from England. ;^)Great work Gary!
Didn’t you also order a set of dial faces from that company in England? I believe they are superior and much more forgiving, and since they are stiffer and go on dry, they show no imperfections.
The diablo are a bit glossy hoping the other type is more of a matt finish.
Last edited:
hoping the other type is more of a mat finish.
They are, the surface has a textured surface that doesn’t shine or reflect. I think they look more like the factory silkscreen finish.
Matt varnish.. . . hoping the other type is more of a mat finish . . .
Two done, not perfect but much better?
I put the second (speedo) decal on dry. IMHO no harder, result about the same. Some tiny bubbles that didn't want to leave even after lancing with an exacto knife.


A 72 out in TSOIR is going to have a fancy gauge necklace on her.
Four to go. Have to cut the 70 gauges open.
I put the second (speedo) decal on dry. IMHO no harder, result about the same. Some tiny bubbles that didn't want to leave even after lancing with an exacto knife.
A 72 out in TSOIR is going to have a fancy gauge necklace on her.
Four to go. Have to cut the 70 gauges open.
Last edited:
Looks great Gary! 
STOP THE PRESSES!
Cutting apart XS1 and XS1B housings has always bugged me.
Was getting ready to do the deed on a speedo this morning when I thought what the heck..
Grabbed the black plastic ring and housing and twisted hard, got a bit of movement.
added some silicone at the joint, put on a pair of those stretchy knit rubber gloves for better grip and............


Son of gun: that ring is THREADED! Also glued. On this set the glue was brittle and dry and it cracked loose, bingo, bango gauge open..

I didn't use heat but that may help removal with lots of care to not OVERHEAT anything.
The lens on these 70-71 is plastic not glass.
Lots of fun clean up to do on those threads. the side in the black ring is well hidden in a deep groove.
Cutting apart XS1 and XS1B housings has always bugged me.
Was getting ready to do the deed on a speedo this morning when I thought what the heck..
Grabbed the black plastic ring and housing and twisted hard, got a bit of movement.
added some silicone at the joint, put on a pair of those stretchy knit rubber gloves for better grip and............
Son of gun: that ring is THREADED! Also glued.
On this set the glue was brittle and dry and it cracked loose, bingo, bango gauge open..I didn't use heat but that may help removal with lots of care to not OVERHEAT anything.
The lens on these 70-71 is plastic not glass.
Lots of fun clean up to do on those threads. the side in the black ring is well hidden in a deep groove.
Attachments
Good for you !!
Good for us !!
Put it in the tech section ??
Good for us !!
Put it in the tech section ??
On my 75 I have had to replace either the face plate with another one off a different gauge
or replace the gauge entirely with a spare
I believe the 75 is a 1 year only for the guages so there are no replacement decals
My question is it, always seems to be the screws holding on to the faceplate
that wobble out the face plated out even if the screws are glued on I've had 1 break in half
Would a little dab of silicone around the screws during re assembly help
I think I'm on my 3 or 4th cracked face plate
I'd post pictures of all of this but they died with my old computer
Son of gun: that ring is THREADED! Also glued.
Well I’ll be! How has that little nugget been missed all these years? That sure could’ve saved a lot of heartache along the way! I don’t know if you’re planning on re gluing that ring, but maybe something non hardening like a thin smear of Hylomar?

On my 75 I have had to replace either the face plate with another one off a different gauge
or replace the gauge entirely with a spare
I believe the 75 is a 1 year only for the guages so there are no replacement decals
My question is it, always seems to be the screws holding on to the faceplate
wobble out the face plated out even if the screws are glued on I've had 1 break in half
Would a little dab of silicone around the screws during re assembly help
I think I'm on my 3 or 4th cracked face plate
I'd post pictures of all of this but they died with my old computer
Have you tried blue locktite? That’s what I used on the tiny screws on my XS2.
I believe soHave you tried blue locktite? That’s what I used on the tiny screws on my XS2.
It's just odd that the screws will be tight and I don't think them getting loose is the problem
It might just be the old Yamaha shake
Obviously the dampening rubber isn't original and have been replaced with 2 O rings as per some other post
It might be that I'm just not getting enough dampening
Maybe use a tiny washer on the screws to spread the vibration further out as in more surface area on the face plate
While putting these back together I'm spreading a bit of thread locker on the raised knob surrounding the two screw holes on the metal frame for exactly that reason to act as a damper so the gauge face doesn't fret on the screw heads. Will check if the little BS34 carb needle washers will work here also. If not I'll measure and order some SS washers from China.
Last edited:
In addition to many other talents you're a mind reader now?Well I’ll be! How has that little nugget been missed all these years? That sure could’ve saved a lot of heartache along the way! I don’t know if you’re planning on re gluing that ring, but maybe something non hardening like a thin smear of Hylomar?

On my 75 I have had to replace either the face plate with another one off a different gauge
or replace the gauge entirely with a spare
I believe the 75 is a 1 year only for the guages so there are no replacement decals
My question is it, always seems to be the screws holding on to the faceplate
that wobble out the face plated out even if the screws are glued on I've had 1 break in half
Would a little dab of silicone around the screws during re assembly help
I think I'm on my 3 or 4th cracked face plate
I'd post pictures of all of this but they died with my old computer
These guys sell decals for 72 and the one year only 75
https://www.diablocycle.com/Gauge-Faces-c-379/