Hey Lanz---I'm interested in knowing what the PMA mounting plate is that you are using....
tim
I have used the right cover of a scooter. I had to shape it to fit.
Hey Lanz---I'm interested in knowing what the PMA mounting plate is that you are using....
tim
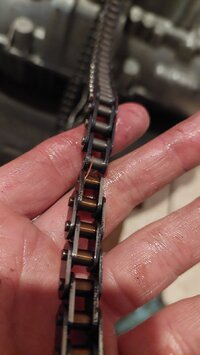
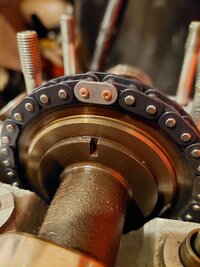
Yes, Jan, the ends of the master link pins are softer material than other pins. If you want to know why that's necessary, try putting a dent in one of the other pins with a riveting tool or center punch. There's no side load on the master link, and I've never seen or heard of anyone's cam chain riveting job failing. That leads me to conclude that the pins just need to be spread enough to retain the plate.
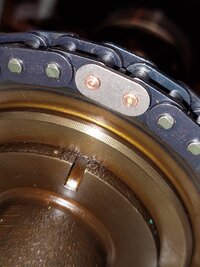
Not that it will be any less expensive than other systems, or any more reliable, here is what’s on my Commando that has a 3phase Lucas alternator. The three diodes, with the blue dots are in parallel with the rectifier. Unlike single phase systems on my other bikes the diodes are situated on the AC side before the rectifier.I have seen these before and Bought some parts I have stashed
I have seen cross lists about which parts fits
Does anyone out there perhaps ( former ) brit bike owner know how the regulating is done on PMA systems
Or better still already know which regulator works
I remember a Zener diode under the lamp with cooling fins.
I assume we are talking a shunt regulator ( I believe it is called ) that cooks off excess charging to heat somewhere
But I have not done the read up
I believe this is of interest .. since a setup can be made happen for low cost with some cheap salvage parts .
Which is good in an evaluation period as the Gonzo ignition. Getting some miles on a bike before decisions is made
and a knowledge base is also good for the ones having these systems from Other vendors
Here exists replacements for the stock rectifier and regulator But this would be of use I believe
Thank you SirJust use a gy6 regulator to match the stator.
Thats is what I was thinking. I have seen diode packs similar to these inside car alternators. But car alternators are not permanent magnets, and as such have a regulator.Those 3 diodes are most likely Zener diodes. Not to be found in automotive alternators.
A primitive form of voltage control. Doesn’t and can’t control output from a PMA, but gets rid of the excess a bit like running with the lights on.So if I get this right
There is no regulator installed ,,which can be an advantage for a low budget rider
Rectifier diodes can be found on Car rectifiers at low cost.
Please give more info
Is the alternator 3 phases forked so one part goes to the rectifier bridge
and another to this we se in the picture.
Commandos can have Battery or no Battery is this a no battery setup ?
Any adjustments Possible ? ?? Resistor in the pictured diode Branch ?
Without a regulator a PMA will deliver more at higher rev that the regulator cooks off
Perhaps matching the diodes here with the bridge takes care of the over voltage.
Nice installation .setting the standard