That windshield will help A LOT! Trust me, it makes a noticable difference especially when riding in cold temps. That little windshield helps create a wind tunnel that you must tuck your head down to fit inside. Once inside you have the added befefit of less air hitting your upper chest and going into the underside of your full face helmet. Thus reducing coldness, and dry eyes.
-
Enjoy XS650.com? Consider making a donation to help support the site.
XS650.com receives a small share of sales from some links on this page, but direct donations have a much greater impact on keeping this site going.
You are using an out of date browser. It may not display this or other websites correctly.
You should upgrade or use an alternative browser.
You should upgrade or use an alternative browser.
My 20+ year project
- Thread starter Meddy
- Start date
Meddy
XS650 Addict
Meddy, I just reviewed this thread and must say you have done a truly wonderful job! I still eagerly await to hear if your disk brake runs silent after the sanding you gave. Will also be interesting to know if the wind shield deflects enough to make riding above 55 mph more comfortable.
Well done....
Thanks for the kind words Paul, I'm hoping my sanding hasn't upset the disc's too much, I had to do something though they were in a bad way. I will report back on the windshield and the brakes very soon I hope.
I'm still having problems with this Commando exhaust system from MikesXS, half mounting brackets in the kit are too short and the holes are not drilled large enough. I have some 25mm x 5mm flat bar stock that I am going to use to make some more suitable mounting brackets, more to come.
Another little side project I have been working on is my sidecover badges, as the bike is now just black and chrome the gold plastic badges were just no going to work. I wanted some chrome ones but nobody seems to make aftermarket ones and I don't believe Yamaha did any in chrome.
I eventually came across Molotow liquid chrome so I set about removing the gold paint from the badges with my Dremel and then giving the whole thing a coat of flat black.
I then sanded off the black from the face of the badge where I wanted the chrome plating to replace the original gold.
It was then just a matter of going over the badge with the chrome pen to get the finish I wanted.
And here, mounted on the side cover. It's a bit hard to get a decent pic of it as when I use the flash it reflects too much.
The Tin Man
XS650 Addict
Nice nice nice Meddy, That Chrome pen looks awesome !
Meddy
XS650 Addict
I've been slowly working on this exhaust system for over a week now and it's been a real challenge especially for someone with my metalworking skills which amounts to drilling holes and some pretty average filing.
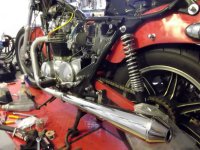
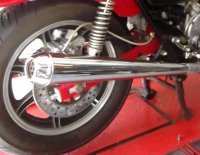
I had to try and work out how to get a decent mounting bracket onto the mufflers as the ones supplied in Mikes kit were useless, they were lucky to be 2" long and I needed ones about 10 " long.
Here's what I came up with, drilling the brackets.

I decided to fix these 2 long brackets to the original chrome muffler mounts and then spaced them out 20mm to allow the ends of the mufflers enough room so as not to touch the lower shock mounts.


Those brackets that slide into the muffler mounts allowing for a stronger connection were not in the package I received from Mikes so I emailed them and they said they would send some, the package turned up today with 1!! in it, I can't win with this system.
I bought this system because I wanted something that was going to be a simple bolt on installation and it definitely hasn't been that.
Another thing I just remembered, the header pipes don't come with the lower mounting tab like the originals they have to mount onto the supplied brackets with a chrome clamp similar to the muffler clamp.
Also found to mount the mufflers onto the headers they are too loose if you use 2 of the reducer rings and won't fit on with all 3, I had to scrounge around and find a piece of thin walled pipe to fit over the headers and then fit the 2 larger reducers.
These pics are just some I took today whilst test fitting, will post some more when it is fitted up permanently.
I had to try and work out how to get a decent mounting bracket onto the mufflers as the ones supplied in Mikes kit were useless, they were lucky to be 2" long and I needed ones about 10 " long.
Here's what I came up with, drilling the brackets.
I decided to fix these 2 long brackets to the original chrome muffler mounts and then spaced them out 20mm to allow the ends of the mufflers enough room so as not to touch the lower shock mounts.
Those brackets that slide into the muffler mounts allowing for a stronger connection were not in the package I received from Mikes so I emailed them and they said they would send some, the package turned up today with 1!! in it, I can't win with this system.
I bought this system because I wanted something that was going to be a simple bolt on installation and it definitely hasn't been that.
Another thing I just remembered, the header pipes don't come with the lower mounting tab like the originals they have to mount onto the supplied brackets with a chrome clamp similar to the muffler clamp.
Also found to mount the mufflers onto the headers they are too loose if you use 2 of the reducer rings and won't fit on with all 3, I had to scrounge around and find a piece of thin walled pipe to fit over the headers and then fit the 2 larger reducers.
These pics are just some I took today whilst test fitting, will post some more when it is fitted up permanently.
I normally run the supplied bracket up to the passenger peg mounting stud. Yes you have to drill out a hole to fit over that that stud. Also use stainless clamps from the local fleet store for the muffler header joint.


I'm somewhat of an exhaust expert, I believe "Madness" is on muffler pipe setup #5 currently.


I'm somewhat of an exhaust expert, I believe "Madness" is on muffler pipe setup #5
 currently.
Attachments
We mounted the Commandos on my buddy's Special in a similar manner but we placed the spacer between the muffler and strap, not at the hanger .....

We also hung the muffler from the passenger footpeg mount like Gary did. This allowed us to use the supplied chrome hanger starp with all the holes already in it. It fit just right. Yes, you will need to install your own "P" clamp to attach the lower part of the headpipe to the frame. I made them up from stainless strap .....

We also hung the muffler from the passenger footpeg mount like Gary did. This allowed us to use the supplied chrome hanger starp with all the holes already in it. It fit just right. Yes, you will need to install your own "P" clamp to attach the lower part of the headpipe to the frame. I made them up from stainless strap .....
PS I advise red locktite on the strap to muffler mount bolts. You don't have much thread and that joint carries a large shaking load. I've lost a few bolts there.
Last edited:
Meddy
XS650 Addict
Thanks for the tips there Gents.
I forgot to mention I had to use the forward mount on the frame as I still need to be able to attach the pillion pegs to the rear mount.
I forgot to mention I had to use the forward mount on the frame as I still need to be able to attach the pillion pegs to the rear mount.
Thanks for the tips there Gents.
I forgot to mention I had to use the forward mount on the frame as I still need to be able to attach the pillion pegs to the rear mount.
No problem.
Meddy
XS650 Addict
Just finished fitting the exhaust this morning, still need to get some of those T Clamps that Garry suggested but I couldn't wait to get it on and fired up, sounds good, not loud, just how I wanted it.
Has a leak where the muffler joins the header as I expected from those reducers, I will remedy that when I get the different clamps.
So for the first time in over 20 years my bike saw daylight and I actually rode it up and down the drive a few times.

Everything seems to work OK, clutch feels nice, brakes feel good, feels like a new bike.
A couple of quick pics I took sitting in the driveway.


Now to get it Registered.
Cheers, Mick.
Has a leak where the muffler joins the header as I expected from those reducers, I will remedy that when I get the different clamps.
So for the first time in over 20 years my bike saw daylight and I actually rode it up and down the drive a few times.
Everything seems to work OK, clutch feels nice, brakes feel good, feels like a new bike.
A couple of quick pics I took sitting in the driveway.
Now to get it Registered.
Cheers, Mick.
My calendar girl nominations are all used up Mick....
Anybody?
Anybody?
Looks great Mick!
I will second that nomination!
Pete
I will second that nomination!
Pete
Mick, if you ain't been following it, here's the calendar thread.
Meddy
XS650 Addict
Got the T clamps for the mufflers this arvo, Couldn't believe they stocked them at our local metal supplies store.
Fitted them up and filled all the joins in those pesky spacers with hi temp silicone, fingers crossed all will be good tomorrow.
Yes I did have a couple of beers tonight to celebrate Jim.
And thanks for the nomination Azman & Pete.
Fitted them up and filled all the joins in those pesky spacers with hi temp silicone, fingers crossed all will be good tomorrow.
Yes I did have a couple of beers tonight to celebrate Jim.

And thanks for the nomination Azman & Pete.

