If it isn't bringing you joy, it needs to go. That philosophy is what I'm following in my own life and I'm better for it.
-
Enjoy XS650.com? Consider making a donation to help support the site.
XS650.com receives a small share of sales from some links on this page, but direct donations have a much greater impact on keeping this site going.
You are using an out of date browser. It may not display this or other websites correctly.
You should upgrade or use an alternative browser.
You should upgrade or use an alternative browser.
New here, need some help!!
Xs6502021
XS650 Addict
It does a bit. I tried putting it to full retard again and am going to have to adjust it manually to more advanced gradually.. but I'm at a loss, everything is replaced and the voltages is correct everywhere and everything. I don't know what else to upload or video tape..? There's spark, the plugs and wires are new, the carbs are clean fresh fuel fresh and clean tank and everything. I'm at a loss lol. The wiring is good to go all the lights work, and the voltage is right where it needs to be too.... What other thing could it be possible??
A picture tells more than 1000 words
If you could upload a picture how the new ignition sit ... cover off left side
And a picture of the opposite side with the advance unit ( i suspect that one is stuck in the advanced position )
looks something like that

Those bronze weights shall move in and out and depending on ... Rev now at the start up be in the depicted position
turned counter clockwise.
With the picture I / We can see if it looks right .
And a picture of the wiring new ignition ..
Perhaps then later connect it directly to the battery. since ground is an important factor
( don't connect it now permanently it can only be connected for testing and then taken off again )
Again the pictures do help and then we go step wise from that.
If you could upload a picture how the new ignition sit ... cover off left side
And a picture of the opposite side with the advance unit ( i suspect that one is stuck in the advanced position )
looks something like that
Those bronze weights shall move in and out and depending on ... Rev now at the start up be in the depicted position
turned counter clockwise.
With the picture I / We can see if it looks right .
And a picture of the wiring new ignition ..
Perhaps then later connect it directly to the battery. since ground is an important factor
( don't connect it now permanently it can only be connected for testing and then taken off again )
Again the pictures do help and then we go step wise from that.
Xs6502021
XS650 Addict
Okay thank you! Whenever I get home I will take pictures of the bike. My advance looks exactly like that I replace the springs and clean the entire thing and now it actually snaps back like the video shows I made sure the lines are lined up too. The opposite side is literally just the electronic ignition is there a certain spot that you need a picture of?
Xs6502021
XS650 Addict
If the ground wasn't attached somewhere good wouldn't it be getting some volts to it? Not sure if there's a way to test if it's good ground it doesn't have any volts going to it though
Put a timing light on it and see what your timing is if you have not done so already. If the timing is right and you have spark then you probably have a fuel problem. Try spraying a shot of carb cleaner in both carbs and see if it fires.
Okay thank you! Whenever I get home I will take pictures of the bike. My advance looks exactly like that I replace the springs and clean the entire thing and now it actually snaps back like the video shows I made sure the lines are lined up too. The opposite side is literally just the electronic ignition is there a certain spot that you need a picture of?
Please take pictures left and right side according to above.
And if possible the ground point.
We take it from there.
If the right side is fully retarded at start test . Please report how you set the ignition timing.
Xs6502021
XS650 Addict
Put a timing light on it and see what your timing is if you have not done so already. If the timing is right and you have spark then you probably have a fuel problem. Try spraying a shot of carb cleaner in both carbs and see if it fires.
The carbs are completely rebuilt it's definitely not the fuel The gas tank the petcock the carbs everything is completely cleaned or completely new. The fuel is definitely good to go. As for the timing light I thought I can only use that if the bike is starting and running to make sure timing is correct on electronic ignition
Xs6502021
XS650 Addict
Please take pictures left and right side according to above.
And if possible the ground point.
We take it from there.
If the right side is fully retarded at start test . Please report how you set the ignition timing.
Yeah the ground is grounded to a bolt on the front of the bike frame. I've been moving it fully retarded to prevent kickback and slowly turning it to advanced while trying to start it to try to do the quick timing once I got it to start I was going to adjust the timing to what it actually should be but I was doing what I was told byJim so I don't break my leg lol
OK
still by words
I have never done this ignition but
According to Instructions
there
https://www.mikesxs.net/blog/xscharge-xs650-standard-ignition-installation/

At the middle is the nut that holds the Rotor
12. Hold the rotor firmly to the right (clockwise) when tightening the nut on the shaft.
13. Hold the nut on the advance mechanism firmly when tightening the nut on the rotor.
( I assume in the full retard position )
At 11 o clock and 5 o clock are screws that
1. Loosen the mounting screws on the plate.
2. Rotate the plate to position the mounting screws at the midpoint of the upper slot.
3. Tighten the upper mounting screw.
Now with the advance unit right side retarded
the rotor on the left side
Needs to be positioned correctly on the advance rod going through the motor
has a pin on --- the stock setup pos 7

On a Boyer that pin is not used if I remember correctly.
Since I never done this ignition I don't know if the pin is used.
But if not the slot adjustment possibility is out of range.Rotor at the wrong place.
7. If necessary, loosen the mounting screws on the plate and rotate the plate clockwise to advance the timing and counter-clockwise to retard the timing.
If the advance unit is fully retarded on the right side and plate is fully counter clockwise on the
left no kick back would be the normal
That is something would suspect problematic
ground is grounded to a bolt on the front of the bike frame.
The frame ground I would for testing draw on a separate wire to Battery minus.
Directly from Ignition module

still by words
I have never done this ignition but
According to Instructions
there
https://www.mikesxs.net/blog/xscharge-xs650-standard-ignition-installation/
At the middle is the nut that holds the Rotor
12. Hold the rotor firmly to the right (clockwise) when tightening the nut on the shaft.
13. Hold the nut on the advance mechanism firmly when tightening the nut on the rotor.
( I assume in the full retard position )
At 11 o clock and 5 o clock are screws that
1. Loosen the mounting screws on the plate.
2. Rotate the plate to position the mounting screws at the midpoint of the upper slot.
3. Tighten the upper mounting screw.
Now with the advance unit right side retarded
the rotor on the left side
Needs to be positioned correctly on the advance rod going through the motor
has a pin on --- the stock setup pos 7
On a Boyer that pin is not used if I remember correctly.
Since I never done this ignition I don't know if the pin is used.
But if not the slot adjustment possibility is out of range.Rotor at the wrong place.
7. If necessary, loosen the mounting screws on the plate and rotate the plate clockwise to advance the timing and counter-clockwise to retard the timing.
If the advance unit is fully retarded on the right side and plate is fully counter clockwise on the
left no kick back would be the normal
That is something would suspect problematic
ground is grounded to a bolt on the front of the bike frame.
The frame ground I would for testing draw on a separate wire to Battery minus.
Directly from Ignition module
If it isn't bringing you joy, it needs to go. That philosophy is what I'm following in my own life and I'm better for it.
Wise words.
Trying to fix and work with whats there doesn't seem to be working. if you want to keep working on the bike i recommend pulling all the wiring and rewire completely. Honestly i m still concerned about the condition f the valve pockets and question what that sludge is or why it is there.
if that is beyond what you want to do, maybe Marty's suggestion is the go and just cut your losses and get a working bike, you can do stuff to it as you ride
Xs6502021
XS650 Addict
Wise words.
Trying to fix and work with whats there doesn't seem to be working. if you want to keep working on the bike i recommend pulling all the wiring and rewire completely. Honestly i m still concerned about the condition f the valve pockets and question what that sludge is or why it is there.
if that is beyond what you want to do, maybe Marty's suggestion is the go and just cut your losses and get a working bike, you can do stuff to it as you ride
I forgot to reply to that! It is wise words for sure. And I already did rip all the wiring and rewired it, new wires, new diagram, new fuses, new switches, new key ignition. Everything on the bike is brand new, except for the motor and lights lol. And as for the stuff in the valves it doesn't come off with a qtip or anything so it isn't like gooey sludge it looks as if the metal was painted almost w rust spray or something but it's dry, aside from when I put marvel oil into it and now that the carbs are hooked back up
Xs6502021
XS650 Addict
OK
still by words
I have never done this ignition but
According to Instructions
there
https://www.mikesxs.net/blog/xscharge-xs650-standard-ignition-installation/
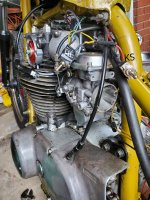
View attachment 192200
At the middle is the nut that holds the Rotor
12. Hold the rotor firmly to the right (clockwise) when tightening the nut on the shaft.
13. Hold the nut on the advance mechanism firmly when tightening the nut on the rotor.
( I assume in the full retard position )
At 11 o clock and 5 o clock are screws that
1. Loosen the mounting screws on the plate.
2. Rotate the plate to position the mounting screws at the midpoint of the upper slot.
3. Tighten the upper mounting screw.
Now with the advance unit right side retarded
the rotor on the left side
Needs to be positioned correctly on the advance rod going through the motor
has a pin on --- the stock setup pos 7
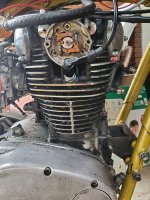
View attachment 192201
On a Boyer that pin is not used if I remember correctly.
Since I never done this ignition I don't know if the pin is used.
But if not the slot adjustment possibility is out of range.Rotor at the wrong place.
7. If necessary, loosen the mounting screws on the plate and rotate the plate clockwise to advance the timing and counter-clockwise to retard the timing.
If the advance unit is fully retarded on the right side and plate is fully counter clockwise on the
left no kick back would be the normal
That is something would suspect problematic
ground is grounded to a bolt on the front of the bike frame.
The frame ground I would for testing draw on a separate wire to Battery minus.
Directly from Ignition module
View attachment 192213
Your so helpful and have been the whole time! I did use all of Mike's instructions inside and out. It's definitely not that, unless I'm completely stupid and can't figure it out but I've out it every which way. There is kickback on the bike when I advance it so I don't know .. I'm just so discouraged with it like when I say I've studied and tried everything I really don't know what's left. I don't really want to go back and redo everything I've done because I literally checked it all a million times I was so sure this stupid junk would start ugh!
Timing light works even at cranking speeds.
Hi Moving forward.
I am still out in the dark with no pictures
But At this point in time keep the ignition at the most retarded position
There is kickback on the bike when I advance it so I don't know ..
7. If necessary, loosen the mounting screws on the plate and rotate the plate clockwise to advance the timing and counter-clockwise to retard the timing.
That kickback when advancing can be fully normal ..It indicates that there are spark but at the wrong timing position
If at the most retarded position ( Left side ) ´ with the advance at FULL retard at the right side is there kickback then also
Please report.
Now if you are certain that ignition is installed correctly ..with the locating pin , and carburetor is clean.
Please draw that extra wire from the output black from ignition module .Not to the frame up front
aka not there
Yeah the ground is grounded to a bolt on the front of the bike frame
But instead
You pull a wire from the ignition module to the minus on the battery and nowhere else en route there ( To minus ) and report what happens
Kick back and else. Trying to kick it a couple of times ..
Since you have kickback there are spark but at the wrong timing position we are looking to get rid of that for now. ( the kickback but still with spark )
Xs6502021
XS650 Addict
Hi Moving forward.
I am still out in the dark with no pictures
But At this point in time keep the ignition at the most retarded position
There is kickback on the bike when I advance it so I don't know ..
7. If necessary, loosen the mounting screws on the plate and rotate the plate clockwise to advance the timing and counter-clockwise to retard the timing.
That kickback when advancing can be fully normal ..It indicates that there are spark but at the wrong timing position
If at the most retarded position ( Left side ) ´ with the advance at FULL retard at the right side is there kickback then also
Please report.
Now if you are certain that ignition is installed correctly ..with the locating pin , and carburetor is clean.
Please draw that extra wire from the output black from ignition module .Not to the frame up front
aka not there
Yeah the ground is grounded to a bolt on the front of the bike frame
But instead
You pull a wire from the ignition module to the minus on the battery and nowhere else en route there ( To minus ) and report what happens
Kick back and else. Trying to kick it a couple of times ..
Since you have kickback there are spark but at the wrong timing position we are looking to get rid of that for now. ( the kickback but still with spark )
Yeah I'm sorry it's storming here and raining and I can't get to it in the garage it needs pulled out. I had to relocate it out of my sun room so now I can't work on it at any time. I will try the ground, there isn't kickback when full retard just when I start to advance, and it's still only sometimes like I said how the coil clicks etc, I still can't get a click half the time.
Come to think of it perhaps You don't have a battery.
If so sorry about that ..
Pictures would still help reducing the guesswork.
I have been doing these kinds of Wiring problems for 35 years on C*ap bikes .So I feel confident we can get it into a better position
And if get off cant figure it out --there are world class Competence here on he forum.
Keep it there in the retarded position for now with no kickback.
And try to get that ground wire and if no battery try to get it better. a bit grinding and so
Seeking a position -->
Full retard both sides ( left and right ..advance unit and base plate ) even if the ignition then is off a bit ..something should happen if not so we slowly advance it later on.
No kickback.
And solid ground.
We go from there ..
The clicking sound .. later on. it sounds as power sometimes and other times not.
Xs6502021
XS650 Addict
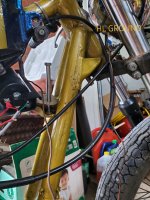
Okay guys, im gonna upload pics in about 10 minutes! Sorry it's been delayed. I wanted to update I changed all the grounds, and then I tried making it to the neg on that battery as well and nothing is working. So I'm officially at a loss! Just a recap: carbs are rebuilt, tank is new fuel and cleaned and resealed etc, oil is clean and changed, all new filters, coil is new, ignition is mikesxs and is new, spark plugs and wires new, fuses new, wiring new, new regulator, new battery, new switches, new ignition key. Wiring is right, headlights work, but only get kickback/clicking a few times. Volts measure 12 everywhere. Everything measures as should. Not timed because haven't been able to start it, but when from retard to advance and back and can't get anything. About to take the pics now and get everything uploaded. Will upload grounds, left and right side, etc. Some things came up which is why I am so delayed
Xs6502021
XS650 Addict
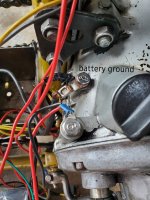
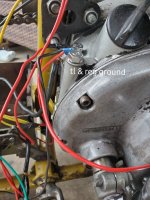
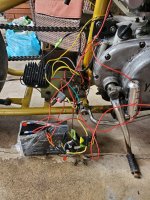
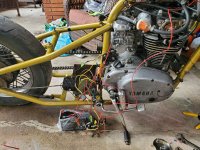
Okay so battery ground is two wires but it's because I can't get the old ground off. It isn't connected to anything I need to cut it but I don't have a tool to cut it lol. But here's all the pics, I labeled them too. This is the neatest I can get the wiring, as the only place for it is in the box. There's a few things not completely soldered and it's because I've recently replaced it or fixed it and didn't yet.
Attachments
-
 20210610_175529.jpg221.7 KB · Views: 120
 -
 20210610_175343.jpg221.8 KB · Views: 121
 -
 20210610_175408.jpg342 KB · Views: 114
 -
 20210610_175404.jpg320.9 KB · Views: 125
 -
 20210610_174837.jpg233.4 KB · Views: 118
 -
 20210610_174912.jpg270.2 KB · Views: 119
 -
 20210610_174829.jpg253.4 KB · Views: 121
 -
 20210610_174808.jpg284 KB · Views: 124
Xs6502021
XS650 Addict
Also - I moved the taillight and reg ground to separate places and made no difference either. I have tried several different bolts for all the grounds, and the electronic ignition is currently hooked up to neg battery