One Dakota.... XS1 fix, restore labor of love SoDak

Yeah it’s time consuming for sure. I know with my XS2, there were days that I spent as much time photographing and doing daily write ups as I did wrenching! 😄
But for me the blogging was part of the fun, plus it’s fun for forum members. Not to mention I really benefitted from the deep pool of experience that hangs around here.
This really is a great forum. The best I’ve ever been a part of for sure! 😉
Part of my doing this is to help fill the vacuum cuz mailman isn't laboring on an XS project..........
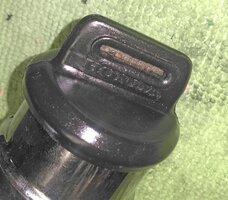
Anyone ever see a key cozy like this?
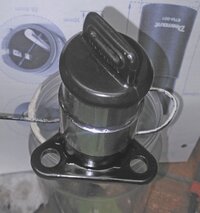
KIMG3122.JPG KIMG3123.JPG
Sez honda but the original Yammy key is inside. Great at keeping water out of the lock!

Found one marked polaris on Amazon
https://www.amazon.com/Custom-Insta...hvlocphy=&hvtargid=pla-4583795273862405&psc=1
 
Yeah it’s time consuming for sure. I know with my XS2, there were days that I spent as much time photographing and doing daily write ups as I did wrenching! 😄
But for me the blogging was part of the fun, plus it’s fun for forum members. Not to mention I really benefitted from the deep pool of experience that hangs around here.
This really is a great forum. The best I’ve ever been a part of for sure! 😉
...and thank you for the pics. Us amateurs are best served by actually taking pics because there are eagle eyes on this forum that catch our failings or note difficulties and steer us forward.
 
Columbia Coatings:
CURING
1. Single Coats
Light Parts: 385ºF for 20-25 minutes (ie. Pulleys, brackets and other small
parts)
Heavy Parts: 385-400ºF for 25-30 minutes (ie. Wheels, intakes, manifolds)
Heavier part=higher temperature
2. Multiple Coats
Chrome/Silver base coat with a translucent and/or clear top coat
Satin White base coat with Red Fluorescent
Primer base coat
Dormant base coat with a clear top coat
Solid Colors: Partial cure for 5-10 minutes.
Metallics: Full cure at 385-400ºF for 25-30 minutes. Let parts cool down to less than
100ºF before adding a top coat.
NOTE: These are just general guidelines. Follow the exact cure schedule for each
powder found on the respective Tech Data Sheet.;)🤙
 
Yeah, I don't like powder on hubs - too thick - Cerakote works well, if so inclined (.001-.002")
 
Like most of them, the headlight jewel for the brights indicator had gone opaque
Had some of these around.
1680478824057.png


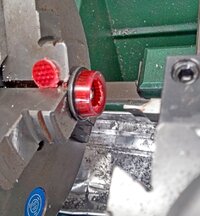
Easy to chuck in the lath and cut a disk out of the middle. Spritzed a bit of mineral spirits as I cut the groove, helped it cut nice, smooth, and easy.
headlight jewel.jpg
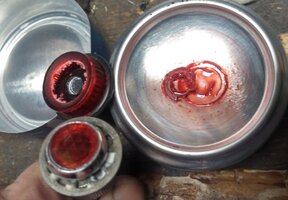
Drilled through the old "jewel", let it sit in acetone for a while.
Then it just pushed out of the chrome bezel. Sanded the back of the new reflector so it would recess into the bezel a bit,
KIMG3404.JPG
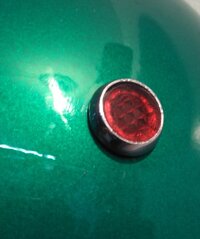
A bit of super glue and nice and bright again.
KIMG3413.JPG
 
Last edited:
Like most of them the headlight jewel for the brights indicator had gone opaque
Had some of these around.
View attachment 239601

Easy to chuck in the lath and cut a disk out of the middle. Spritzed a bit of mineral spirits as I cut the groove, helped it cut nice, smooth, and easy.
View attachment 239599
Drilled through the old "jewel", let it sit in acetone for a while.
Then it just pushed out of the chrome bezel. Sanded the back of the new reflector so it would recess into the bezel a bit,
View attachment 239600
A bit of super glue and nice and bright again.
View attachment 239603
Could have saved you some time. I have a couple of NOS ones. Just saying.
I do like what you did.:thumbsup:
 
Like most of them, the headlight jewel for the brights indicator had gone opaque
Had some of these around.
View attachment 239601


Easy to chuck in the lath and cut a disk out of the middle. Spritzed a bit of mineral spirits as I cut the groove, helped it cut nice, smooth, and easy.
View attachment 239599
Drilled through the old "jewel", let it sit in acetone for a while.
Then it just pushed out of the chrome bezel. Sanded the back of the new reflector so it would recess into the bezel a bit,
View attachment 239600
A bit of super glue and nice and bright again.
View attachment 239603

Very nice!!!
 
Like most of them, the headlight jewel for the brights indicator had gone opaque
Had some of these around.
View attachment 239601

Easy to chuck in the lath and cut a disk out of the middle. Spritzed a bit of mineral spirits as I cut the groove, helped it cut nice, smooth, and easy.
View attachment 239599
Drilled through the old "jewel", let it sit in acetone for a while.
Then it just pushed out of the chrome bezel. Sanded the back of the new reflector so it would recess into the bezel a bit,
View attachment 239600
A bit of super glue and nice and bright again.
View attachment 239603
That is “Sweet”!🧐👍
 
Like most of them, the headlight jewel for the brights indicator had gone opaque
Had some of these around.


Easy to chuck in the lath and cut a disk out of the middle. Spritzed a bit of mineral spirits as I cut the groove, helped it cut nice, smooth, and easy.

Drilled through the old "jewel", let it sit in acetone for a while.
Then it just pushed out of the chrome bezel. Sanded the back of the new reflector so it would recess into the bezel a bit,

A bit of super glue and nice and bright again.
View attachment 239603
That's pretty awesome ingenuity there. Glad to see your success on your own stuff after battling a certain frustrating CR:thumbsup:
 
Back
Top