One Dakota.... XS1 fix, restore labor of love SoDak

What is the method for centering the rim?
Well......
We are lucky in that the various XS650 hubs all just have the rim centered on the hub.
Note; I took and printed a couple pics of the wheel, spoke pattern before disassembly.
Soooo, standard spoking works fine. Inners all in the hub, rim, nipples installed on inners, Just a couple turns on each nipple, then outers all go on, same. Next go around the rim a few times, tightening nipples a few turns at a time 'til the same amount of thread shows on each spoke. This set from 650Direct was perfect fit, @toglhot ;) the nipples started to snug up just as all the threads disappeared and threads don't stick out of the nipple ends. Then round and round the wheel several more times, tightening each spoke the same small amount till the spokes are "tight".
I've always just used a magic marker for truing, but now that I have magnetic base for the indicator, tried that. It's bit easier to work both close and far spots towards the center with the gauge. (I've done, dunno, 6-8 wheels with the magic marker with no issues) Bring the rim in radially then for side to side. Recheck radial true, go back n forth a time or two. Recheck there are no "loose" spokes, done. Mark and ignore the seam where the rim is welded together, there's always going to be a bump there. You can see an X marking the seam in the pic.
I watched a Buchanon wheel truing video, the guy was all "don't go OC on truing It'll drive you nuts for no good reason." Took that to heart. Somewhere 'round .01" (or when it gets hard to tell where the magic marker is touching first) is PLENTY straight enough. IMHO Wheels going to "settle in" move a bit after it's ridden anyways. A spoke tension check after a few hundred miles, prolly a good idea but so far haven't found any "glad I did this" wheels when checking.
I don't use a spoke torque wrench. :whistle: Feel when tightening and a "ding ding" check, spinning the wheel, bouncing a smooth piece of metal on the spokes. "Good enough?"
 
I agree about the wheels “settling” in. I had a very slight vibration or something when I first put Patience back on the road. It was very slight but drove me nuts to the point I pulled the wheel back off and checked it for true and balance. It was so close I really didn’t change anything. Since that time things have smoothed out on their own and I really don’t feel anything anymore even at highway speeds. I‘ll be doing the set on Problem Child this week so hopefully no issues there either. Looks great Gary! Mailman would approve!
 
Where does time go? pic is from Oct 11th
front wheel.jpg

but same shot could have been taken today... :confused:
 
Where does time go? pic is from Oct 11th
View attachment 231099
but same shot could have been taken today... :confused:
Cmon ol' man.... we should all be "green" with envy by now. ;)
Never enough hrs in the day is there....

What I "wanted" to do today..... :geek:


1669943827160.png


What I "wound" up doing instead....:cautious:


1669943913703.png
 
I promised @jpdevol :thumbsup: So I got enough crap out of the way to start in on SoDak again.
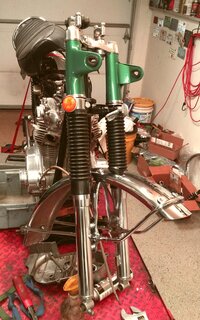
A fancy shmanzy resto is out of my normal wheelhouse, it's going s-l-o-w-l-y.
Recent thread detailed the lower triple rework.
Fought one tube/cap thread interface but got it together,
forks ears on.jpg
forks, fender, ears etc are on.
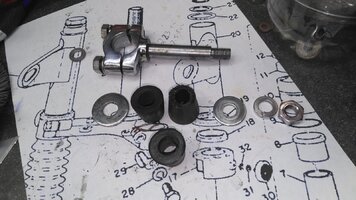
Handlebar bushings were worn oval and rock hard.
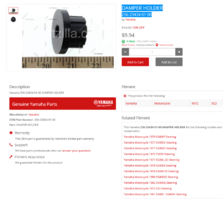
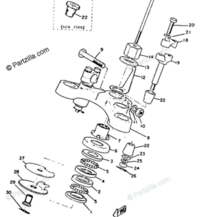
@GLJ mebby you can chime in, do your 72's have this cone style rubber bushing or the square with flange type. The Partzilla parts fiche crosses the original #22 to the "new type" seen in the inset
1676685805079.png
to
1676685740845.png
The new type are available at $9.00 + each.
But 12 #4 bottle stoppers for $11 on Amazon got my business. A #4 bottle stopper has the correct diameter and taper needed here! It's about 3/8" too long.
Bit of lathe time
KIMG3080.JPG
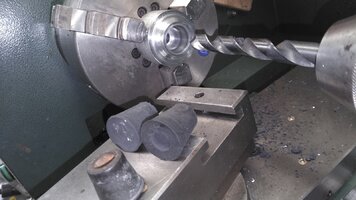
Old bushing foreground. as received stopper on left, drilled but not cut to length stopper on right. Made a holder by cutting a tapered bore in a chunk of aluminum. tapped them into the holder, drilled the hole, shortened a bit with a utility knife while they spun on the lathe then turned and polished a stainless washer to fit the top like the later bikes used.
KIMG3081.JPG
Another day gone and a few more parts back on the bike.

:geek:
 
Last edited:
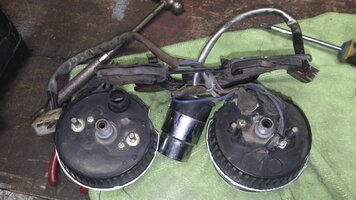
Gary, I occasionally have need to bore holes in solid rubber for bushings and haven't figured out a logical way to do it. I manage, but they're usually ugly and not very accurate.

Could you post a picture of your holder and maybe a bit more detail on the procedure? Bored with a twist drill or ???
 
Gary, I occasionally have need to bore holes in solid rubber for bushings and haven't figured out a logical way to do it. I manage, but they're usually ugly and not very accurate.

Could you post a picture of your holder and maybe a bit more detail on the procedure? Bored with a twist drill or ???
kimg3080-jpg.235845

It's about all in the pic? everything was done on the lathe.
Made the holder out of some aluminum stock. Center drilled, then through drilled it 1/2"
(the through hole should be made with the same bit you will drill the rubber with, this will create a clean exit hole in the rubber) then set the cross feed at an angle to match the taper on the #4 bottle stopper. Using a small carbide insert boring bar cut an angled bore/recess to the depth of the original rubber in the aluminum. kept it a bit undersized so when the bushing is tapped in, it is held tightly.
1676724005542.jpeg

Use a freshly sharpened drill bit. I ran the lathe at it's lowest speed, about 60RPM (no back gear) then was fairly aggressive feeding in the bit with the tail stock, it cut two continuous spirals of rubber as it went in. Once the drill went all the way through the rubber, the bushing "stuck" on the bit and came back out of the holder with the drill. Removed the bushing from the bit, stuffed it back in the aluminum holder. Then used a utility knife held against the aluminum face to cut the bushing to the desired length. Cut from the bottom of the bushing with the knife edge up. That cut went amazingly well makes a very smooth face! I found running the drill through the bushing one more time, again advancing it fairly quickly so it's cutting rather than tearing off little chunks, makes the hole nice n smooth.
 
Last edited:
front end work, restoration continues...
KIMG3100.JPG
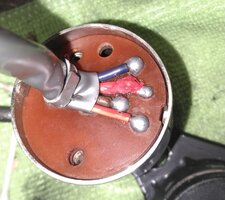
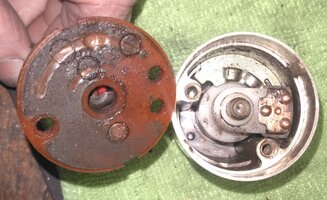
Always open the iggy switch on old bikes.

KIMG3101.JPG
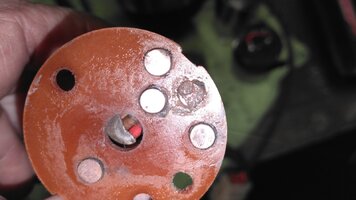
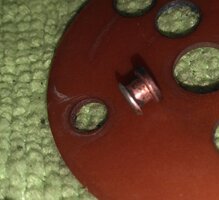
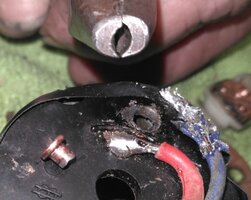
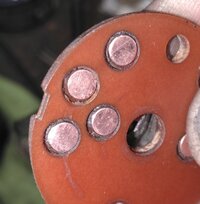
It was pretty good but (the main) contact is toasted, worn, eroded.
KIMG3104.JPG
Toss it and buy new? HAH!
Put on the gear, tromp through the snow with flashlight in hand to TSOIR, after some digging scrounged up parts of a later iggy switch with the same contacts inside.
Throw ANYTHING away? Not til the relatives have to clean up the "estate"!
Unsoldered and drove a "good"contact out of the phenolic disk, cleaned it up,
KIMG3109.JPG
squeezed and filed the riveted back until it would fit in the XS1 penolic
KIMG3110.JPG
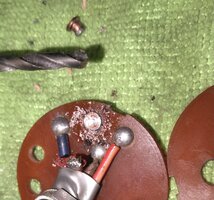
Used a drill and diamond ball mill in the dremel and removed the "expanded rivet"from the back of old eroded contact from the XS1 phenolic board.

KIMG3114.JPG
Installed the fresh contact button, re-expanded the rivet back and soldered the wire back on.
KIMG3118.JPG
And back together, when fresh paint on the housing, hanging by the wood stove, dries.
KIMG3119.JPG

Key words
early xs1 xs1b xs2 tx650 ignition switch repair install assemble clean remove replace wire solder contact contacts intermittent voltage drop resistance dim how to picture design circuit test connector wiring inspect inspection key action turn tumbler connection blade
 
Last edited:
You also had time to record it...this always amazes me how forum members can shoot pics while doing a repair...:umm:
5 stars to all.:cheers:
Yeah, LOL, when I first started hanging out here, I posted some stuff about my bobber build and guys asked about "build thread" & pics...I'm like: hey, I'm workin here...ain't got time for no stinkin pics - I'm getting the hang of it:D

Masterful work G! :heart:
 
Last edited:
when I first started hanging out here, I posted some stuff about my bobber build and guys asked about "build thread" & pics...I'm like: hey, I'm workin here...ain't got time for no stinkin pics

Yeah it’s time consuming for sure. I know with my XS2, there were days that I spent as much time photographing and doing daily write ups as I did wrenching! 😄
But for me the blogging was part of the fun, plus it’s fun for forum members. Not to mention I really benefitted from the deep pool of experience that hangs around here.
This really is a great forum. The best I’ve ever been a part of for sure! 😉
 
Back
Top