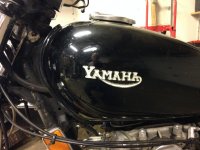
Painting Tins. No really...

What color should these tins be?

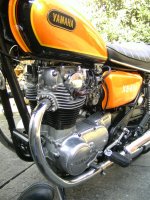
  • Candy green and white a la XS1

    Votes: 15 30.0%
  • Candy gold and white a la XS1

    Votes: 19 38.0%
  • Candy red and white a la XS2

    Votes: 16 32.0%

  • Total voters
    50
Lookin' at it makes me wonder if I should fill in the badge mount and put a tuning fork there like Bob's 77D?
Opinions?

You could do something similar to mine?

PICT1928.JPG

Fill in the badge mount and just stick 'er on.
Made to my spec by vinylcuztuk, only paid £12 for the pair, see here: http://www.xs650.com/threads/hello-from-new-member.55057/page-4#post-599111

There's a link there to the shop.
 
Last edited:
Tips and Techniques: Bondo.
This thread is supposed to be a 'How To', so I better start offering up some....
For years, body filler aka Bondo™ had a bad rap as a bunch of garbage that just fell off as soon as you slammed the door shut. There was more than a grain of truth to that, but it wasn't the bondo's fault... it was mainly due to user error. People just didn't use it correctly. Over the years the formula improved and we users got better... today's bondo is a practically foolproof material for mending dings. So... here's some things I've learned...
Safety: If you've never used bondo before, read ALL the precautions on the can... and follow them. You really need to know what you're dealing with. 'Nuff said. At minimum, use a dust mask when sanding bondo.
Surface prep: Some people use bondo over painted metal. I don't and don't recommend you do either. Your best adhesion comes with bare metal. Anything less is iffy in my (experienced) opinion. What I'll do is take the area down to bare metal and then scuff it real good with some 60-80 grit sandpaper. In other words, I'll scratch the hell out of it. I've found it gives the best bond possible. Next I'll wipe the area real good with a rag soaked in lacquer thinner. As with all things in painting, cleanliness is everything.
Mixing and applying: Here, watch this guy.


Here's a little trick I use when I can. Bondo is what's called "photo-chemically reactive." What that means in practical terms is, sunlight will accelerate it's curing. This allows you to mix it slightly weak... a little less hardener and you can double your working time from about 4-5 min. up to about 8-10 min. All you do then is take it out into the sunlight. When the sunlight hits it, it will "kick off" and harden very quickly. And that bring me to a warning... never apply it in direct sunlight. It'll cut your working time in half or more.
Sanding: Once it's cured, start sanding with an aggressive paper. I normally start with 40-60 grit. Use a hard sanding block. I just make 'em out of 1by wood and tape the paper on with Gorilla tape.

block.jpg


With a hard sanding block, It's much easier to shape bondo... and small blocks like these are perfect for something the size of tanks and side covers.
After you get the bondo close, you just switch to finer and finer grits. I usually wind up at about 240 or 320. That's fine enough for the initial primer. If you need to add bondo between sandings, blow the dust off with a blow gun, use a shop vac to suck the dust out of the nooks and cranies, then wipe it down with the lacquer thinner. Apply more bondo and git back to sanding.
As far as knowing when the bondo is shaped right, your fingers will tell you more than your eyeballs. Once trained, you fingers will find dips and imperfections your eyes will never see. And you can practice that anytime just by running your hand over something and comparing what you feel with what you see. Try it.
That's about it for now. Next up, priming and hunting "pinholes."
 
Last edited:
Good stuff!
If you're "sculpting" a surform just after the bondo sets lets you shape with little effort and it doesn't clog like paper does.
surform.jpg

They come flat and curved in many sizes.
Fine sanding and edges are best worked once the bondo is fully cured.
To remove thick bondo (think bondo filled gas tank emblem recesses) a heat gun will soften it even after years in place, so a screw driver or putty knife readily pries it out.
 
Last edited:
As far as knowing when the bondo is shaped right, your fingers will tell you more than your eyeballs. Once trained, you fingers will find dips and imperfections your eyes will never see. And you can practice that anytime just by running your hand over something and comparing what you feel with what you see. Try it.
That's about it for now. Next up, priming and hunting "pinholes."

If you place a rag under your fingertips, it will act as a magnifier when you run them over your work. Another :twocents: from the peanut gallery.
 
I always mixed bondo on a scrap of cardboard and simply throw it away when it sets up.
Yeah, I disagree with the guy in the video saying cardboard "leaches the chemicals out." It sits there for a minute or so. No way there's time for enough leaching to have an affect. I've always used throwaway cardboard too Bob.
 
Last edited:
The R5 is cool but, being a Air cooled VW guy, the Type III Squareback draws my eye. Back in the mid 70's my sister had a '68 SB. One of the first production Fuel Injected cars on the market.
 
The R5 is cool but, being a Air cooled VW guy, the Type III Squareback draws my eye. Back in the mid 70's my sister had a '68 SB. One of the first production Fuel Injected cars on the market.
If memory serves, that one was a 68... maybe a 70
 
Heh... forgot about that... I called that VW, Cheech. So I painted Cheech Lizard and Cheech Wizard on the bonnet. What can I say... I'm a product of the 60's & 70's. I read every cartoon Vaughn Bode put out. :D

R5C Al. b.jpg


bode original.jpg
 
This is absolutely excellent information - thanks for sharing your knowledge and experience! I will be following as I have several tanks for fix over the winter.

I have only limited experience with Bondo and can now see the errors I made all those years ago when I applied it.

Pete
 
Good video, Jim.
I used to get a small, say 1 ft square, sheet of window glass from the hardware store for the Bondo mixing chore. Easy to scrape off and cleanup after...
I tend to cut open a milk or detergent bottle, use a section of that to mix bondo on. after the remains set, flex the plastic, the bondo pops right off.
 
For what it’s worth, I really like Raymond's Yamaha domed decal. I would’ve never guessed that’s what it was. And the price seemed very reasonable!

Indeed - it is right on for the side of an XS650 tank. I went to their website and it looks really good....
...except for the $45 shipping to Canada.

RAYMOND - could you please measure it and give us the length and height (width?) of the decal?

I'd guess that it is about 5" long and 2" high....

Pete
 
Indeed - it is right on for the side of an XS650 tank. I went to their website and it looks really good....
...except for the $45 shipping to Canada.
RAYMOND - could you please measure it and give us the length and height (width?) of the decal?
I'd guess that it is about 5" long and 2" high....
Pete

Hi Pete,
how about these?
IMG_0024.JPG
Shown epoxied onto my Heritage Special's '77 Standard '"long distance" tank.
Made by a list member. Cost for a pair of cast emblems is quite reasonable even for a cheapskate like me
and surface mail from Winnipeg won't break the deal either.
 
Hi Pete,
how about these?
View attachment 155786
Shown epoxied onto my Heritage Special's '77 Standard '"long distance" tank.
Made by a list member. Cost for a pair of cast emblems is quite reasonable even for a cheapskate like me
and surface mail from Winnipeg won't break the deal either.

I have a set of Resto's beautiful sidecover emblems Fred (the italicized XS650 text) and they are just the ticket but I really like the slightly old school look of Raymond's tank emblems. I just need to get them made in green with silver lettering - or at least black and silver.

Also, there are a couple of Triumph guys in my CVMG Chapter who would likely be mightily annoyed with me if I showed up with that style of logo on my bike. ;)

Pete
 
Back
Top