240dx
XS650 Member
This is Chevonne – my COVID project. I’m not really a forum guy but there’s been enough interest in the bike I thought I’d drop my photos here and go through the build some. I was going for a balance of form and function while keeping it simple, distinctive, and unique. I’m quite happy with how she turned out... what a babe at 43 years old!
BEFORE: I didn’t really take any early photos, but I snipped this from the sale ad. The bike didn’t run but it had a solid foundation for a build.

AFTER: Lookin pretty in a hotel bar

BUILD:
I had no intentions of digging far into it, I was just going to clean the carbs and clean up the wiring but one thing led to another...

One of many projects..

Might as well take the motor out at this point and clean up the frame.

So many useless tabs and brackets.

Time for sandblasting.

One of the most important things IMO for a clean bike is a seamless seat line. All the under-seat brackets were protruding up too high so I cut them all off, remade them, and remounted flush.
Gas tank mount position jig

The under-seat tubes are going to be used to accept a luggage rack (I have full intentions on taking this camping). The other tabs are going to be used for mounting the electronics tray and rear fender (this was all guess work with high hopes they'll work because I didn't have the patience to make the other bits beforehand to test-fit. The frame is about to be powder coated so there's no modifying afterwards..

Pretty much everything got powder coated. JSF Coatings does world class work!


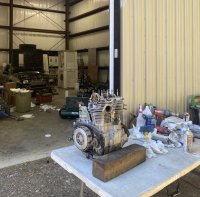
I cleaned up the motor while waiting for powder coating; this is as far as I went into it. I knew if the head came off, I'd end up rebuilding the whole thing and I was pushing to maximize summer riding. I had no idea if the motor ran but it had compression so I was willing to risk it.

For no real reason, I painted the motor with POR15. I wanted to use a brush paint but couldn't really find much during the pandemic and I had the POR15 sitting there. I applied it as properly as possible using the water-based cleaner and etcher. The coating is extremely durable, I had to re-coat the valve cover and sandblasting the bad coat off was impressively difficult. It's very important to clear coat the paint afterwards because it will haze and discolour with simple chemicals, like brake cleaner. I'm not sure if i'd go this route again, but at least I'm confident it will never chip.

Time to rebuild the 35mm forks with new seals and springs. I used the Mikes XS emulator cartridges and made some 2" lowering spacers. No pictures of any of that except the drilled out damper rod! Thanks Matt")

Began reassembly. I Installed the rebuilt forks and new steering bearings, I upgraded the swing arm bearings as well. The rims were sandblasted with my dinky open-air gun, I didn't even take the tires off. Using a deck of card to protect the tires, I rattle-can painted the rims with several light coats and cleared. They actually turned out very well and the paint has proven to be very durable... something I was worried about.


All new handlebar controls and cables. Those are fat bars from Phoenix Handlebars, great product and excellent company!

Started planning where to mount the large electrical components (solenoid, battery, regulator/rectifier). Might as well bundle them all together and suspend them above the swing arm. I wanted the area under the seat as open as possible so this part was very tricky. I don't think it could have been done any tighter..lots of measuring.

That's an EarthX ETX18B lithium battery. A billion hours of research told me this is the best battery on the market with its active BMS. It will protect itself from overcharging, undercharging, blah blah blah.

CAD'd up a box for the bits, keeping the box away from the chain was also a huge space constraint.


POOF! From the computer into reality using fancy magic machines.

SPOILER ALERT: I had to go with a lead-acid battery in the end because I didn't go with a PMA charging system. But here is how the battery box turned out! I painted the reg and buzzed the fins to match the motor (it's the little details I tell yah).
.jpg")
Went with PAMCO electronic ignition.

More assembly and mock up.

Modelling the under-seat electronics tray, this ended up needing to be smashed in place with a mallet because the bike frame wasn't as mil-spec as i'd hoped. I have no pictures of the completed tray but you get hints of it in future photos.

Being a mechanical person, I felt Chevonne needed to flaunt her inner bits. I made some Lexan windows with aluminum spacers to expose her goods. Off to powder coating!


Oh right, I also rebuilt the carbs and cleaned them inside and out! Notice the electronics tray now.

The lip on these puppies needed to be milled off for proper lexan fitment.

Here a nice pic at 2AM on a Saturday. I swear I know where everything is..

Iv'e been dreading the seat and fender design but here goes nothing..


POOF!! Jesus turned water into wine, but I turn cardboard into steel.

Those gold 1/4-20 bolts will be flushed and plug welded. They travel through the electronics tray and secured with wingnuts.

SSS: Seamless seat securement (yup). Probably the most important aspect to a clean bike build id say.

I was starting to panic because nobody was available to upholster my seat in my super pushy time frame. Luckily, I met a neighbour at a block party who was very skilled in the trade. He sure worked magic!


Chevonne is starting to take form

Oh and made this license plate holder (It ended up cracking and falling off).

My limitations with sheet metal end with compounding curves. Jay at Bare Steel Design came to my rescue and made this sexy front fender for Chevonne. I am so incredibly grateful and impressed. This guy is legendary, check out his mega custom XS builds at https://www.bikeexif.com/baresteel-yamaha-xs650


All new wiring

Only decent picture of the electronics tray, you can also see the LED brake light/turn signals. Oh, and my HAGON shocks came in from the UK.

This is how she turned out all buttoned up! The lexan covers have held up at over 1500km! They get a lot of looks and comments. I started the project at the beginning of March and started driving it in early July. I had a lot of trouble diagnosing an overcharging problem and it ended up being my retro style system not cooperating with the lithium battery. All the charging components were brand new, however, I should have gone with the PMA set up and it would have saved me $ and headache in the long run (my only regret).
First burn up the highway.. XD

Thanks for making it this far. Let me know if you have any questions
BEFORE: I didn’t really take any early photos, but I snipped this from the sale ad. The bike didn’t run but it had a solid foundation for a build.
AFTER: Lookin pretty in a hotel bar
BUILD:
I had no intentions of digging far into it, I was just going to clean the carbs and clean up the wiring but one thing led to another...
One of many projects..
Might as well take the motor out at this point and clean up the frame.
So many useless tabs and brackets.
Time for sandblasting.
One of the most important things IMO for a clean bike is a seamless seat line. All the under-seat brackets were protruding up too high so I cut them all off, remade them, and remounted flush.
Gas tank mount position jig
The under-seat tubes are going to be used to accept a luggage rack (I have full intentions on taking this camping). The other tabs are going to be used for mounting the electronics tray and rear fender (this was all guess work with high hopes they'll work because I didn't have the patience to make the other bits beforehand to test-fit. The frame is about to be powder coated so there's no modifying afterwards..
Pretty much everything got powder coated. JSF Coatings does world class work!
I cleaned up the motor while waiting for powder coating; this is as far as I went into it. I knew if the head came off, I'd end up rebuilding the whole thing and I was pushing to maximize summer riding. I had no idea if the motor ran but it had compression so I was willing to risk it.
For no real reason, I painted the motor with POR15. I wanted to use a brush paint but couldn't really find much during the pandemic and I had the POR15 sitting there. I applied it as properly as possible using the water-based cleaner and etcher. The coating is extremely durable, I had to re-coat the valve cover and sandblasting the bad coat off was impressively difficult. It's very important to clear coat the paint afterwards because it will haze and discolour with simple chemicals, like brake cleaner. I'm not sure if i'd go this route again, but at least I'm confident it will never chip.
Time to rebuild the 35mm forks with new seals and springs. I used the Mikes XS emulator cartridges and made some 2" lowering spacers. No pictures of any of that except the drilled out damper rod! Thanks Matt
Began reassembly. I Installed the rebuilt forks and new steering bearings, I upgraded the swing arm bearings as well. The rims were sandblasted with my dinky open-air gun, I didn't even take the tires off. Using a deck of card to protect the tires, I rattle-can painted the rims with several light coats and cleared. They actually turned out very well and the paint has proven to be very durable... something I was worried about.
All new handlebar controls and cables. Those are fat bars from Phoenix Handlebars, great product and excellent company!
Started planning where to mount the large electrical components (solenoid, battery, regulator/rectifier). Might as well bundle them all together and suspend them above the swing arm. I wanted the area under the seat as open as possible so this part was very tricky. I don't think it could have been done any tighter..lots of measuring.
That's an EarthX ETX18B lithium battery. A billion hours of research told me this is the best battery on the market with its active BMS. It will protect itself from overcharging, undercharging, blah blah blah.
CAD'd up a box for the bits, keeping the box away from the chain was also a huge space constraint.
POOF! From the computer into reality using fancy magic machines.
SPOILER ALERT: I had to go with a lead-acid battery in the end because I didn't go with a PMA charging system. But here is how the battery box turned out! I painted the reg and buzzed the fins to match the motor (it's the little details I tell yah).
Went with PAMCO electronic ignition.
More assembly and mock up.
Modelling the under-seat electronics tray, this ended up needing to be smashed in place with a mallet because the bike frame wasn't as mil-spec as i'd hoped. I have no pictures of the completed tray but you get hints of it in future photos.
Being a mechanical person, I felt Chevonne needed to flaunt her inner bits. I made some Lexan windows with aluminum spacers to expose her goods. Off to powder coating!
Oh right, I also rebuilt the carbs and cleaned them inside and out! Notice the electronics tray now.
The lip on these puppies needed to be milled off for proper lexan fitment.
Here a nice pic at 2AM on a Saturday. I swear I know where everything is..
Iv'e been dreading the seat and fender design but here goes nothing..
POOF!! Jesus turned water into wine, but I turn cardboard into steel.
Those gold 1/4-20 bolts will be flushed and plug welded. They travel through the electronics tray and secured with wingnuts.
SSS: Seamless seat securement (yup). Probably the most important aspect to a clean bike build id say.
I was starting to panic because nobody was available to upholster my seat in my super pushy time frame. Luckily, I met a neighbour at a block party who was very skilled in the trade. He sure worked magic!
Chevonne is starting to take form
Oh and made this license plate holder (It ended up cracking and falling off).
My limitations with sheet metal end with compounding curves. Jay at Bare Steel Design came to my rescue and made this sexy front fender for Chevonne. I am so incredibly grateful and impressed. This guy is legendary, check out his mega custom XS builds at https://www.bikeexif.com/baresteel-yamaha-xs650
All new wiring
Only decent picture of the electronics tray, you can also see the LED brake light/turn signals. Oh, and my HAGON shocks came in from the UK.
This is how she turned out all buttoned up! The lexan covers have held up at over 1500km! They get a lot of looks and comments. I started the project at the beginning of March and started driving it in early July. I had a lot of trouble diagnosing an overcharging problem and it ended up being my retro style system not cooperating with the lithium battery. All the charging components were brand new, however, I should have gone with the PMA set up and it would have saved me $ and headache in the long run (my only regret).
First burn up the highway.. XD
Thanks for making it this far. Let me know if you have any questions
Attachments


Last edited:
