Today I replaced all the seals under the left cover. This will be the first article in a series.

I thought I’d throw together a little photo essay of how I did this job. Different people may use other methods or products, but this is how I did it. I will be using basic hand tools, cordless drill, a wooden dowel, a couple small 1 X 2 blocks, the wood was just stuff I had laying around. The only specialty tools I’ll be using is a deburring tool , available at hardware stores or eBay. And a seal puller available at Harbor Freight or online.


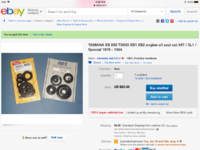
I purchased a full engine seal kit from The Kenosha Kid on eBay. The seals are made by ARS.

The first seal I’m replacing is the shift shaft. I’m going right after the one that I assumed would be the hardest. The shift shaft can be removed by popping off the right cover, but I wanted to see if I could do this job with the shaft in place, just to keep things simple. So first thing to do, remove the E-Clip and the washer that hold the shaft in place.

The seal can be seen now that the washer is off. WARNING.....with the clip off , the shaft is now free to move . Do not push the shaft into the case or you will have to take the right cover off to put it back in place.
With the seal now exposed carefully drill a 1/16” hole into the seal. There is a metal ring inside the seal that you’re going through. Drill just enough to go through that ring. Keep your work area clean and free of metal shavings. I keep a little pocket magnet and shop vac handy to clean up all shavings as I go.

Now run a small sheet metal screw into that hole. Just about 1/4” .

Grab onto that screw with a vise grip pliers and pull the seal out.


This one came out super easy. Now wipe out the seal pocket in the case and make sure everything is clean, get ready to install the new seal. This location has a nice beveled edge around the hole that will make short work of reinstalling the seal. Make sure the shift shaft has a smooth surface, free of any cuts, snags or sharp edges. On mine, prior to removing the E-Clip, I took some very fine sandpaper and just smoothed it up nice.
Now on this seal and the clutch push rod seal, I’m not going to use any adhesive on the outer edge. These two seals are small and not under a load so I’m going to just lube the outside edges with some silicone that I have. Some would probably say to use adhesive, but this is the way I’m doing it. You could also use grease or oil, just lube it so it’ll ease in. I applied it on both the shift shaft and the inner and outer edges of the seal and pressed it in with my fingers.

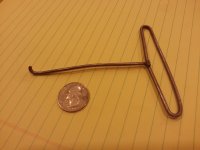
To drive it home the last little bit, this is where the dowel and some shade tree engineering come in. I could’ve ran to the hardware store and picked up a piece of irrigation pipe the right size to go over the shift shaft and drive the seal in. But I just cut a contour end on a wooden dowel and used it to tap around the edges until it was all the way in.


Now that it’s in, reinstall the washer and the E-Clip and this seal is done! This seal turned out to be super easy to install.

Yesterday , I was talking to a forum member and he was saying that the cases had to be split to change the seals because the seals had this ridge around them that fits into a recess. He was correct in that, the original factory seals are that way. I read a post by XSLeo where he explained the difference. The originals have this rounded hump that goes around the seal. The replacements have a smaller ramped ridge to make it easier to install and avoid damaging the seal. Here the original is on the left and you can see the difference.

So shifter is done, without pulling the shifter shaft or opening the right side cover. By the way that seal is really trapped in place between the shift shaft on the inside of the case and the outside washer, I’m not worried about the lack of adhesive on it.
Next up in the series, replacing the clutch push rod seal.
I thought I’d throw together a little photo essay of how I did this job. Different people may use other methods or products, but this is how I did it. I will be using basic hand tools, cordless drill, a wooden dowel, a couple small 1 X 2 blocks, the wood was just stuff I had laying around. The only specialty tools I’ll be using is a deburring tool , available at hardware stores or eBay. And a seal puller available at Harbor Freight or online.
I purchased a full engine seal kit from The Kenosha Kid on eBay. The seals are made by ARS.
The first seal I’m replacing is the shift shaft. I’m going right after the one that I assumed would be the hardest. The shift shaft can be removed by popping off the right cover, but I wanted to see if I could do this job with the shaft in place, just to keep things simple. So first thing to do, remove the E-Clip and the washer that hold the shaft in place.
The seal can be seen now that the washer is off. WARNING.....with the clip off , the shaft is now free to move . Do not push the shaft into the case or you will have to take the right cover off to put it back in place.
With the seal now exposed carefully drill a 1/16” hole into the seal. There is a metal ring inside the seal that you’re going through. Drill just enough to go through that ring. Keep your work area clean and free of metal shavings. I keep a little pocket magnet and shop vac handy to clean up all shavings as I go.
Now run a small sheet metal screw into that hole. Just about 1/4” .
Grab onto that screw with a vise grip pliers and pull the seal out.
This one came out super easy. Now wipe out the seal pocket in the case and make sure everything is clean, get ready to install the new seal. This location has a nice beveled edge around the hole that will make short work of reinstalling the seal. Make sure the shift shaft has a smooth surface, free of any cuts, snags or sharp edges. On mine, prior to removing the E-Clip, I took some very fine sandpaper and just smoothed it up nice.
Now on this seal and the clutch push rod seal, I’m not going to use any adhesive on the outer edge. These two seals are small and not under a load so I’m going to just lube the outside edges with some silicone that I have. Some would probably say to use adhesive, but this is the way I’m doing it. You could also use grease or oil, just lube it so it’ll ease in. I applied it on both the shift shaft and the inner and outer edges of the seal and pressed it in with my fingers.
To drive it home the last little bit, this is where the dowel and some shade tree engineering come in. I could’ve ran to the hardware store and picked up a piece of irrigation pipe the right size to go over the shift shaft and drive the seal in. But I just cut a contour end on a wooden dowel and used it to tap around the edges until it was all the way in.
Now that it’s in, reinstall the washer and the E-Clip and this seal is done! This seal turned out to be super easy to install.
Yesterday , I was talking to a forum member and he was saying that the cases had to be split to change the seals because the seals had this ridge around them that fits into a recess. He was correct in that, the original factory seals are that way. I read a post by XSLeo where he explained the difference. The originals have this rounded hump that goes around the seal. The replacements have a smaller ramped ridge to make it easier to install and avoid damaging the seal. Here the original is on the left and you can see the difference.
So shifter is done, without pulling the shifter shaft or opening the right side cover. By the way that seal is really trapped in place between the shift shaft on the inside of the case and the outside washer, I’m not worried about the lack of adhesive on it.
Next up in the series, replacing the clutch push rod seal.
Attachments
Last edited:

 Nice to see you out and enjoying that beautiful old bike! They really should be ridden and enjoyed.
