Went to school with a guy who had one that color. It's the only one I've ever seen in the flesh (tin's?)I understand your Daughter's attraction to purple motorcycles.
Its my favorite color and I wanted a purple motorcycle too. Thats why I bought this 73 Honda CB350G in purple, Honda calls it "Iris".
View attachment 238900
-
Enjoy XS650.com? Consider making a donation to help support the site.
XS650.com receives a small share of sales from some links on this page, but direct donations have a much greater impact on keeping this site going.
You are using an out of date browser. It may not display this or other websites correctly.
You should upgrade or use an alternative browser.
You should upgrade or use an alternative browser.
Reunited with XS650SH
- Thread starter jetmechmarty
- Start date
J B Weld (original formula).
4+ yrs on mine now.
4+ yrs on mine now.
The shim is perfect. The rebuild is a complete fail. I followed the instructions from XJ Bikes. It doesn’t try to seal. I’ll have to try another kit and likely, another petcock. I have a solution for the time being.I clip some popcan side aluminum make a little shim tween the nylon and the petcock well. been riding with that for years.
VROOM! VROOM!
I pulled the carburetors off and they look pretty good. I had cleaned them once upon a time and they had been drained. Main jets are corroded. I can't read what size they are. So, I took them apart and cleaned them with an aerosol can of carburetor cleaner. I replaced the packings in the fuel valve and the pilot screws. I installed new jets sourced from Niche Cycle. 42.5 idle jets. 135 main, and 132.5 air jets. I corrected the float height to 22mm. Once I slipped the carburetors on, I started it with my thumb. It lit off immediately and in no time settled to a nice idle. It runs smoothly and quiet. It has just 6,000 miles on it. I read 13.6 volts at the battery while idling and 13.8 volts when I spun it up to 5K. I'll get a rewind before it fails (maybe).VROOM! VROOM!
Interestingly, my XS650SJ Factory Service Manual, in the carburetor chapter it says the proper jetting is 42.5 and 135. I think this has caused me confusion in the past. 132.5 main jet size is posted elsewhere, perhaps even in the back of the same book. So, this set-up is identical to my SK other than its air jets are currently 130.
I need to look at the chain and see if it's serviceable. I need air filters and tires. I thought I'd use K&N, but at $150 I believe I'll choose a more economical option.
I'm going to sign off here and get to it. Perhaps I'll get a ride on it this afternoon.
Air filter recommendation please. I have some OE filters with rotted media. I'm clueless as to what media to use to rejuvenate them.
https://www.dimecitycycles.com/uni-bulk-filter-foam-sheet.html?options=cart
Or, are they all the same?
https://www.dimecitycycles.com/uni-bulk-filter-foam-sheet.html?options=cart
Or, are they all the same?

https://unifilter.com/online-catalog/accessories/

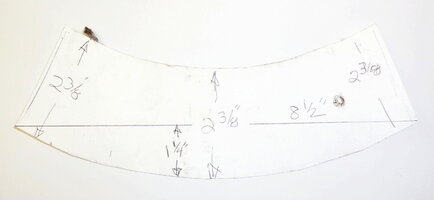
A cut sheet for the special filter frame.

I think the 3/8 sheet ends up working better, the 5/8" sheets kind of fill up the air box.
3/8" green would be ideal cuz it's easier to see if it's dirty but the fine 3/8" black, BF4 is the right combo for street use IMHO.
A cut sheet for the special filter frame.

I think the 3/8 sheet ends up working better, the 5/8" sheets kind of fill up the air box.
3/8" green would be ideal cuz it's easier to see if it's dirty but the fine 3/8" black, BF4 is the right combo for street use IMHO.
I need air filters and tires. I thought I'd use K&N, but at $150 I believe I'll choose a more economical option.
I just so happen to be in the middle of making new air filters for my 1980 Specials.
The stock mouse fur is all rotting away, so I peeled it all off the cages and bought red 3/8" uni-filter sheet off of amazon.
I cut 2 1/4" wide strips, 12" long and wrapped the screens...the flanges of the screens held them in perfectly and the little extra butt up of the 12" long strip keeps you from having to glue anything together.
It worked way better than I expected. I used red so I could see when (or if) they get dirty...black would conceal it too much in my opinion.
So, you will use oil on them? Uni oil? I thought I might try to sew the ends together with .020 stainless steel safety wire.I just so happen to be in the middle of making new air filters for my 1980 Specials.
The stock mouse fur is all rotting away, so I peeled it all off the cages and bought red 3/8" uni-filter sheet off of amazon.
I cut 2 1/4" wide strips, 12" long and wrapped the screens...the flanges of the screens held them in perfectly and the little extra butt up of the 12" long strip keeps you from having to glue anything together.
It worked way better than I expected. I used red so I could see when (or if) they get dirty...black would conceal it too much in my opinion.
So, you will use oil on them? Uni oil? I thought I might try to sew the ends together with .020 stainless steel safety wire.
I think I'll lightly oil them with some two stroke oil I have laying around the shop, wring em out of course.
The ends are butted up tightly enough at the 12" length they wont need any stitching or gluing...worked out really well.
It'll be easier for me to take them back off for cleaning if I ever need to without gluing/stitching as well.
I rode it 15 miles to get gasoline. It’s awesome. I’m sure it will be better with air filters. I still have plenty to do if it’s going to Arkansas.
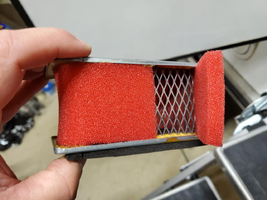
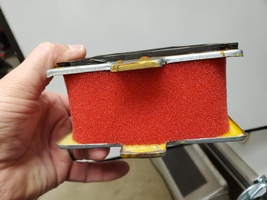
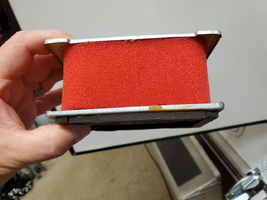
Here are some pics regarding the uni-filter conversion from the oem mouse fur.
Its important to put the end butting pieces on the solid inboard side of the cage, because the outboard side has cutouts that would allow the filter ends to slip away from each other.
The bottom pic is where the seams are butted up to each other on the inboard side.
I tried to illustrate my point in the photos, hopefully it makes sense?
P.S., Another cool thing about the uni-filter sheets, they're a foot wide so it makes it very simple to make ready to install strips 2 1/4" wide X 12" long from the bulk sheet.


Perfect! I never would have thought it would be that easy.Here are some pics regarding the uni-filter conversion from the oem mouse fur.
Its important to put the end butting pieces on the solid inboard side of the cage, because the outboard side has cutouts that would allow the filter ends to slip away from each other.
The bottom pic is where the seams are butted up to each other on the inboard side.
I tried to illustrate my point in the photos, hopefully it makes sense?
P.S., Another cool thing about the uni-filter sheets, they're a foot wide so it makes it very simple to make ready to install strips 2 1/4" wide from the bulk sheet.
View attachment 239491
View attachment 239492
View attachment 239494
AndersJ
XS650 Addict
Well done. I find the hearest part is removing the old filter satisfactorily. Lots of little fibers to contend with in the old glue.Here are some pics regarding the uni-filter conversion from the oem mouse fur.
Its important to put the end butting pieces on the solid inboard side of the cage, because the outboard side has cutouts that would allow the filter ends to slip away from each other.
The bottom pic is where the seams are butted up to each other on the inboard side.
I tried to illustrate my point in the photos, hopefully it makes sense?
P.S., Another cool thing about the uni-filter sheets, they're a foot wide so it makes it very simple to make ready to install strips 2 1/4" wide X 12" long from the bulk sheet.
View attachment 239491
View attachment 239492
View attachment 239494
Well done. I find the hearest part is removing the old filter satisfactorily. Lots of little fibers to contend with in the old glue.
Yes. I’m comfortable with this being good enough. What’s left isn’t going anywhere.
Yes, the best way to get that remaining fuzz off, scrape it it over a trash can with small standard blade screwdriver, then a wire wheel chucked in a drill.
It makes pretty short work of it. Then shake the fuzz bits out of the inside of the cage and vacuum the small intake anti backfire screen with shop vac or blow it out with a compressor.
It makes pretty short work of it. Then shake the fuzz bits out of the inside of the cage and vacuum the small intake anti backfire screen with shop vac or blow it out with a compressor.
Your new foam will fit more snugly along the edges if you scrape and wire wheel that remaining fuzz away the best you can...just dont remove the epoxy holding the screen (its pretty tough epoxy though).View attachment 239572
Yes. I’m comfortable with this being good enough. What’s left isn’t going anywhere.
Last edited:
Pinging can be a little too lean or too much ignition advance. Also fuel can affect pinging.but I had some pinging when opening the throttle out of the turns.
Before messing with the carbs I would recheck timing. Since the bike has been sitting a long time maybe put some more smiles on it.
Similar threads
- Replies
- 25
- Views
- 658
