Stator Fix/Adapt

BarrieC

XS650 Addict
Messages
103
Reaction score
133
Points
43
Location
Downham Market
Hey Guys,
just running through my parts to see what i need down the road to get this Basket case back to life.
Ignition and charging plays on my mind, here is what i have:

  • A bike that was originally Electronic (its not CDI, i know) ignition.
From the bike:
  • Transistor box, Correct Coil, Correct Regulator/Rectifier
Recently acquired a cheap Electronic ignition Rotor (I only had points version)

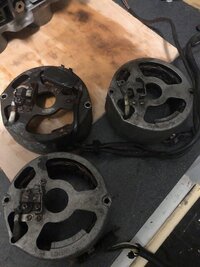
Just been checking out my Stator - I have 3, one with the Pick-up 2 without. and the Stator case is horribly corroded, you can even see the TDC mark (photo below)
The other 2 stators are in good condition screws etc.
I was thinking, i would have to remove the windings from my original one and fit them into my case of choice, but i think i can just mount the Pick-up in the "new" case and change the brush mountings as required?

Have a look at the photo below - as you can see the top left is the offending item,
I'm hoping its just a case of drilling and tapping out the mounting holes for the Pick-up

Thanks guys

Barrie
 

Attachments

  • IMG_1481.jpg
    IMG_1481.jpg
    90.6 KB · Views: 80
I have never done this but I think both your plans would work.
Go with remounting the TCI pick up first as it looks to be the easiest and if it doesn't work move to plan B.
 
Thanks Signal, though the original Stator case is badly corroded, the wiring etc looks the best, if i can easily change everything to the "new" case it would be a better option - good brushes and correct wiring.
Guess its just how easily the Stator comes out of the casing?
Barrie
 
I have removed stator windings and the two I have done did not come out easily. I was not trying to reuse the windings but I would suggest warming the stator in an oven or barbeque.
 
Thanks,
I guess i'm lucky that I have one to practice on, One I can afford to wreck the casing and one I can "afford" to wreck the windings.
I will test out the windings on all three first to make sure they are all good!
 
Thanks Jim, looks familiar, from the "Ignition project"? I forgot that was on there! Better than me making a template LOL
As its originally combine Rec/Reg If I use a complete stator with existing windings bushes etc, I will need to make sure the relevant brush is isolated from ground (Negative) wont I?
 
Last edited:
Is the TCI stator beyond redemption? Your simplest solution may be just to remark the timing marks. there is plenty of info about that on this site. Actually you probably only need TDC and idle timing mark as full advance can be gauged by the side cover drain.
 
Hi, I agree, it would be easiest solution and i'm all for that, but the casing looks almost fossilised at the bottom (salt corrosion) and every screw is a drill out job.
I'm working on another stator, to use the casing, on that one, the metal part where the brush's run has a bad groove! so that cant be used and wont matter if I damage it getting it out.
Plan then is I can (very carefully) cut the bad casing to remove the good windings hopefully easily
I cant see putting them together being as hard as getting them apart:unsure:
 
I should think even in GB finding a good stator wouldn't be that hard with all the aftermarket PMA charging systems that get installed.
I have at least 20 stators in a tub here, cuz no one seems to need em.
About the only time they seem to fail is when someone installs them crooked and ignores the horrible knocking grinding noises til the rotor eats into the windings. (don't ask) :doh:
 
Last edited:
I may have to move to the US, just because of the number of old Motorbikes and parts that seem to be readily available at low cost!
Japanese, British, German - how many motorbikes did you lot buy in the past!
My youngest daughter (though 19) wants to go to Disney, I might make a diversion and go to somewhere like the mid west and buy a load of XS650 spares :D
 
Ha Ha, only in Baraboo!
I guess it costs as much to post a part from one side of the US to the other as it does to Europe! I forgot the US was slightly bigger than the UK ;)
 
The brush block and the stator housing where it mounts (cut-outs) differ between the older and newer units. But, I don't think you need to change the brush block or brush wiring, just use the earlier type of regulator (type B power switching/regulating).

EarlyBrushesInside.jpg


LateBrushesInsideLabeled.jpg
 
Hmmm, the bike did come with an older regulator in very good condition, but being an 83ish, id expect it to have combined, I will swap everything out as is.
As i'm swapping out the wiring/Stator internals, brushes and wiring will come complete =Update: yes its got 80's on brushes
I've noticed 2 (what look like the ends of screws on the outside of the Stator mounting, but nothing on the inside (stator in the way) just hoping it is only an interference fit and heat will aid in removing
 
Last edited:
You can't swap the brush blocks. The older stator housing doesn't have the cut-out for the inner brush screw. As I see it, you have two options - cut out the old stator housing around the inner brush to match the newer housing (then you can use the newer brush block) or do the nylon screw mod for the inner brush mount on the older brush block.
 
Oh, so I see, It looks easy enough to cut out as the centre of the missing inner hole appears central to the existing mounting screw. correct size drill then a bit of file work.
Just had the stator in the oven then trying to knock out the windings/armature, no joy. I could get a grinder in there and cut into the metal parts to relieve tension (same plan as on the casing to get the windings out of the bad mounting
Am I missing something in how the stator windings are held in place? any ideas
 
Am I missing something in how the stator windings are held in place? any ideas
Never took one apart, but I suspect that, along with the screws, Yamaha installed 'em wet. That's to say the epoxy or varnish they used on the windings was still wet when it was pressed into the housing.

Keep in mind the rotor/stator clearance is tight. The one I measured had a total of .028" clearance between the two..... .014" from the rotor to the stator at any given point. Not much room for error.
 
How did you remove the "screws" are they threaded, snap off head install by the factory?
KIMG2743.JPG
KIMG2744.JPG
KIMG2745.JPG

I'll mess around with one a bit, cuz, well see my avatar....
 
Back
Top