The "free"engine

650Burger

XS650 Enthusiast
Messages
70
Reaction score
135
Points
33
Location
NYC
I recently made the purchase of a xs650 1980 Special II, and with it was included an extra seized engine for me to re-use parts or just use as decoration for my house.

Since I plan to do major engine work to the main bike, I have been taking the engine apart as a means to familiarize myself with the engine and design. Here are some pictures, the last one is pretty gruesome so view at your discretion!

20191219_171316.jpg


20191221_192051.jpg


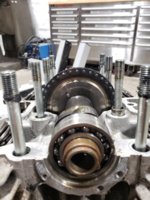
Seems like someone needed an advance system...
20191223_222017.jpg


Engine was seized so I couldn't turn this to TDC. Still, it's in decent shape all things considered...

20191225_094241.jpg


Nope it really isn't. This smelled FOUL! I would love to have any tips to clean this junk off so I can remove the jugs and continue the teardown.
 

Attachments

  • 20191223_222037.jpg
    20191223_222037.jpg
    181.1 KB · Views: 212
Breaking loose a stuck engine is a delicate balance among finesse, force, brains and violence.

DO NOT use the kick start lever.

The XS650 is a 360 degree twin which means that the two pistons go up and down together. When one side is on its power stroke, the other side is drawing in a new air-fuel moisture in preparation for its power stroke.

From the photo in your first post, it appears that the pistons are not down far enough in their cylinder bores to get the wrist pins out and so the way to do this gracefully would be to try using a socket and breaker bar on the alternator rotor nut which is on the LEFT HAND end of the crankshaft. When you are applying pressure in the counterclockwise direction (looking at the nut) the nut may begin to loosen - not to worry, just reverse direction and it will retighten.

DO NOT use an impact gun or any other power tool and DO NOT hammer on the tops of the pistons (some folks use a piece of wood and do just that, but in my view, you risk damaging the crank and connecting rod bearings - and THAT is expensive).
ALSO - be sure to keep track of the timing chain to make sure that it doesn’t get bunched-up or drop into the depths of the crankcase.

Your goal here is to rotate the engine juuuuuust a little - likely around 1/4 of a turn or so - to bring the pistons down to the bottom of their travel - a point imaginatively known as bottom dead centre or BDC. If the entire cylinder barrel begins to lift off the engine case - you are turning the engine in the wrong direction. However, it really is no problemo - just pull the barrel right off until you can remove those wrist pins and then the pistons (which are likely scrap anyway) can easily be removed by a machine shop.

Just apply pressure one way - and then the other way - and then repeat back and forth. More often than not, the crank will slowly begin to turn little-by-little and eventually, you will be able to rotate it far enough to move the pistons down to their lowermost point.

At that point, you should be able to remove the little clips on the ends of the wrist pins and slide the pins out of the pistons.

You’ll need to take the barrel and pistons to an automotive machine shop to have them measured and cleaned-up and almost certainly re-bored oversize. You will need new rings and pistons - virtually for certain. However, all of the necessary parts are available at reasonable cost, so you should be OK.

Keep asking questions and posting photos - we’re all here to help as much as you like.

Pete
 
Last edited:
scrap has much of the carbon build up around the piston and cylinder wall,then go to Oreillys and get a gallon can of Chem Dip carb cleaner
wear protective gloves and fill the cylinders above or slightly higher with Chem,let it soak a few hours, come back again to scarp the carbon off,then
use lots of rags to soak up the Chem Dip,use compressed air looking away to blow the cylinders off. If another application is needed soak again for
a few hours. A better penetration fluid would be a 50% ratio of transmission fluid mixed with Acetone. Chem Dip will desolve that carbon build up fast
but use caution not to get in on bare skin.
 
Breaking loose a stuck engine is a delicate balance among finesse, force, brains and violence.

DO NOT use the kick start lever.

From the photo in your first post, it appears that the pistons are not down far enough in their cylinder bores to get the wrist pins out and so the way to do this gracefully would be to try using a socket and breaker bar on the alternator rotor nut which is on the LEFT HAND end of the crankshaft. When you are applying pressure in the counterclockwise direction (looking at the nut) the nut may begin to loosen - not to worry, just reverse direction and it will retighten.

Pete

Thank you! For now all I did was fill the cylinders with PB blaster, but it hasn't made its way though at all and since this is kind of low priority for me, I don't want to use kroil since it's so expensive. I will definitely try to move the alternator rotor nut though, seems like a great plan.
This engine will be parted out, since I may need to reuse some of its parts for my main build for which I will make a thread very soon.

Thanks for the tips Gary, Bushyeyed and Pete!
 
scrap has much of the carbon build up around the piston and cylinder wall,then go to Oreillys and get a gallon can of Chem Dip carb cleaner
wear protective gloves and fill the cylinders above or slightly higher with Chem,let it soak a few hours, come back again to scarp the carbon off,then
use lots of rags to soak up the Chem Dip,use compressed air looking away to blow the cylinders off. If another application is needed soak again for
a few hours. A better penetration fluid would be a 50% ratio of transmission fluid mixed with Acetone. Chem Dip will desolve that carbon build up fast
but use caution not to get in on bare skin.

Thanks for the suggestion. I already purchased a bunch of cleaners for my main build, is chem dip non abrasive, meaning can I use it to clean surfaces without needed to re-finish them after? I will probably need to clean carbon off my working engine too. Sorry very new to these automotive cleaners.
 
For carbon removal on pistons, combustion chambers, whatever, you can use plain old paint stripper. Apply it, let it soak 10 to 15 minutes, wipe off. It literally melts and dissolves the carbon away, but may take several applications to get it all.
 
For carbon removal on pistons, combustion chambers, whatever, you can use plain old paint stripper. Apply it, let it soak 10 to 15 minutes, wipe off. It literally melts and dissolves the carbon away, but may take several applications to get it all.

Thanks, that was my initial plan ( I think I read you post about it in another thread so thank you)
 
Thanks for the suggestion. I already purchased a bunch of cleaners for my main build, is chem dip non abrasive, meaning can I use it to clean surfaces without needed to re-finish them after? I will probably need to clean carbon off my working engine too. Sorry very new to these automotive cleaners.
Chem Dip has acid in it formulated for soak cleaning carbs and dissolving heavy deposit
carbon build up on pistons and will turn aluminum a darkest color if left soaking for long periods. You need liquid penetration to seep down deep to loosen the rings up. Been using this product since the 80's and you won't find a better product for soaking engine parts besides
a automotive shop that acid soaks engine blocks.
 
Last edited:
For carbon removal on pistons, combustion chambers, whatever, you can use plain old paint stripper. Apply it, let it soak 10 to 15 minutes, wipe off. It literally melts and dissolves the carbon away, but may take several applications to get it all.
Maybe not relevant for this engine, but the best way of removing soot and carbon deposits from marine diesel engine pistons is just water, beleive it or not. At the shipyard I worked at in the 80s, we would pull the pistons, and drop them upside down into large buckets filled with fresh water. Let them soak overnight, and next morning it was really easy to remove the carbon deposits.
 
So, I still haven't managed to free the pistons. It's not really high on my list of priorities though, I'm working on setting up a place to receive the working engine from the bike.
I've also been messing around with the valve head and I was wondering how to remove this piece to access the red gasket underneath? One of them just came off, but the others seem deep in there and I don't want to hit them too hard since they seem like fragile parts.

20191228_174810.jpg


Extra bonus question: Is it necessary to remove the valves and lap them if they present no issues running now? Previous owner says he has changed valve guide seals recently.

As always, many thanks.
 
Take a similar size socket to the underside of the head cover and softly tap that piece out.

just my opinion but if I’m in the engine and can change a gasket and seal I would if I wasn’t the one who changed it. You can kinda tell if the guide seals are good though if they kinda have a little suction effect when you trying to remove the valves.
 
Personally, I don't replace those o-rings very often. It's not a problem leak area and you may do more damage than good to that area trying to get the sleeve out. If I do try for removal, a perfectly sized socket that just fits in there is what I use.

I test the valves for leaks using solvent and compressed air. If leaking, they get hand lapped back in to fix it .....

dAyCZVL.jpg


scTVevw.jpg


mLxDTcb.jpg


EmVtx11.jpg


The exhausts are more prone to leaking or developing leaks because they run hotter.
 
So, I still haven't managed to free the pistons. It's not really high on my list of priorities though, I'm working on setting up a place to receive the working engine from the bike.
I've also been messing around with the valve head and I was wondering how to remove this piece to access the red gasket underneath? One of them just came off, but the others seem deep in there and I don't want to hit them too hard since they seem like fragile parts.

View attachment 156886

Extra bonus question: Is it necessary to remove the valves and lap them if they present no issues running now? Previous owner says he has changed valve guide seals recently.

As always, many thanks.
Why would you skimp on doing the head right, take it to a machine shop for valve refacing along with cutting the valves seats, Will 30 to 50 bucks break you? and don't take the word of the pervious owner check guide wear along replacing the guide seals
 
Extra bonus question: Is it necessary to remove the valves and lap them if they present no issues running now? Previous owner says he has changed valve guide seals recently.
Here's a rule of thumb I go by.... If you have to pull the engine to replace/rework it, replace/rework it while the engine's pulled. As Jack sez.... now's not the time to scrimp.
 
Back
Top