Sportster forks! A lot of people use them as they are readily available and cheap. There are also lots of brake and wheel options for them, or so I'm told.As always I am open to ideas and or suggestions...
-
Enjoy XS650.com? Consider making a donation to help support the site.
XS650.com receives a small share of sales from some links on this page, but direct donations have a much greater impact on keeping this site going.
You are using an out of date browser. It may not display this or other websites correctly.
You should upgrade or use an alternative browser.
You should upgrade or use an alternative browser.
The Punisher
- Thread starter BluzPlayer
- Start date
Hey Skull...Another big issue or cost of setting up a 270 Crank...................... Need 2 female spline d shafts to go onto a 270 Crank Shaft pin.
In other words you need 2 cranks to make up a 270 degree motor so you are not using the 2 male splined shaft sides of the 2 cranks
Soooo Two lefts make it right.
But two rights don't make anything???

Yes indeed that is another way of doing it though I don't think it has been implemented very often.
Rebalancing the crank and getting the correct runout are the critical aspects to this operation.
I have a 20 ton press and will doing mine. Unfortunately I don't have the ability to twist the cam.
The equipment and skills some of the guys here have make me drool...
I find myself regularly astounded
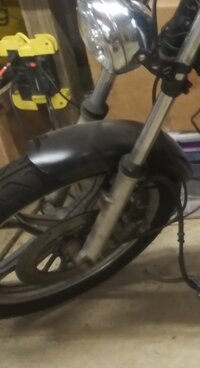
Thanks Marty. I will look into it. I was thinking Suzuki as they have a set as well and that set came with the front wheel that matches the one on the bike.Sportster forks! A lot of people use them as they are readily available and cheap. There are also lots of brake and wheel options for them, or so I'm told.
Similar but not the same as the Yamaha mag on the back.
Can't believe I don't have a better pic but here are a couple.
Attachments
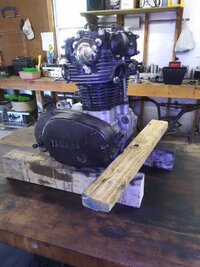
Engine on the bench...
PO said it had just been rebuilt.
I rarely take someone's word for something like that.
Besides... WHO rebuilt it? What was their skill level?
I didn't make the purchase hoping for a cheap ride and endless maintenance.
Of course I performed routine tests..
Compression was on the low side for a fresh engine. Just over 100 lbs.
More confirmation that it needs a deeper dive.
My intent from the start has been a complete build.
and.. well... I mean, You have seen the pics of the builders work up above.
Like I'm trusting an engine to that guy?????
Hopefully you guys know me better than that by now.
Anyways, Here we go, Let's see what we are working with.
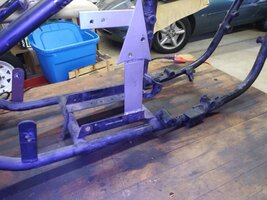
But hey.. Check out that ultra cool arrow thingy on the frame!
That's some really trick stuff right there. I might have to keep it.
NOTTTTTTTTTTT.
wow
PO said it had just been rebuilt.
I rarely take someone's word for something like that.
Besides... WHO rebuilt it? What was their skill level?
I didn't make the purchase hoping for a cheap ride and endless maintenance.
Of course I performed routine tests..
Compression was on the low side for a fresh engine. Just over 100 lbs.
More confirmation that it needs a deeper dive.
My intent from the start has been a complete build.
and.. well... I mean, You have seen the pics of the builders work up above.
Like I'm trusting an engine to that guy?????
Hopefully you guys know me better than that by now.
Anyways, Here we go, Let's see what we are working with.
But hey.. Check out that ultra cool arrow thingy on the frame!
That's some really trick stuff right there. I might have to keep it.
NOTTTTTTTTTTT.
wow
Attachments
Well opening up the engine..
Looking pretty clean.
Maybe it will be better than I have been thinking.
It has points... No TCI..
Not that I hate points, I ran them for decades.
However this time there will be an upgrade.
Looking pretty clean.
Maybe it will be better than I have been thinking.
It has points... No TCI..
Not that I hate points, I ran them for decades.
However this time there will be an upgrade.
Attachments
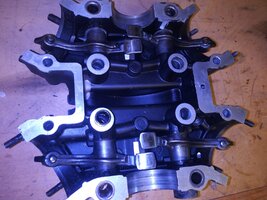
Head is off...
The head looks pretty good.
Nothing glaring to me. It will be reworked none the less.
Valves, porting, springs, anything else if required.
Slugs look good and clean and the gaskets fresh.
Solid indicators or a fresh rebuild.
Remains to be seen just how well it was done.
They aren't out of the holes yet, soooo...
I see some wear indications on the rocker arms.
Somewhat concerning, whether they can be renewed or replaced I have yet to detwermine.
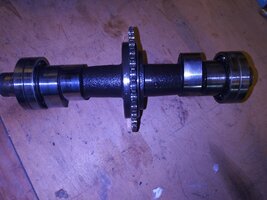
The bumpstick will be replaced with a shell #1 and new bearings. It doesn't look that bad.
I just have other plans.
The head looks pretty good.
Nothing glaring to me. It will be reworked none the less.
Valves, porting, springs, anything else if required.
Slugs look good and clean and the gaskets fresh.
Solid indicators or a fresh rebuild.
Remains to be seen just how well it was done.
They aren't out of the holes yet, soooo...
I see some wear indications on the rocker arms.
Somewhat concerning, whether they can be renewed or replaced I have yet to detwermine.
The bumpstick will be replaced with a shell #1 and new bearings. It doesn't look that bad.
I just have other plans.
Attachments
and.... Heeeeere we go,
The following pics are exactly why I never purchase something as old as these xs650s and just get it going.
Of course the indications were like neon that I would find something in this instance.
Not that it mattered. I bought it knowing my plan beforehand and what would be required.
A best case scenario would have just saved me some time and made my budget easier to digest.
Like getting a refund so to speak. I always plan on worst case scenarios.
Better to have a surprise that makes me happy as opposed to one that pisses me off.
Anyways on with the autopsy:
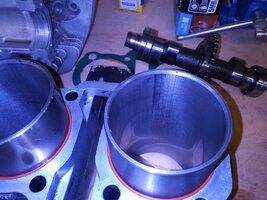
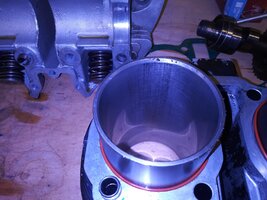
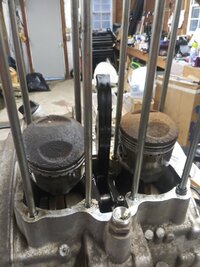
The barrels tell the story, Obvious wear and scratches. Simply appalling for something that
was freshly rebuilt with not even a few hours on said rebuild. Not surprised at all.
The same story just continues on with that oh so sad chain guide. Terrible, but already planned on new.
The small end of the piston rod makes certain it gets into the act as well.
Obvious wear... How someone just throws this stuff together amazes me.
Clearly will need replaced.
Hmmmm.. Long Rod engine???? LOL. nah
So as always it is buyer beware, or BE AWARE.
More to come......
The following pics are exactly why I never purchase something as old as these xs650s and just get it going.
Of course the indications were like neon that I would find something in this instance.
Not that it mattered. I bought it knowing my plan beforehand and what would be required.
A best case scenario would have just saved me some time and made my budget easier to digest.
Like getting a refund so to speak. I always plan on worst case scenarios.
Better to have a surprise that makes me happy as opposed to one that pisses me off.
Anyways on with the autopsy:
The barrels tell the story, Obvious wear and scratches. Simply appalling for something that
was freshly rebuilt with not even a few hours on said rebuild. Not surprised at all.
The same story just continues on with that oh so sad chain guide. Terrible, but already planned on new.
The small end of the piston rod makes certain it gets into the act as well.
Obvious wear... How someone just throws this stuff together amazes me.
Clearly will need replaced.
Hmmmm.. Long Rod engine???? LOL. nah
So as always it is buyer beware, or BE AWARE.
More to come......
Attachments

Splitting the cases...
As a few of you guys already know this isn't always easy.
I already knew it wasn't going to be for me.
Like my main man Albert King said... If wasn't for Bad Luck....
I too must have been born under a bad sign.
However thanks to the incredible membership on my favorite forum,
numerous ways have been shown to approach this issue.
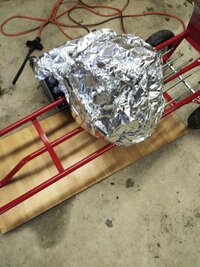
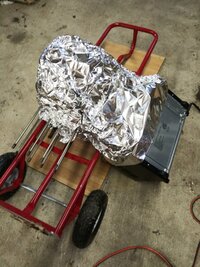
The one that worked for me was what I call "The Easy Bake Oven".
I wish I could tell you whose idea I grabbed so they can receive the credit they deserve,
I could re-research it I suppose but I am out of red bulls so I am hoping you can forgive me.
Anyways... The basic idea is to bake the case until it ready to open.
I used my dolly to hold the case to elevate it off the floor and allow air flow around the complete case.
I used my small toaster oven (used for projects of all kinds, not for food) leaning it against the dolly.
It was placed in such a way that the door was propped open. Then I covered everything in aluminum foil.
Cranked up the heat and set my alarm for 30 min. ( Time and Temp may vary)
The cases parted like the Red Sea. Easy Peasy.
Sooo.. For the (as of this moment) unknown poster that shared his genius... This Bud's for YOU!
Hopefully someone else can benefit as well.
Pics below
As a few of you guys already know this isn't always easy.
I already knew it wasn't going to be for me.
Like my main man Albert King said... If wasn't for Bad Luck....
I too must have been born under a bad sign.
However thanks to the incredible membership on my favorite forum,
numerous ways have been shown to approach this issue.
The one that worked for me was what I call "The Easy Bake Oven".
I wish I could tell you whose idea I grabbed so they can receive the credit they deserve,
I could re-research it I suppose but I am out of red bulls so I am hoping you can forgive me.
Anyways... The basic idea is to bake the case until it ready to open.
I used my dolly to hold the case to elevate it off the floor and allow air flow around the complete case.
I used my small toaster oven (used for projects of all kinds, not for food) leaning it against the dolly.
It was placed in such a way that the door was propped open. Then I covered everything in aluminum foil.
Cranked up the heat and set my alarm for 30 min. ( Time and Temp may vary)
The cases parted like the Red Sea. Easy Peasy.
Sooo.. For the (as of this moment) unknown poster that shared his genius... This Bud's for YOU!
Hopefully someone else can benefit as well.
Pics below
Attachments
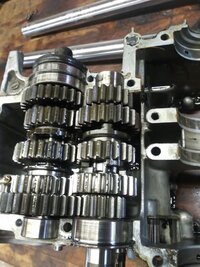
Just a couple more pics from the tear down.
Not really anything glaring. I will be doing deeper dives as I get closer to those sections of the build.
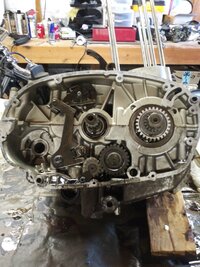
I found nothing obvious in the transmission section. Bearings seem solid and free.
Everything spins and feels pretty good. Obviously that was just a cursory inspection.
Detailed inspection (bearings, gear teeth, shift forks, etc.) will be done later.
Have yet to make up my mind regarding the overdrive 5th gear.
Need more understanding about the undercutting on the upgrade
and would love feedback from the members that have used them.
I will be deep in the tech as well as my notes on the subject.
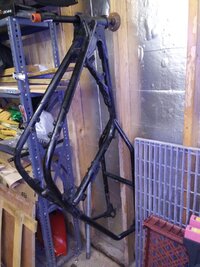
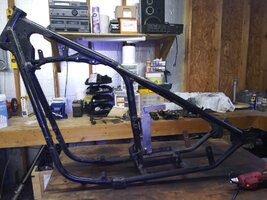
Frame is mostly stripped and I will be cleaning it up some but will have to wait until after mock up,
gussets and tabs added/removed to prep it for powdercoat. Stored for now.
I may (just maybe??) be willing to let the one of a kind arrow go provided the bid goes past the reserve...
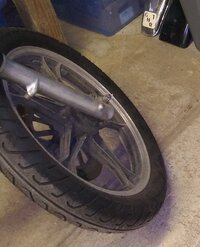
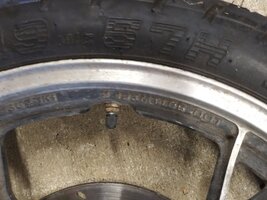
Also a pic of the front rim that came on the air front forks. Stamped Suzuki.
The reason I think they may be Suzuki forks. I've never used air forks so unfamiliar with their performance.
Continued research into these but I am now leaning to rebuilding the 77's 35mm forks with mods.
Hopefully something more interesting coming soon.
Not really anything glaring. I will be doing deeper dives as I get closer to those sections of the build.
I found nothing obvious in the transmission section. Bearings seem solid and free.
Everything spins and feels pretty good. Obviously that was just a cursory inspection.
Detailed inspection (bearings, gear teeth, shift forks, etc.) will be done later.
Have yet to make up my mind regarding the overdrive 5th gear.
Need more understanding about the undercutting on the upgrade
and would love feedback from the members that have used them.
I will be deep in the tech as well as my notes on the subject.
Frame is mostly stripped and I will be cleaning it up some but will have to wait until after mock up,
gussets and tabs added/removed to prep it for powdercoat. Stored for now.
I may (just maybe??) be willing to let the one of a kind arrow go provided the bid goes past the reserve...
Also a pic of the front rim that came on the air front forks. Stamped Suzuki.
The reason I think they may be Suzuki forks. I've never used air forks so unfamiliar with their performance.
Continued research into these but I am now leaning to rebuilding the 77's 35mm forks with mods.
Hopefully something more interesting coming soon.
Attachments
You were worried about the guy that built your engine, what about the guy that welded that hard tail kit on.
Hello Wingedwheel,You were worried about the guy that built your engine, what about the guy that welded that hard tail kit on.
Good question and one that is critical.
I think that most builders either have the skills to properly weld a frame or they know they don't.
If someone from the first group did it, NP.
If someone from second group wanted it done they most likely get a competent welder/fabricator to do it. After all it is THEIR azz riding it. The bike could have been through several hands since the frame was done.
obviously as the frame is a critical element on a motorcycle nothing is asssumed and everything is double and triple checked.
I measured the hardtail for straightness,
and alignment. I did this before purchase. I did it again after stripping the frame. Much more accurate obviously. It is correct. As for the welds themselves; They look solid with decent beads. I will be able to have a better look when I strip all the paint off the frame. There is nothing glaring when inspected to indicate concern. The primary concern for me in regards to the frame is geometry at this point.
Measurements say it is correct.
My eyes say the same.
IF any issues are revealed with the welding itself, They will be corrected. I will be welding on it anyway with the gussets as well as whatever tabs, etc I require during the mock up. All welds will be dressed as well when prepping the frame for powdercoating. Some of the welds on a stock xs650 are atrocious from the factory.
Should there be anything I consider remotely sketchy or beyond my skills, I have a step son that is a master class welder. I am certain he will be over my shoulder anyways as he loves builds. Cars, Trucks, Bikes... but then again...
Who doesn't????
Last edited:
Well I finally got around to tearing down the 1977 engine.
It had some obvious issues from jump when I bought it.
No title; I purchased it for parts.
I will be cleaning, inspecting, and using the best of what I have between the two engines.
This engine had low pressure on one cylinder and no pressure on the other.
Always interesting to see what's inside. Some bad and some surprisingly good.
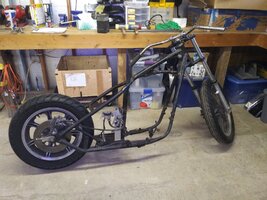
I'm including some pics, the bike was very rough and neglected but the frame is solid,
and the forks are rebuild material. I am thinking I will be using the R6 Forks from my other parts bike though.
Some issues with the motor as you can see but the internals inside the crankcase are extremely clean and look great.
Obviously a very thorough inspection and measurements will have to be completed.
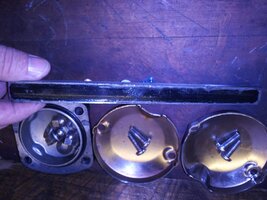
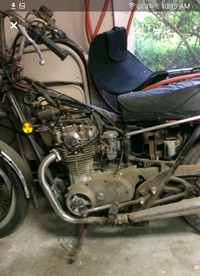
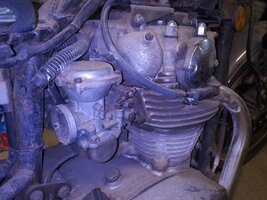
Soooo here are the pics....
1) As I picked it up 2) Left Side Carb 3) Right Side Carb
It had some obvious issues from jump when I bought it.
No title; I purchased it for parts.
I will be cleaning, inspecting, and using the best of what I have between the two engines.
This engine had low pressure on one cylinder and no pressure on the other.
Always interesting to see what's inside. Some bad and some surprisingly good.
I'm including some pics, the bike was very rough and neglected but the frame is solid,
and the forks are rebuild material. I am thinking I will be using the R6 Forks from my other parts bike though.
Some issues with the motor as you can see but the internals inside the crankcase are extremely clean and look great.
Obviously a very thorough inspection and measurements will have to be completed.
Soooo here are the pics....
1) As I picked it up 2) Left Side Carb 3) Right Side Carb
Attachments
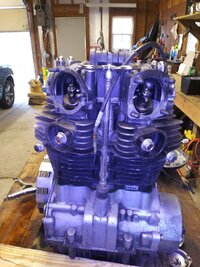
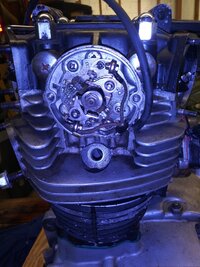
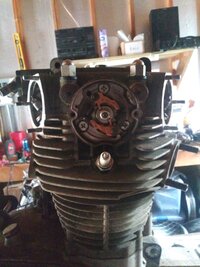
More Pics...
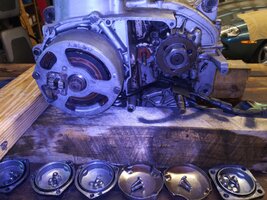
1) Stator looks like it was soaked in water, film all over it.
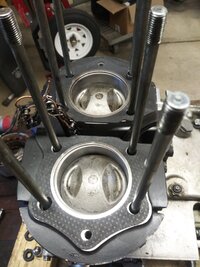
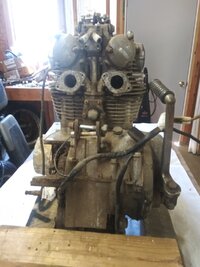
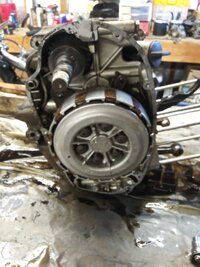
2) Right Side on the Bench with the good old wood block engine stand.
I really need to get around to building me one for the rebuilding phase.
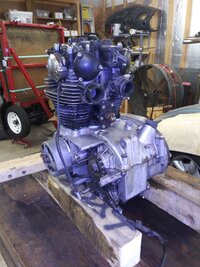
3) Engine from the rear
4) The points
1) Stator looks like it was soaked in water, film all over it.
2) Right Side on the Bench with the good old wood block engine stand.
I really need to get around to building me one for the rebuilding phase.
3) Engine from the rear
4) The points
Attachments

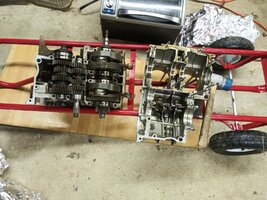
Next Set.....
Nothing special here to see,,, Just documenting.
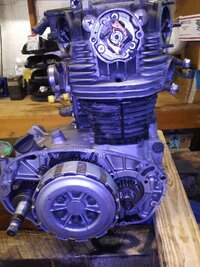
1) Right side clutch basket. Looking nice and clean.
2) After the basket removal. Would not have guessed it to look this nice.
Nothing special here to see,,, Just documenting.
1) Right side clutch basket. Looking nice and clean.
2) After the basket removal. Would not have guessed it to look this nice.
Attachments
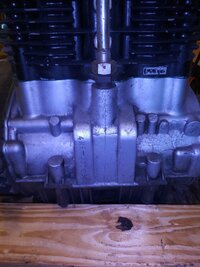
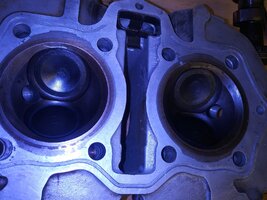
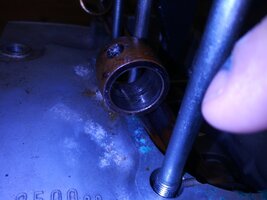
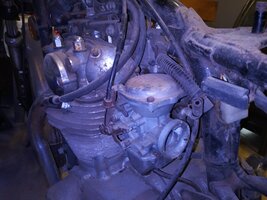
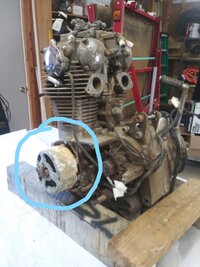
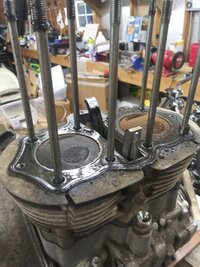
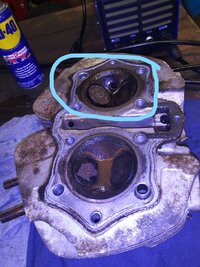
Getting to the pistons and the cylinder head.
The top of the domes look kind of nasty
The cylinder head reveals why the engine had no pressure.
One valve is obviously stuck. No sign of conflict with the piston but will see better once cleaned up.
Perhaps bent, perhaps not. definitely stuck.
Both heads will be rebuilt anyway as well as ported.
Going to be a fun project. I'll be following Jack's D Port with some upgrade in technique.
His thoughts and philosophies mirror my own in regard to lower volume, higher velocity ports.
I believe his documentation has set the standard in the forum as far as reshaping the ports on an xs650.
By tackling some of the parameters of the process that he neglected to include (or perhaps chose not to address);
I am hoping to optimize the heads for maximum performance based on my engine's requirements.
Those processes would include balancing and cc'ing the ports as well as the chambers themselves.
I will be utilizing a flow bench while doing the modifications as opposed to simply having the heads
flow tested after the modifications have already been completed,
Additionally the flow bench will have the added ability to allow me to visually see the air moving as well as measure it.
Jack was on the right track utilizing the age old technique of string movement to detect air currents.
I will be using smoke travelling at specific rpm vacuums and specific lifts to see what the actual effects of any modification will be.
Much like a wind tunnel but obviously not. Most importantly the port shaping will be done initially with clay.
This will allow me to optimize the flow before actually building the port.
From there it is a matter of molding the port and annotating the measurements in order to build it to spec.
I will create baselines for both of the heads once they have been reconditioned prior to modifications.
Other than direct power upgrades such as displacement or intake/exhaust upgrades the head is the place to find the most gains.
In reality all of those systems can be optimized to work together to maximize the intended result.
But for me... I just really love doing this kind of thing.
Since engines are just air pumps... potential gains can be calculated with decent accuracy.
Not a dyno but then again since when did dynos ever become accurate?
It's about the percentage. Boring stuff for some in the forum I am sure.
Going to be a minute before I can dive into that part of this project unfortunately.
But I am very anxious and very excited to get there. Kind of like a kid waiting on Christmas and it's only February.
Attachments
Am I confusing your confidence for arrogance? Different? Don’t be dismissive. I am rarely coming across something new on these builds. Surprise me please. Have you seen fuel injection, reverse head, turbos, etc.? Might as well knock it out of the park.
Good morning @JRay77.
Well I am pretty confident.
Not sure what you are asking by different? These bikes have been around for a long time I doubt there is anything that hasn't been done already. Including fuel injection, reverse head, and turbo.
I just realized where you grabbed "different" from. Didn't catch it at first. I was not implying different than anything that has been done.
Sorry if I gave you that impression.
I outlined the build at the beginning of the post. It's all been done before. I simply meant different in regards to other bikes.
When I said different I was specifically discussing a 2 into 1 intake and the way it is instantly identifiable as being different from most parallel twins. Of course they aren't really that different either. There are thousands in use. Still not a very common sighting.
The things I would say are different on this build besides the intake would be the rephase which gives the bike a syncopated sound as opposed to a sewing machine.
Belt drive. Fork swap. The D ported head. Big barrels. Oil system mods. Ignition.
Some visually noticeable.
Some audibly noticeble.
Some not noticeable until you turn on the power. All of it has been done. Tried and true.
Just a mundane build.
Last edited:
No giant steps yet on the build.
A lot of peripheral things coming together.
The new powdercoat oven is perhaps 40% complete. The R6 parts bike has been stripped.
Still not 100% on using the R6 front forks but leaning that way so far that my pegs are dragging. Want to get a look at the bike with the xs650 mag between the forks. Issues to overcome. I have some slightly longer air assist suzuki gs650gl forks and a set of 1977 xs650 forks I intend to adapt with the Minton Mods.
I had some fantasy based ideas of keeping the r6 rims but the width of the rear wheel is too wide for me to make it practical. Already too many changes in the game plan to add more complications. So I'll be sorting out the front end and coming to a decision soon.
Did manage to get some parts ordered.
Talked a bit with Gary Hoos and he should have a shell #1 for me next week. Of course he will be sending it to Hugh to have it rephased.
Hugh will fit it in when he can and I will get it at some point. I'll need it to flow the heads. The delay really isn't critical as the flow bench isn't built yet although the parts have been gathered.
It will be a bit before that part of the project takes off but the process has been started at least.
Also had quite a long conversation with Mike Morse. I will tell you that he is genuinely a very interesting and intelligent guy. We shared a lot of thoughts and conversations from making power to durability issues. Shared some experiences and discussed some theoretical vs real world.
Discovered that we shared many of the same opinions and talked about the minute kinds of details that many never even consider. I found the conversation extremely informative and he made a few points I had only considered superficially, which has given me cause to do a deeper dive into those areas of thought.
He is clearly experienced and has a true love for Yamaha. He is one of those people that has tried about everything racing wise in modifications for these bikes. Great call. I'm certain I will be talking with him again.
Heiden is unable to ship to the US at this time.
Talking with him he explained that the US customs has been denying his parts entry.
The parts don't make it. He loses money shipping and has to refund the customer. He's not happy about it and neither was I. Another great guy.
He's hopeful that issue can be sorted out in a few weeks. I'll check back with him.
Hoping to start stripping the frame next week.
Some actual work on the motorcycle.
@BluzPlayer you have an interesting drawing board. Now, back to the drawing board!
'TT'
'TT'
A little progress on the build recently.
After lots of time mocking the bike's front end using all three of the fork sets I have available (77 xs650, 83 Suzuki gs650gl, 2000 r6), I have finally come to a decision. I really was leaning to the R6 forks being beefier and newer technology.
Just didn't like the look with a stock mag wheel.
Forks were too wideand were the shortest of the three. The other two are nearly identical size wise but the suzuki forks are longer so they are my first choice. I still intend to Minton mod the set of 77 xs forks and should be able to change to them with minimal effort if I don't like the suzuki forks.
Guess I'll clean up the R6 forks and resale them at some point.
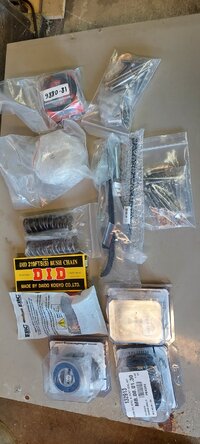
I also managed to order a grab bag of parts I will be needing and most have arrived.
HD Clutch springs
Upgraded clutch bolts
Side engine oil cooler and filter
Front and rear wheel bearings
Upper and lower copper washers
Chrome engine bolt set
Cam chain tensioner arm and stopper
Cam chain
HD Valve spring set
Fork seal and dust cover kit
New gas tank
Waiting on the 277 cam from Hugh via Gary at Hoos. Gary also will be sending a seal kit.
Vesrah gasket set should arrive tomorrow.
Parts I have already accumulated..
750 big bore kit
8 plate clutch upgrade via @gggGary
Joe wiseguy 2 into 1 and vm36 carb
1 piece clutch pushrod via @GLJ
Trytronics and Gonzo ignition parts
Still some parts to grab but getting there.
After lots of time mocking the bike's front end using all three of the fork sets I have available (77 xs650, 83 Suzuki gs650gl, 2000 r6), I have finally come to a decision. I really was leaning to the R6 forks being beefier and newer technology.
Just didn't like the look with a stock mag wheel.
Forks were too wideand were the shortest of the three. The other two are nearly identical size wise but the suzuki forks are longer so they are my first choice. I still intend to Minton mod the set of 77 xs forks and should be able to change to them with minimal effort if I don't like the suzuki forks.
Guess I'll clean up the R6 forks and resale them at some point.
I also managed to order a grab bag of parts I will be needing and most have arrived.
HD Clutch springs
Upgraded clutch bolts
Side engine oil cooler and filter
Front and rear wheel bearings
Upper and lower copper washers
Chrome engine bolt set
Cam chain tensioner arm and stopper
Cam chain
HD Valve spring set
Fork seal and dust cover kit
New gas tank
Waiting on the 277 cam from Hugh via Gary at Hoos. Gary also will be sending a seal kit.
Vesrah gasket set should arrive tomorrow.
Parts I have already accumulated..
750 big bore kit
8 plate clutch upgrade via @gggGary
Joe wiseguy 2 into 1 and vm36 carb
1 piece clutch pushrod via @GLJ
Trytronics and Gonzo ignition parts
Still some parts to grab but getting there.
Attachments
Last edited:
Similar threads
- Replies
- 15
- Views
- 3K
Sold / Found / Inactive -
700cc 277* D-Port engine - Hugh's Handbuilt - complete, crated, ready to party.
- Replies
- 11
- Views
- 2K
- Replies
- 8
- Views
- 2K