What have you done to your XS today?

Fixed a leaking petcock, had to sand down a fibre sealing washer so the barb would end facing inwards, emery paper wrapped around a piece of flat in the vice then rubbing with my finger. Then went shopping for NGK BP7ES brought 4 for spares
Yeah they always tighten up pointing in wrong direction.:thumbsdown:
 
Rode the TX about 150 miles today round trip to the vintage bike show and swap meet in Abbotsford. My two riding buddies had their late '70s Kawis. I didn't see any other XS650s but lots of other interesting bikes, including several side car rigs, Laverda, and too many Harleys to count. First pic is of part of the parking lot, next in the ferry lineup and on the ferry to get home, and a few bikes. We skirted the rain, which was nice. Lots of 40 to 65 mph riding.
20230430_121729.jpg
20230430_151559.jpg
20230430_160747.jpg
20230430_121921.jpg
20230430_132256.jpg
20230430_132325.jpg
 
Yeah, was a good day, rain held off, and a decent turn out. As usual the best part of a swap meet is the show of bikes outside. My son said they a a lot of bikes on the ferry he was working tsawwassen to Swartz bay, Sunday.
 
I've never bothered with balancing on my XS. Never had a problem. It's not like it's going to do 120! 😬🇬🇧
The out-of-balance forces start making themselves felt at 60-ish mph. Below that, all they're doing is slowly wrecking your wheel bearings, loosening spokes (if you have them) and wearing out fork bushes and stanchions.
So, nothing to worry about, really.
 
Nowt, still dry lining the under staircase area……..Sod it.
 
I made up my own polish from a couple of small polishing bars I bought at HF, mixed it with paint thinner and put a nut in the bottle of the bottle to agitate it and get the solids back in suspension after it has set for a while. When I started I had about a half bottle of the mix shown attached. I got the idea of the web when I was looking into aluminum polishing tips. Apply with a small soft cotton cloth and wipe off with cotton or microfiber.

Don't use steel wool. It may look good immediately but your scratching the chrome up and embedding carbon bits from the wool into the chrome so sure to rust again quickly.

Maybe half a bar of this green:

http://www.harborfreight.com/1-4-quarter-lb-green-polish-compound-96778.html

and the same of white:

http://www.harborfreight.com/1-4-quarter-lb-white-polish-compound-96780.html Next time I'm going to mix up green and blue.


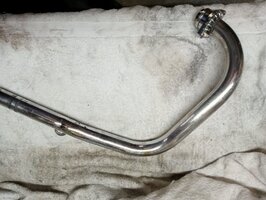
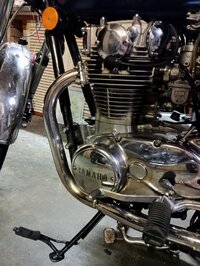
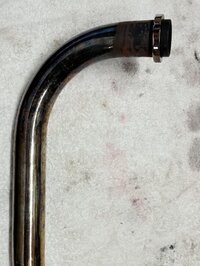
Some before and after Pictures below and it didn't take much time at all to do it! Does it color again, yes but easy to clean. Subsequent times aren't bad at all to keep it looking good.
After installing the swingarm and with the pipes still off I thought I'd try and clean up the exhaust headers, after years of riding in all weather the chrome was badly heat stained and showing some rust and I wasn't expecting too much.
I was surprised how well they cleaned up by using glennpm's recipe though I did use an old worn down green scouring pad to apply the mixture first, then a few more applications using a soft cloth to apply and polish. I found it dries quickly and took some elbow grease to clean up so I didn't give it time to dry just applied and polished.
To make the mixture I ground the compound on a course rasp to get fine granules, poured into a bottle, added about half a cup of thinner and two 10mm ball bearings and give it a shake. I figured by grinding up the compound I wouldn't need to wait overnight for it to dissolve as glennpm noted in his 2015 post.
Followed it up by using Autosol on a cotton cloth to reduce the scratches from the scouring pad and then Silvo on a microfiber cloth to polish.
I tried using just Autosol and Silvo on the second header but ended up using the mixture on a cloth then the two polish's.
 

Attachments

  • IMG20230501172545.jpg
    IMG20230501172545.jpg
    352.5 KB · Views: 55
  • IMG20230501172450.jpg
    IMG20230501172450.jpg
    312.5 KB · Views: 48
  • IMG20230504183049.jpg
    IMG20230504183049.jpg
    324.1 KB · Views: 54
  • IMG20230504180812.jpg
    IMG20230504180812.jpg
    335.7 KB · Views: 53
After installing the swingarm and with the pipes still off I thought I'd try and clean up the exhaust headers, after years of riding in all weather the chrome was badly heat stained and showing some rust and I wasn't expecting too much.
I was surprised how well they cleaned up by using glennpm's recipe though I did use an old worn down green scouring pad to apply the mixture first, then a few more applications using a soft cloth to apply and polish. I found it dries quickly and took some elbow grease to clean up so I didn't give it time to dry just applied and polished.
To make the mixture I ground the compound on a course rasp to get fine granules, poured into a bottle, added about half a cup of thinner and two 10mm ball bearings and give it a shake. I figured by grinding up the compound I wouldn't need to wait overnight for it to dissolve as glennpm noted in his 2015 post.
Followed it up by using Autosol on a cotton cloth to reduce the scratches from the scouring pad and then Silvo on a microfiber cloth to polish.
I tried using just Autosol and Silvo on the second header but ended up using the mixture on a cloth then the two polish's.
Looks great. Can you post a link to @glennpm ’s recipe?
 
Looks great. Can you post a link to @glennpm ’s recipe?
G'day bosco, sorry I don't know how to post a link, it took me a lot of searching before I found it after googling xs650 exhaust header cleaning.
Found it in the garage titled, How have you cleaned your original headers . Posted by SinisterMatti, June 23/ 2015.
Post 14 is by glennpm.
Recipe is easy, he used half each of the green and white 1/4 lb bars and a small amount of thinner, recommending it be a liquid and not a paste.
I used half the bars and 1/2 cup thinner and it wasn't in the least bit thick, probably could have used less thinner, just be aware it takes some elbow grease to remove any residue .
Glennpm said he did it with light rubbing, mine were in a bad state and I did multiple applications with lots of rubbing but well worth the effort.
Yet to see how it goes after some engine running as I've been too busy to put it back together but I'll post an update once I've had it running.
 

Attachments

  • IMG20230504180759.jpg
    IMG20230504180759.jpg
    358.4 KB · Views: 41
  • IMG20230501172513.jpg
    IMG20230501172513.jpg
    343.6 KB · Views: 38
Back
Top