XS 850 Re Model

Signal

XS650 Guru
Messages
1,564
Reaction score
5,010
Points
513
Location
New Zealand
XS 850 Rehash.

My holiday plans were disrupted by weather, so I have been in the shed working. I thought some of you might be interested in a project that has been ongoing for a while. So with the unplanned extra time I have decided to launch in to print.

Some time ago I got hold of an XS850. It was basically complete but in pretty bad condition.

With the bike came another 850 Engine in pieces and a XS 750 also in pieces , but most importantly a set of Japanese market GX750 wire wheels.

The wheels were rusted beyond redemption, and I made the costly mistake of having them professionally rebuilt. They look great but the cost is still giving me heart burn.

This has been a back burner project and over time my plans have changed from a full blown café racer with clip on’s to a more sedate 80,s period style (sort of but not strictly period) sport bike. In my mind I see a 80s race bike replica, although I don’t remember anyone successfully campaigning one of these here.

Realistically its going to be a sheep in wolfs clothing. So, with that slightly confused sense of direction here are some of the main things I have been doing over the last few years.

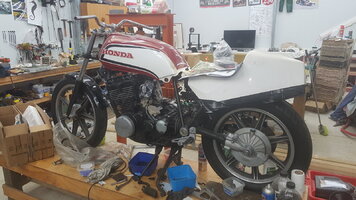
I bought a single race seat that is for an XS and a Honda CB900f tank. I also have sourced a GPZ 750 rectangular headlight and a GPZ style bikini fairing.
The seat needs some work as it does not look quite right, I am going to try making the rear a bit wider and less tapered.
20221006_850.jpg


CB tank and XS 650 race seat .
Going away from the round headlight was an easy decision as I felt the original one was huge and would not look out of place on the front of an old Bentley tourer.

I needed to make new fork clamps and ears. The ears could do with some go faster holes in them, but I am holding off in case I need to mount something.

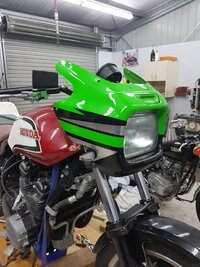
Mounting the bikini fairing was a learning experience as in the past I have fitted them to a bike that had a headlight mounted so mounted the headlight first. Then after fitting the fairing it would not adjust to look right and match up to the headlight.

So starting again mounted the fairing got it looking mostly right then worked out where the light needed to be.
20230214_215131.jpg
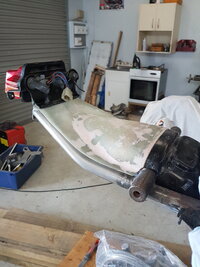
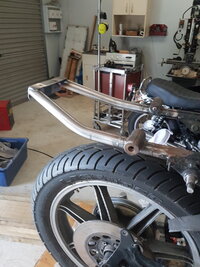
I have cut off the XS rear subframe just aft of the shock mounts and made up a new sub frame with a bracket to mount a GPZ 250 tail light.
20230208_102612.jpg

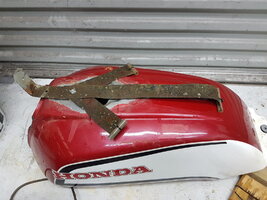
The tank was a bit tricky to fit and required a lot of hammer work to get it on. I have also changed the filler to an aircraft style one, relocated the fuel tap and added an external breather. The front tank mounts on the frame needed altering. The tank internally was a bit rusty and needed a long electrolysis session to clean it up, it is sealed up with ½ a litre of diesel in it for now. The fuel tap has been converted from vacuum to manual operation. The filler conversion is not the prettiest but with some body filler will come up well.
20210629_112023.jpg
Sort of a ship in a bottle anode. The outer arms of the anode are held by a bolt and can be opened out once through the filler hole, plastic tubing on the ends helps ensure it does not short out.

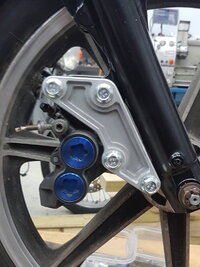
I have upgraded the brake callipers to R1 blue spots and replaced the front discs with floating 320mm ones , the rear disc is a standard XS one cleaned up and drilled. It needed to be spaced off to suit the new calliper. I also needed to make another torque arm to suit the R1 calliper hanger that only needed the axel hole enlarged.
20230214_215215.jpg

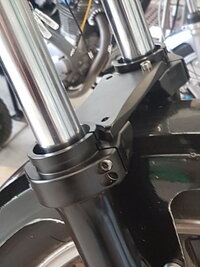
It now has a fibreglass front guard (a copy of a GPZ one) made by a mate as a thank you for some lathe work I did for him. Pleased with the un-sprung weight reduction, I then added weight in the form of a fork brace. The brace still needs some work tiding it up after some over enthusiastic drilling.
20230130_132848.jpg20230109_210900.jpg20230109_203328.jpg
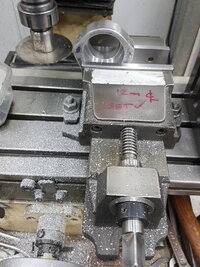
And some photos of making it. I have ordered some new dust seals.

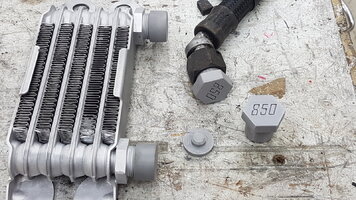
The oil cooler was removed, and bead blasted and I re zinced the front oil tubes I needed to block off the oil ways on the cooler and found the 3D printer very handy for making some disposable bungs, I also had a play in adding text to a print.
20220326_184614.jpg
 
Continued
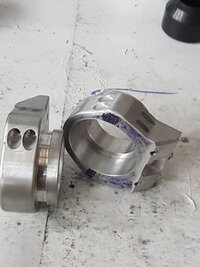
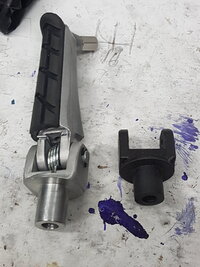
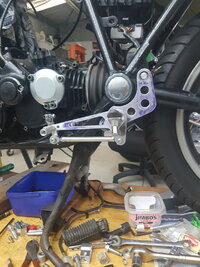
At present I am working on the foot pegs a sort of mild rear set or mid set. I bought folding foot pegs for a modern sport bike and then designed, and 3D printed a prototype peg hanger. I just about have the left side done then need to think about the other.
20230214_204818.jpg20230214_143246.jpg
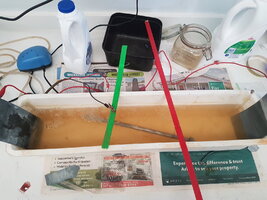
On the stock bike the foot pegs are held in place by a bottom engine mount through bolt, it needed to be shortened. It has a rolled thread so I cut the bolt to length and welded a nut on the end. Bead blasted it and put it in the zinc plating bath. Its drying now so will clean it up tomorrow. I have run out of brightener so just leave parts in a bit longer and polish then with 0000 steel wool. It is a lot more time consuming.

20230214_123701.jpg
In case you are having trouble the green and red are plastic strips I grabbed to support the axel, the bubbles are from an aquarium bubbler to agitate the solution break up bubbles forming on the work surface.

I also want to modify very slightly the rear swing arm to allow a wider rear tire to fit. I do not wish to do a chain drive conversion.

I have most of the expensive bits now just need brake lines, pads and tyres. This is a road bike so the lines will need to be standards approved. I was a bit disappointed in that they don’t make Pirelli phantoms to fit the rims I have. This would have suited the 80’s style I am hoping to achieve as every man and his dog had them on their bike back then.

I have also splashed out on a readymade 3 into 1 rather than a home-made one and a nice set of carbs with velocity stacks, sock air filters, new rear shocks and a dual speedo rev counter.

The work continues.
 
XS 850 Rehash.

My holiday plans were disrupted by weather, so I have been in the shed working. I thought some of you might be interested in a project that has been ongoing for a while. So with the unplanned extra time I have decided to launch in to print.

Some time ago I got hold of an XS850. It was basically complete but in pretty bad condition.

With the bike came another 850 Engine in pieces and a XS 750 also in pieces , but most importantly a set of Japanese market GX750 wire wheels.

The wheels were rusted beyond redemption, and I made the costly mistake of having them professionally rebuilt. They look great but the cost is still giving me heart burn.

This has been a back burner project and over time my plans have changed from a full blown café racer with clip on’s to a more sedate 80,s period style (sort of but not strictly period) sport bike. In my mind I see a 80s race bike replica, although I don’t remember anyone successfully campaigning one of these here.

Realistically its going to be a sheep in wolfs clothing. So, with that slightly confused sense of direction here are some of the main things I have been doing over the last few years.

I bought a single race seat that is for an XS and a Honda CB900f tank. I also have sourced a GPZ 750 rectangular headlight and a GPZ style bikini fairing.
The seat needs some work as it does not look quite right, I am going to try making the rear a bit wider and less tapered.

View attachment 235588


CB tank and XS 650 race seat .
Going away from the round headlight was an easy decision as I felt the original one was huge and would not look out of place on the front of an old Bentley tourer.

I needed to make new fork clamps and ears. The ears could do with some go faster holes in them, but I am holding off in case I need to mount something.

Mounting the bikini fairing was a learning experience as in the past I have fitted them to a bike that had a headlight mounted so mounted the headlight first. Then after fitting the fairing it would not adjust to look right and match up to the headlight.

So starting again mounted the fairing got it looking mostly right then worked out where the light needed to be.

View attachment 235599
I have cut off the XS rear subframe just aft of the shock mounts and made up a new sub frame with a bracket to mount a GPZ 250 tail light.
View attachment 235600

The tank was a bit tricky to fit and required a lot of hammer work to get it on. I have also changed the filler to an aircraft style one, relocated the fuel tap and added an external breather. The front tank mounts on the frame needed altering. The tank internally was a bit rusty and needed a long electrolysis session to clean it up, it is sealed up with ½ a litre of diesel in it for now. The fuel tap has been converted from vacuum to manual operation. The filler conversion is not the prettiest but with some body filler will come up well.
View attachment 235601
Sort of a ship in a bottle anode. The outer arms of the anode are held by a bolt and can be opened out once through the filler hole, plastic tubing on the ends helps ensure it does not short out.

I have upgraded the brake callipers to R1 blue spots and replaced the front discs with floating 320mm ones , the rear disc is a standard XS one cleaned up and drilled. It needed to be spaced off to suit the new calliper. I also needed to make another torque arm to suit the R1 calliper hanger that only needed the axel hole enlarged.
View attachment 235602

It now has a fibreglass front guard (a copy of a GPZ one) made by a mate as a thank you for some lathe work I did for him. Pleased with the un-sprung weight reduction, I then added weight in the form of a fork brace. The brace still needs some work tiding it up after some over enthusiastic drilling.
View attachment 235603View attachment 235604View attachment 235605
And some photos of making it. I have ordered some new dust seals.

The oil cooler was removed, and bead blasted and I re zinced the front oil tubes I needed to block off the oil ways on the cooler and found the 3D printer very handy for making some disposable bungs, I also had a play in adding text to a print.
View attachment 235606
Hi, those plates for the brakes look good.... did you make those?
Gr Camiel
 
Skull thank you I have not seen that. Apart from flat slides and a 3 into 1 I have no plans to hot it up unless I need to remove the head.
Then I will see what can be done to the ports and maybe try to make some indexing cam sprockets to adjust the stock cams . The aim being more mid range than top end.

CWM yes and thank you I try and make as many parts myself as practical, I bought a 3 into 1 because of the time it would take me to make them and no mater how I try it would not look as good as a stainless Delkevic.

Kiwi no plans for a sidecar,unfortunately that outfit was in a nasty start line incident last weekend at Pukekohe (the last classic meeting at that track before it closes) the rider was unhurt but the passenger had a night in hospital.
The rider also owns a XS750 triple based race bike I have no plans to go that way either.
Adamc Progress will be slowing down on this project shortly but will post pictures.
 
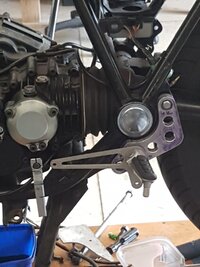
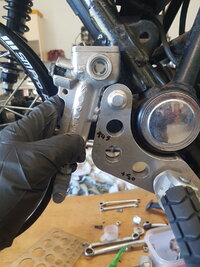
Today was a mixed day had a win in that the frame lugs for the stock rear foot peg and exhaust mounts are symmetrical, so plate for the left can be reversed and used as a template yah winning!

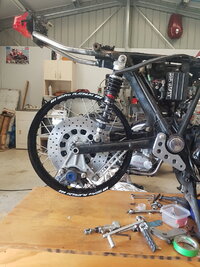
I put the rear wheel in with the R1 calliper to work out a position for the rear master cylinder.

It was so long ago that I fitted the calliper that it took a while to work out the order of the spacers. The stock R1 bracket has removable steel bushes / spacers that the axel runs through. I cant remember what I did to get the XS axel to fit. It’s a bit fiddly to get the wheel in I hope I don’t need to take the wheel out on the side of the road someday.
20230217_143058.jpg

I want to use a master cylinder with an integral reservoir but if I use the foot peg mount as the pivot the lever ratio will be wrong. Looking at photos of an R1 it looks like the pivot to clevis centre is about 30mm.
20230217_162149.jpg

To use the master, I want I will need to alter the bracket and make a pivot for the lever in the correct place then make a lever that curves under the peg mount. So, there is a bit more head scratching and cut up cardboard to go yet.

As I write this, I remembered I have forgotten about the muffler support that should come off the foot peg hanger as well. I need to put the exhaust on and have another think but that’s a job for tomorrow.
 
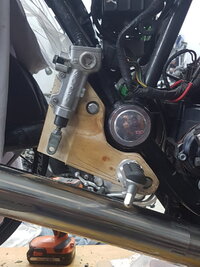
After fitting the exhaust I made a wood mock up of the foot peg hanger. I also decided on a spot for the rear master cylinder. I think I may have a problem if I use the foot peg as the pivot for the lever as the ratio of the lever will a lot closer to 1:1 than a lot of the rear brake set ups I have been looking at.

I may need to move the lever pivot and make a curved lever either under or over the foot peg mount, probably over like a GSXR.

I will make a plywood lever using the foot peg as the pivot and see how the lever ratio works out.
20230313_185646.jpg
It still very much a work in progress the most obvious change needed being making the lower edge of the bracket parallel to the exhaust.

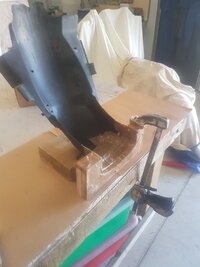
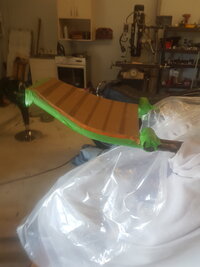
After all that I felt like a change so I started work on the rear inner guard. Using Polyester resin and a mixture of chopped strand and woven cloth I first made a piece join to the inner stock guard and a flat section to sit on the rear frame rails.
20230311_092455.jpg20230311_092423.jpg
I am not bothering to do the job by making a plug instead I am just going for the good enough lay it straight up method.
To people who do fibreglass it will be obvious that I am bumbling my way through this but I get there in the end.

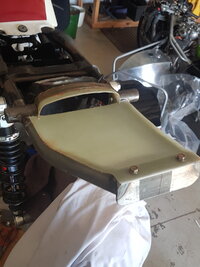
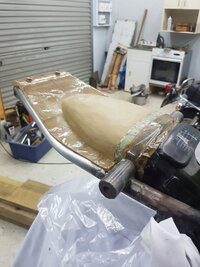
After a clean up I fitted the parts on the bike and started to model the hump. Experimenting as I go I tried florist block to do the initial shaping then finished it off with potters clay. I am surprised how much I enjoyed shaping and smoothing the clay I now have an insight into why pottery is so popular.

20230311_183708.jpg20230313_185551.jpg
I then coated the clay with watered down PVA glue. The intention of the glue is not to act as a release agent but more to seal the moisture in the clay. I then hot glued some conduit wire around the perimeter of the hump to act as a dam for the resin.

This is an experiment and may end in tears but hopefully it will go ok.
20230313_195146.jpg
The next stage is to lay up the hump, then cut the flat section out and join the three parts together.
On Saturday the new dust seals for the forks arrived from the UK . The shipping was a bit slow as the Royal Post international system had been hacked.
 
The under seat guard is finished for now needs some high build primer and more sanding.
20230330_105907.jpg

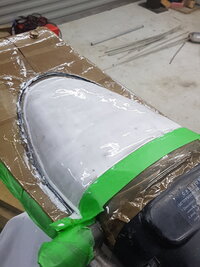
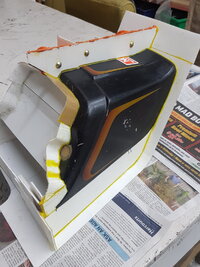
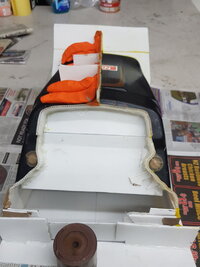
Spurred on by this I borrowed a KZ1000 tail piece to make a mould for the seat tail unit I have in mind. This tail shape to me is one of the quintessential forms of superbike /production racing in the 70’s and 80’s.

Moving away from the usual quick and dirty way of making body parts I have opted to make proper split mould. This is all new territory to me and it is probably overkill for a simple piece such as this.

Anyway armed with core flute, hot melt glue, plasticine and fillet wax here is where it is. It needed to be a bit deeper in the side to cover the new frame rails hence the extension.
20230401_155711.jpg20230401_155741.jpg

The tail piece although battle scarred need to go back to its owner no worse for wear so I am
being cautious and intend to try the wax and PVA release on the tank first before I coat the plug with gel coat. I have to work tomorrow so will puts some gelcoat on the tank and see how it comes off tomorrow night.
20230401_162657.jpg

With regard to the rear brake master cylinder I have decided to move the foot pegs back so that the lever ratio is correct. It is easy to do on the gear change side as well all that is needed is a longer rod between the levers.
I make need to get some handle bars with more pull back and have my eye on some Renthal low rise superbike ones.
 
Back
Top