XS1 Motor Disassembly Help

Dinner200

XS650 Member
Messages
22
Reaction score
26
Points
13
Location
Fort Collins, Colorado
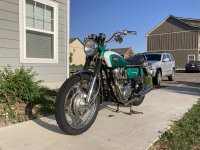
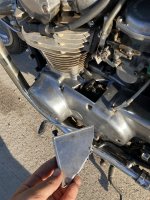
Hi everyone! This is my first post. I have an early 3/1970 XS1 that unfortunately the chain broke on and snapped the little cover over the forward sprocket off the upper crank. I love this bike almost as much as I love my girlfriend, I was devastated. I found an aircraft crankcase repair place that will weld up and straighten the busted piece so apart the motor goes. I’m really nervous as I’ve never taken a motor apart so before I do I’d like some pointers. Ive seen a few YouTube videos and I’m used to mechanical work so I’m sure I can figure it out with a little help. I’ve got the motor out and on the workbench, I’ve started taking the points and advance unit covers off but the screws that hold the plates on are stuck. I put a little WD40 on the screws to see if that will loosen them. Upon reassembly I’ll install new gaskets. That being said, how do I go from assembled motor to split case and just the upper in my hand ready to send in for repair the right way? I don’t want to do anymore damage or have to tear the motor apart again once I get the case fixed and the bike running again. Anything helps!
 
You need an impact wrench for those screws and several others you will run into. Either hand or the newer better battery impact drivers work extremely well. Hand impact tools are typically about $10.
Not in front of me but think those screw heads are JIS3, #3 phillips will work also. The hand impacts include that bit
 
Welcome to the forum saw your pics on FB maybe post them here also?

Sure thing! This bike is drop dead gorgeous, in my opinion one of the best looking bikes ever produced. I’ll stop by harbor freight after work and see if I can pick up an impact wrench. Little update: I wanted to see if the head acorn nuts were easy to get off and they all came off no problem. Where can I find the torque specs for when I reassemble the motor?
 

Attachments

  • 9CA4BC0E-EDB9-471C-A201-DFCDC64789A2.jpeg
    9CA4BC0E-EDB9-471C-A201-DFCDC64789A2.jpeg
    268.3 KB · Views: 206
Beautiful looking bike. How long have you owned it? Got a photo of the damage?
Yeah I got it right here. Again I’m completely devastated with the damage. Bike still runs fine but has a gaping hole in the crankcase so I’m getting this fixed right
 

Attachments

  • B9E0DC0F-CCD6-4B1E-A89C-1400085DB98D.jpeg
    B9E0DC0F-CCD6-4B1E-A89C-1400085DB98D.jpeg
    244.2 KB · Views: 208
Yeah I got it right here. Again I’m completely devastated with the damage. Bike still runs fine but has a gaping hole in the crankcase so I’m getting this fixed right

Yup! That’s just about what I was imagining. A thrown chain will do that every time. Fortunately it’ll be an easy welding repair and it’s not a part that provides structural strength to the case. That’s too bad, but it could’ve been worse. Good luck with your repair.
 
Yup! That’s just about what I was imagining. A thrown chain will do that every time. Fortunately it’ll be an easy welding repair and it’s not a part that provides structural strength to the case. That’s too bad, but it could’ve been worse. Good luck with your repair.
Thank you for your kind words, it’s been hard for me to face it. I’m bound and determined to get it back together. Off topic but do you know how to get the screws off from behind the advance and points plates off? Other than that I should be able to get it apart without too much trouble.
 
Yeah I got it right here. Again I’m completely devastated with the damage. Bike still runs fine but has a gaping hole in the crankcase so I’m getting this fixed right
That will be fixed good as new, and you'll be far more familiar with your bike as a result. (I wish I could see my own silver linings that clearly.)
 
do you know how to get the screws off from behind the advance and points plates off?

You’re talking about these three big Phillips screws? If so I like using a cordless drill with a Phillips head bit. It kinda hammers like an impact wrench. Usually the first hit spins them right out. There might be some thread lock on them that made them stuck. You can also use a hand held ( hit it with a hammer type ) impact wrench on it to bust them loose.
62600C5F-270D-4265-ADA4-9F88B1C82D3E.jpeg
 
You’re talking about these three big Phillips screws? If so I like using a cordless drill with a Phillips head bit. It kinda hammers like an impact wrench. Usually the first hit spins them right out. There might be some thread lock on them that made them stuck. You can also use a hand held ( hit it with a hammer type ) impact wrench on it to bust them loose.
View attachment 194095
Yep that’s them, that’s the problem. I’ll try with a drill and a fat Phillips bit. My goal is to have the jugs off today and the case out to the welder by the fourth. Fingers crossed
 
Is the possibility to weld it without disassembly investigated ?
It is a fairly flat surface and rags for protection -- wet perhaps ...can be placed inside if the side cover is removed and
On the outside against the cylinder and so .
On the inside root support ( not sure it that is the correct English word )
can be placed making the welding simpler. Even clamping it a bit. is possible
I have not welded TIG on aluminum but for other methods I would not rule the welding in place impossible.

Sticking my nose out I think I could do it and there are much better welders than myself out there
It has the advantage not warping as much as if on the table in parts.
Again TIG I have not done .But I have welded other methods And as a first assumption I would at least ask around for the top Notch people on this and Air industry have them. Showing that picture and a couple more --- listen what they say.
If that goes wrong there is the possibility to dissemble .. Again we are not talking the farmhand Cowboy trying to weld
But a experienced senior professional.
 
Back
Top