What have you done to your XS today?

I reset the points gaps and ignition timing statically this morning. On the top set of points, the opening is just at the left side of the F mark with the points plate rotated fully anti clockwise against it's screw. So it's slightly too advanced. Mildly concerning but OK for now, picture below showing what I mean.

The bottom set of points are timed spot on the centre of the F mark.

Once I have the bike running I'll have to verify the timing. But if the top points set needs retarding, it's presently not possible.

1000001795.jpg
 
TAFFY GETS A WASH!

Today I actually paid the vehivle licencing tax on The Brat (GS1200) which was £64 for the season.
For Taffy (XS650) I still have to notify the DVLA about the bike being used on the road, but no payment is required as Taffy is registered as an historic vehicle.
What this means is we are now all legal and can go riding on the roads of Blighty.

Some of you may know I have a new 'lock-up' Workshop for the bikes. I do not have any water or electrical power at the site which is awkward.
Power is not too much of an issue with battery powered tools (Petrol generator comming soon). Fresh Water issues have been solved with the purchase of two 25Ltr containers from a camping outlet. For washing the bikes I use a two bucket system (one for suds & one for rinsing). Thats OK but getting to the detailed inaccessible areas is a pain; so I bought a KARCHER OC3 Foldable battery power washer. I aint tried it on the bike yet; but a home test of the unit was good. See below for details. £149 for the unit; but on offer direct from Karcher for £99.00 with three year warranty.

 
Last edited:
20240503_180301.jpg
Thanks to Jim's Thorough Step By Step -
Big Help in Completing the Top End

I bought a failed '77 project that had a motor rebuilt up to joining the cam chain and I took over from there.
20240425_144415.jpg
Only Needs a Few Items

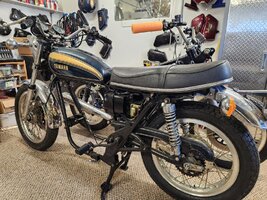
PO did a nice job bringing back this matching numbers (FWIW) standard.
I put the top of the head on today and torqued it, now need to assemble the clutch, install the starter, etc. I thought of putting it in the frame as is because it would be lighter, but installing the motor with the bike on its side is not so bad.
 
I finally finally FINALLY got the new clutch cable to replace the one that I tore the ferule off of. It took a week to travel 11 miles. Sad.
However, I already installed it tonight and adjusted it. After lubing it, of course.
The clutch lever pull is definitely still very heavy I am hoping it's just the routing (as per my search here) and not an internal clutch problem. I will post an update later this weekend.

The 11/16" drill bit also arrived today which allowed me to drill out he insides of the Chinese split handlebars that were woefully undersized. Then I could finally install the bar-end mirrors so that she would be legal for the upcoming state safety inspection.

I also had to adjust he idle stop screws a little because the RPM were too low at cold idle and the engine wouldn't keep running, choke or no choke. So she idles now around 1,000 RPM. Not that big of a deal.
 
I hadn't adjusted the cam chain since the top end rebuild but it was getting noisy so when I got home from work I let it cool down for an hour or so then started it up and adjusted it by hand.
The plunger was recessed about 8-10 mm, no wonder it was getting noisy! , been running great though.
Haven't done the valve clearances yet, need time to let it get cold between rides.
 
That reminds me, I gotta do valve adjustments on mine too.
Plus the MM/FSM calls for valve carbon cleaning every 2,000mi. LOL The bike has over 30k. When it gets hot this summer, I'll pull her into the shop, turn on the A/C, pull the motor out of the frame and do some good mx on it. Frame needs some cleaning and painting, so does the engine (it has overspray on it. SMF

In the meantime, I re-routed the clutch cable this morning, cleaned and lubed the throw dog and the clutch pull is more bearable now. (thanks to all the good information on this forum and a functioning search feature) Still not happy with how tight the clutch is but it is much better than it was before. And I need to make a spacer because the new clutch lever has much lower distance from the adjustment screw to the ferule, about a centimeter less. Sucks. Can't take up that much slack with the dog or lever screw adjustment. Need to make a custom spacer but I need a lathe for that. Which, coincidentally, I might have found on Craigslist. Might go get it next week.

And since she is complete (enough), I waited for a break in the showers and took her for a test ride. Ops check good. Gonna take her for a state safety inspection first dry day next week.
All-in-all, she's in roadworthy shape but nowhere near done. I want her to be a show bike and she is a far cry from that right now. So I'll take time this hot summer and make her pretty. Gonna be a productive summer!
 
Not had much time for the bike the last couple of days. Ground down a 10mm open spanner to hold the start motor terminal while I removed the terminal nut. New rubber boot fitted to the cable. Looks like I need a small cable tie on the boot. Not an immediate issue as the bike will never see water. I'll put one on next time I'm working on it though.

Next job is fit the chain, check I've done everything required in there and reinstall the left side engine cover. :)

1000001799.jpg
 
20240505_164551.jpg
Finished Off the Bottom
20240505_112338.jpg
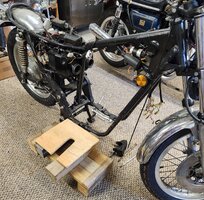
Jury-Rigged a Platform
20240505_181651.jpg
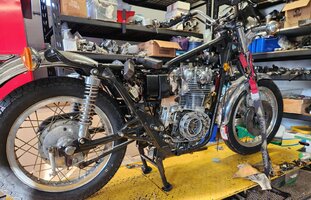
Presto! Engine in and Up on the Lift

The "bodywork" on this project came to me pretty well all assembled, so I was reluctant to lay it on its side to put the engine in.
I fashioned some cribbing to hold the engine while I wrestled it into place and was amazed at how quick and sorta easy it went in. All the mount bolts in and up on the lift.
 
View attachment 325056
Finished Off the Bottom
View attachment 325058
Jury-Rigged a Platform
View attachment 325059
Presto! Engine in and Up on the Lift

The "bodywork" on this project came to me pretty well all assembled, so I was reluctant to lay it on its side to put the engine in.
I fashioned some cribbing to hold the engine while I wrestled it into place and was amazed at how quick and sorta easy it went in. All the mount bolts in and up on the lift.
I really appreciate the pic of the undercarriage. I know where my starter is now.
 
Since “riding” weather has barely descended upon us, the only bike I’ve been riding is the Shadow. The weather was nice today so I took the XS out for its first run of the year. The bike ran well but I was quickly reminded of the bike’s character. Stiff shifting, elusive neutral, vibration from the engine. It’s for all these reasons and more I enjoy owning and riding this bike so much. When I sell the Shadow I’ll be sure to get lots of seat time in this season.
 
Lou_TX, you don't need a lathe to make up a spacer for the clutch cable, you can make one by cutting the end off an old clutch cable elbow ......

CableSpacer.jpg


ElbowCut2.jpg


ElbowCut.jpg


83CableSpacer.jpg


Then simply slip it on the cable above the existing elbow ......

CableSpacer2.jpg


I've been using these for several years now on both my 650s because I run Kawasaki clutch levers and perches. They have the same issue you've encountered - the distance is less between the adjuster and where the cable hooks into the lever .....

PerchCompare.jpg
 
A productive morning today. A couple of warm and dry days at last certainly helps.

New battery arrived and installed but not connected just yet. Camshaft timing checked and OK, that's in another thread. Left side engine cover installed and clutch adjusted. As suggested here some where, the cross head screws in the carburettor rubbers clamps replaced with allen head screws, far easier to get them nice and tight. Chain fitted and tensioned. Footbrake pedal, kickstarter and gear change lever all refitted. Will soon be ready now to switch on the ignition switch and see if the wiring bursts into flames or not. Hopefully it won't and I can start testing the electrics. Fingers crossed on that one.
 
Last edited:
20240508_181039.jpg
The Galt Bike
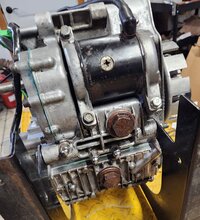
Today, I arranged all the parts to assemble the right side and got a head start on tomorrow by squeezing the spring on the starter gear and installing it.
Tomorrow I wrestle with the kick start spring.
 
I blasted and prepped to rebuild the front master cylinder but having a hell of a time finding the right rebuild kit for the round style front master… not having to worry about stopping is nice
 

Attachments

  • image.jpg
    image.jpg
    199.3 KB · Views: 18
  • IMG_8838.jpeg
    IMG_8838.jpeg
    1 MB · Views: 18
  • IMG_8835.jpeg
    IMG_8835.jpeg
    644.4 KB · Views: 19
  • IMG_8836.jpeg
    IMG_8836.jpeg
    640.4 KB · Views: 17
Back
Top