Tayno's TX650A

Tayno

XS650 Enthusiast
Messages
44
Reaction score
0
Points
6
Location
Brisbane, Australia
Im new to the forum, thought I would post up a 'build' to keep track of what Im doing, get some help, and get invloved.

Picked up the bike recently after looking around for about 6 months. Its a 74 TX650A. The goal is a 'bratstyle' type rig which I can ride daily. I have a pretty keen eye for design, so here's hoping it doesnt turn into a big bag of dicks.

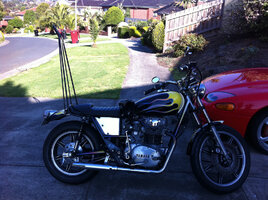
Was running (poorly) when I looked at it and took about 15 kicks to start, but that was good enough for me for the price I payed. Got it home and below is what it looked like straight off the trailer

IMG_0394.jpg


Everything seems pretty much stock except for the ugly loungechair seat, the luggage rack and the 2-into-1 pipes.

IMG_0396.jpg


IMG_0398.jpg


First plan of action was to check/replace fluids and check/clean connections to see if it would run a little better. Also, piss off that 'king & queen' seat and replace the handlebars with some flatter ones.

Going backwards already, I took off the luggage rack and snapped the upper suspension bolt (rusted and worn from the rack) when I was tightening it back up. Awesome start. Hence only 1 rear shock on.

I also found that it was running pod filters in place of the standard airbox. It seems to be running rich so I assume it hasn't be re-jetted to suit the pipes and filters.

IMG_0405.jpg


Picked up a honda c90 seat from the wrecker which I am going to modify to sit super flat.

IMG_0409.jpg


IMG_0410.jpg


Got some 'superbike' bars from MikesXS along with a range of filters which my local yamaha couldnt get (they hadnt heard of an XS650 let alone a TX).

IMG_0454.jpg


So at the moment I am pulling off all the bits I dont want, which is as much as possible. The wiring was a bit of a mess, so Ive been removing un-needed wiring and trying to clean up what is currently there. Ill be cutting off a heap of unwanted tabs and brackets soon too.

Im no specialist fabricator or welder, so dont expect to see anything fancy in this thread. Instead my dad is teaching me to weld, and my housemate is showing me how to use a mutlimeter. The rest will be swearing, grinding and some rattle can paint.

I have lots of questions already, so ill post them up very soon. Thanks for looking!
 
Ok, thought I finished up with the wiring tidy, installed some new plugs and tried to start it. No dice. Battery is a new 12V 9amp job and everything seems to be wired as before (when running) and/or correctly. Pulled the plugs after 20 or so attempts at kicking and they look like below, thoughts?

IMG_0449.jpg


Left is black, right still looks as new.

Ive also noticed that fuel is spitting out of the carbs when I kick it over. Im planning on pulling down the carbs and going through them, but wondering if I should keep troubleshooting the electrics just incase I have missed something.

As it sits currently...

IMG_0458.jpg
 
Pull the carbs clean em use the guide don't short cut.
I like the inline spark testers they catch spark problems a plug outside the cylinder won't show.
 
make sure points/coils are wired in right, switched points wires make it real easy to be 180 out on timing, but yes look like carbs need help first, those air filter aren't helping either, looks like they are very dirty
 
Looks good.
Just bought a Xs650 myself, although mine has a chair attached.
just a quick question, what is the brand of the seat you removed. Looks pretty comfortable.

Did you ride at all with it on, if so what was it like.

I have a 1962 Rigid Triumph Chopper and a 2OO7 Triumph bonneville that is set up with rearsets etc so the xs is going to be setup a bit more comfortable for her Indoors. I wont be starting on the resto for a while but Like the look of a king /queen seat.

I will be restoring to original spec's but may be looking for a touring seat as well.

What Part of Brissie you in. I have family in Aspley and down south in Carinya ?.

hoping to bring one of the bikes next time and head up into Maleny and Glasshouse areas.

Do you have the manual?

I may be able to help if you don't just PM me.

Ride Safe
Nigel.
 
Now that I think about it Im sure I ran it on thos plugs for 5 or so mins one night. Not sure if that effects how they are coloured?

Pull the carbs clean em use the guide don't short cut.
Yea Ill get the guide and go through them carefully. Should I pull all the jets out to see what settings/numbers they are? or just leave them as they are currently set?
make sure points/coils are wired in right, switched points wires make it real easy to be 180 out on timing, but yes look like carbs need help first, those air filter aren't helping either, looks like they are very dirty
I have already cleaned the filters there :( they are clean, just discoloured, but maybe I should just invest in a new pair?
just a quick question, what is the brand of the seat you removed. Looks pretty comfortable.

Did you ride at all with it on, if so what was it like.

Do you have the manual?
Im not sure of the seat brand Nigel, but I can look at it more carefully and see if its marked if you like?

I did the test ride with it on, and it was actually super comfortable, as you would expext from looking at it. But its just not the style im going for, as Im sure you can understand.

I just got a Haynes manual for it, and ive downloaded a few wiring diagrams which I have been using to go off. Ill use the carb guide and the haynes to go through the carbs and a few other things then try kicking her over again.

I might sent you a few PM's from time to time Nigel, thanks.

I was planning on putting the seat, bars, rack etc on ebay and selling them off. So if you interested just give me a PM and we can work something out.
 
" Should I pull all the jets out to see what settings/numbers they are?"

Yes that is a required part of a carb overhaul. On BS38s many of the critical circuits are in the float bowls so pay close attention to them. The emulsion tubes need to come out too, make sure the mixing holes in the emulsion tubes are clean. Looks like a gem in the rough, keep us in the loop as you go along?
 
Yes that is a required part of a carb overhaul. On BS38s many of the critical circuits are in the float bowls so pay close attention to them. The emulsion tubes need to come out too, make sure the mixing holes in the emulsion tubes are clean. Looks like a gem in the rough, keep us in the loop as you go along?
Ok, Ill make sure I get everything out, cleaned and photo'd. Im hoping between my manual and the carb guide I should be able to get it done properly.

It is a bit rough looking currently, but Im hoping to tidy it up alot. It came off a farm, the old guy was using it to trundle down to the shops every now and then, so its got fine dust and dirt everywhere. Ill clean it up, go through as many parts as I can, and keep everyone updated as I go along!
 
CARB TIME! Ok, another massive post. I like photos so here we go.
BS38's from 74 TX650A for reference.

First question, when they were on the bike, because the airbox is gone and im running pod filters, the carbs are simply 'hanging' off the engine with only the carb boots supporting their weight. Is this how other people with pod filters have them? It looks as though they were drooping down to the left side (cylinder with the black plug), would this droop effect their operation?

So I got the carbs off, crummy looking things.
IMG_0478.jpg


Stupid me left my carb guide and service manual at home (bike is in my old boys shed), so I decided to only pull one carb down, have a look around and clean it up, then check over it properly next time with my guides handy.

I noticed that only the left carb had an enricher/choke system, is this correct? And it seems that I may be missing some kind of 'handle' off the end of the enricher shaft, as Im pointing to in the pic below
IMG_0476.jpg


Opened up to find brass floats which dont seem to have any fuel inside them or and visible holes/cracks
IMG_0483.jpg


The needle jet is marked as a Z-6 but Im unsure of how to determine if it is a 'short' or 'long' version. Carb guide specifies needing a Z-6 short for the TX. The o-ring on the needle jet is slightly mis-shaped too, so Ill probably have to replace that too
IMG_0492.jpg


Jet needle, slide and diaphragm look ok? Needle clip is on the 4th slot from the top as per spec.
IMG_0486.jpg


Not having the carb guide handy I forgot to check the pilot jet to see if it was correct, and I missed the number on the main jet :doh: so Ill have to double check that again when it comes apart again.

Gave it a bit of a clean and put it back together so I wouldnt forget what goes where. Here is the left (clean) sitting next to the right (still untouched).
IMG_0498.jpg


Thoughts?
 
What did you use to clean the carbs and what method?

Did you use cleaner on any of the rubber parts as it can be detrimental.

By the way, now I know what a TX is supposed to look like!

Sissy_0979.jpg
Lele_0985.jpg


The fuel spraying out the carbs when kicking 10+ times may be due to flooding??
 

Attachments

  • Sissy_0979.jpg
    Sissy_0979.jpg
    811.5 KB · Views: 2
What did you use to clean the carbs and what method?

Did you use cleaner on any of the rubber parts as it can be detrimental.

By the way, now I know what a TX is supposed to look like!

The fuel spraying out the carbs when kicking 10+ times may be due to flooding??

I just used fuel and a toothbrush to clean them, I didnt have any carb cleaner around. I also tried to keep the fuel off the rubber parts, but assumed it wouldnt hurt them too much considering they are on a carb.

The fuel out the carbs might have been from flooding. The float in this carb was at 25mm, and the carb guide says 24mm +/-1mm for a TX so Im assuming that is ok.

Not sure if the drooping/sagging of the carbs off the engine would have affected that level but. Im not really keen on them just hanging there, so Im going to look into a may to brace them somehow.

Nice bike Aussie, burnt look on the frame is a nice touch.
 
You can see on my bike I have the same filters. They are only held on by the boots & hose clamp. No bracket/brace and they don't droop.

Can we get bits for these carbs to rebuild locally, do you know?
 
yes your missing the lever on the choke. and yes its only on the left side, the lower horizontal connecting tube is a crossover. if you got the cash check out JBMindustries. im running uni pods on a hardtail no support without any problems, his diaphragms are nice too.
 
You can see on my bike I have the same filters. They are only held on by the boots & hose clamp. No bracket/brace and they don't droop.

Can we get bits for these carbs to rebuild locally, do you know?
Im not aware if we can get carb parts local, I havent looked into it yet to be honest. Will post if I come across anything Aussie.

yes your missing the lever on the choke. and yes its only on the left side, the lower horizontal connecting tube is a crossover. if you got the cash check out JBMindustries. im running uni pods on a hardtail no support without any problems, his diaphragms are nice too.
Ok so Ill check the mounting of the carbs and see if they will sit level when I pop them back in. Will save having to fab something else to support them. Ill check out JBM too, thanks.
 
Ah thanks for the link Jayel! As it sits the choke wont 'stay on', you have to hold it on, which is mildly annoying. So I guess Ill have to shell out for that part. Its probably cheaper then Id find locally anyway
 
Carb time version 2! Got back into the carbs, this time with my carb guide and haynes manual handy.

I found that both main jets were 127's, and both pilot jets were 45's. So Ill have to rejet in future as I have pod filters and a blown out muffler.

I pulled down the already 'clean' left side carb to re-inspect and find out the main jet size. Noticed the diaphram had a small split in it :mad: Can you buy just the rubber part to replace? Mikes wants $76 for the whole diaphram, dammit! Is this split small enough to ignore? Im assuming not...

IMG_0503.jpg


Pulled down the right carb and cleaned it up also

IMG_0506.jpg


Noticed the right side also had a split in the diaphram... Awesome. So now Im looking at $152 for a pair of these from Mikes, unless I choose to ignore it (which will prob bite me on the ass later), or can get just the rubbers from another source?

IMG_0504.jpg


ALSO, Can someone please confirm for me here, the photo below is of the left carb with the choke. When I compared this carb to my right carb (no choke), I noticed I was missing this brass tube, circled in red. Is this fine because the right carb has no choke? Im assuming the tube circled below is the 'starter jet' for the choke system.

IMG_0509_2.jpg


Thanks for everyone's input so far!!!! :thumbsup:
 
Back
Top