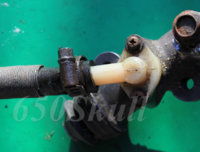
Rear Master Cylinder Trouble

David Toll

Reliving my youth?
Top Contributor
Messages
587
Reaction score
1,778
Points
143
Location
Gold Coast Australia
Afternoon People
Cleaned and rebuilt my rear brake master cylinder. Thing came up looking a treat. Approached the cycle in anticipation of a simple installation and a beer or two to celebrate. Forgot I still had my readers on, tripped over a milk crate and dropped the bloody thing with the resulting damage. Apparently, that plastic part is included in the "Master cylinder assembly", not listed separately by Yamaha. The wreckers I talk to are barely interested when I explain what I need and would, understandably, prefer to sell me the whole cylinder assembly which I don't need. Have searched suppliers from the UK to Japan with no luck. I can buy the whole thing new from Mikes for around $110 AUD, (not including shipping) or I can buy a weather beaten one on eBay for around $40 - $60 AUD (again not including shipping). These prices seem exorbitant for so small a piece. Thought about supergluing the broken bit back on but, it is my rear brake and I'd like to see another Xmas. Can anyone point me in the direction of an American wrecker who might carry insignificant but essential parts of this sort. Alternatively, if you have one attached to a non-functioning cylinder and would care to part with the plastic bit, (a "nipple" I believe it is called), I will send you enough for postage and a six pack of your favourite beer, it would have to be cheaper than buying and shipping a replacement from the rest of the world IMG_0479.jpg .
Cheers
 
Hi David,
that plastic elbow can be fixed real easy as long as you still have both parts.
I'd shove a suitably sized thin walled metal tube into both parts and slather the joint with 5-minute epoxy,
it'll be stronger after it's fixed than it was before.
And you don't need the lecture about not leaving stuff about to trip over, right?
 
Hello Fred
Got the picture on that.
Would the reduction in internal diameter have a detrimental effect on the fluid flow within the brake line causing decreased brake performance or perhaps requiring the need for a heavier foot on the pedal?
And, yes, the lecture doesn't hurt as much as the inconvenience and disappointment. At least I wasn't carrying a chainsaw.
Regards
 
David ! that is why I have 2 pare of readers ! I leave one in the shop and one in here so I don't brake a leg , step on a cat or Kick the dog on the way back in here....which I have been known to do !!!!! Freds idea is a great one ! that's what I'd do ! repair the old one!
use a strong piece of tubing (stainless steel if ya can ) or at worse copper tubing.... but something to keep the epoxy from oozing inside
at the joint..... clean it with a drill bit (by hand) when it's dry and give it a good test before you assemble it.... if it snaps off again then perhaps its already weakended by the UV rays and you may have to bite the bullet and replace it ! arn't plastic parts FUN !?!?!?! Aurgh !
hang in there !
....p.s. I don't think the reduced diameter will show ANY reduction at all to be honnest.
Bob..........
 
I like the sound of the repair technique Bob but I am concerned about constricting the tube diameter with a sleeve and causing reduced braking performance. I have found another XS specialist here on the Coast so I will try him. Unfortunately he only operates on weekends (?) so I will have to wallow in my regret until then. At least I can brush up on my bartering skills. I refuse to pay more than 25 bucks for that little piece of plastic. If I'm still walking and driving in a month I'll confess to stubbornness and frugality overcoming common sense.
As for my eyesight and workshop tidiness well, they are obviously both in need of attention. I had failed cataract surgery on my left eye a year or so ago and my vision there is somewhat blurred. Makes left side traffic a challenge and is the reason why I like to stay in the left lane on the highway, (we are right hand drive here). Anyway, the journey continues. Remember, that one "small step" we were talking about a thread or two ago? That was one step forward, this is one step back, means everything is maintaining par. Thanks for your interest.
Cheers
 
LOL one step forward one step back..... who cares at our age at least it's MOVEMENT !!!!!! HAHAHAHAHA !
I seriously Doubt there can be a reduction in the Pressure applied . volume perhaps but the volume is small in these things.
all I can sujest it try it,.... and test your brakes good. and if they act strangely chuck them and get new ones !
I have glued brake parts together before with allot of reservations... but the results were great.... as far as I know they are still working !
sure it's better if you can replace the part... but that's not alwayse an option.
throughout my life I have had to make do.... fix everything that broke or do without as a normal corse of action ...so I am callised on repairs I repair anything that brakes very few things do I ever buy as replacement parts..... to give you an idea,.... the mainjet adjustment screw in the bottom of the 8hp B&S engine i have on the roto-tiller stripped out and was leaking bad.... I made a new one
and threaded the jet needle into it..... I thought I had it whooped but discovered the jet needle screw is stripped as well... ( I may have used the wrong tap !) anyway I can't make that..... so I'll have to buy that $12.00 part on line and it urks me to no end !!!!!!
I might try wrapping the jet needle in teflon tape next though,... maybe I can get it tight enough to hold so I can get the engine to run ! LOL:umm:
I discovered this the other day I got the engine rinning... but it was running real rich... i screwed in the needle screw and it cleared out and then it Poped down under the spring's tension !!!!! Aurgh !
oh well,.... best plans of mice and men ! :banghead:
.....
Bob........
 
Dave if you get the right size tubing, you might be able to withdraw the tubing as the epoxy sets....

Surface prep the smooth outside, use West systems (ATL composites) boat building epoxy with some microfiber blend (403 microfibre)....5:1 ratio resin / hardener

Mick
 
but, but Why ???? leave it in there so it don't snap off again ! LOL
....hehehehehe what ever ! as long as it stops ya !
Bob...........
 
Hello Fred
Got the picture on that.
Would the reduction in internal diameter have a detrimental effect on the fluid flow within the brake line causing decreased brake performance or perhaps requiring the need for a heavier foot on the pedal?
And, yes, the lecture doesn't hurt as much as the inconvenience and disappointment. At least I wasn't carrying a chainsaw.
Regards

Hi David,
the busted elbow is part of the brake's fluid make-up system and so long as there's enough flow
(and there shouldn't be ANY flow in normal circumstances)
to make up fluid loss the elbow's reduced internal diameter CANNOT affect the brake performance.
So no, leave the tube in there to strengthen the repair.
And good about not carrying a chainsaw. You don't want to re-name yourself as Ol' Stumpy Dave.
 
What is the function of the broken plastic part? I think someone said it's a nipple, is that where the fluid enters from the reservoir?
 
As Fred just stated... yes it is....
so there is no worries Dave just Epoxy the @$#&!# out of it and do a pit of cleanup and your done !
easy pezy ! LOL
..... Thanks Fred !
Bob..........
 
Yes Joe, it is where the tube from the reservoir enters the cylinder. Ok Fred, I'll find some tubing of the correct diameter, preferably thin walled, slide it in place, slide the broken piece over and epoxy it in place and trim the tube to length. See how I go though I imagine the hardest part will be finding that tube. Thanks for all your support folks and Bob, not so much chuckling at my expense!
Regards
 
It's the rear brake so i guess, for me, it is not as important as the front if there is a failure. The right glue is paramount and the joint has to be properly cleaned for proper adhesion.

Bad place for the brake, some suggestions. That part is quite thick i would be looking at making a couple of light groves on either side and finding some small stainless, or good clean steel pins and place them as splints. That area is no where near where the hose clamps on, so a rough up of the surface before applying the glue, also means you can build up around that area as well.

On the tube inside i would not try to remove it before the glue hardens, to much of a risk the join will separate. ..........Turn the tube at regular intervals keeping an eye on the glue as it sets.

Some pics of a spare i have................worse comes to worse............give me a hoy. It may be a spare i will never use.......
IMG_5534.jpg IMG_5538.jpg IMG_5539.jpg
 
Last edited:
Thanks Skull. I'll have a go at the repair this weekend. I have never had a lot of success gluing plastic in an area that is liable to come under some pressure and stress. Hitting the picks when a little old lady in a wheel chair rolls out onto a zebra crossing and drawing a blank from the rear anchors is not my idea of a fun outing. I will examine the splint idea. The positioning of the break brings the curve of the ball end into play and may cause drama but I will certainly give it a go. If it doesn't work I'll get back to you on your spare though I hate to deprive a man of a perfectly good working part so that I can use a small section of it and remember, I know how hard these things are to come by. Appreciated.
Cheers
 
HA ! Dave I'm NOT laughing AT you... I'm laughing With you ! getting Old is rediculas ! I remember when I could cut wood all day long and hardly brake a sweat Now just bringing a bag of wood pellets tires me out ! ....it's Not fair !!! LOL
and stumbling around because you didn't take off the reading glasses is something I do all the time... still not used to them and keep trying to focus... it don't work !!!!! no doubt I need REAL glasses but they cost Money so I'ed rather get liscnses on the bike than glasses ! LOL
there's priorities and then there are PRIORITIES don't ya know !!!!
Try looking through a rack of the Hobby metals at the hardware stores, they usually have tubes of verious sizes...take your broken nipple with ya and see if ya can find a good fit ! ...that's what I'd do.... you know you don't have anything laying around that will fit that tiny hole.... that's just how things work ! ... LOL
good luck !
glue that puppy together and you'll be good to go !
C ya !
Bob........
 
No problems mate! As I have said, I appreciate your humour and I'm sure we are both aging as gracefully as possible. Agree with you about the glasses and the hardware hobby section. I'll fix the bugger or know the reason why!
Cheers
 
Good for you ! Sick'em David ! leave no stone unturned ! you can do it ! HAHAHAH!
Bob........
 
My apologies Skull, should have kept this one going. Kind of gone backburner as I am still looking for a tube to fit into the original passage - one that doesn't restrict the diameter by too much. Have tried Bunnings, Auto 1, Supa Cheap and a Hobby store that specialized in model aeroplanes, (thought that was a chance) to no avail. Am considering hitting up a couple of car wreckers on the week-end and having a look at the aluminium brake and fuel injection lines they may have still attached under the bonnet. I have a gentleman by the name of Peter Mercer going through his buckets of XS spares and calling me back on Thursday. He is my best hope as I really don't trust the idea of repair, (regardless of Fred and Bob's enthusiasm and confidence in my abilities). Peter is a former Pommy champion motorcycle rider and a great XS enthusiast. Thought his business was closed down but found that he had relocated to his suburban home in Robina and was playing things low key. Lovely fellow who thought he had a buggered master cylinder laying around somewhere and might be able to locate the part.
Will let you know either way. Thanks for your interest Skull.
 
Last edited:
Back
Top