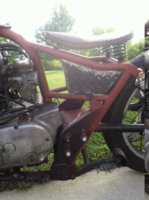
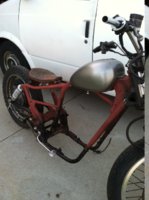
Bought this 76 xs a year ago and finally a month or so ago I got around to making something out of it.
It had been laid down, barely ran. It was a rear wreck. I got a peanut tank mid mount and a seat done by Birdman seats. I did not document much during this. Ive got alot to do yet but its been fun.
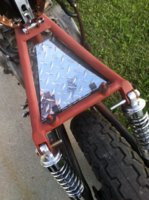
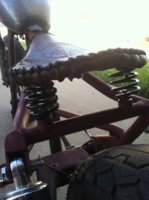
I bent up some seat rails rather than buy them, I had the tube and I figured why not give it a try.
Cut off the original and welded mine in. Added mounts for the rear of the seat and made my own for the front. Its going to hinge so I can get to the electronics. And I also put springs under the seat. I know no one else does this if they have shocks why put springs under the seat. Well I want a better ride been there done that.
Last night I mounted the gas tank, I had to make some spacers to bring the tank up a quarter inch to clear my upper engine mounts. Drilled and tapped holes for 1/4 20 bolts.
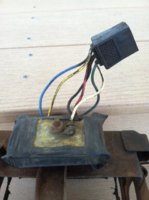
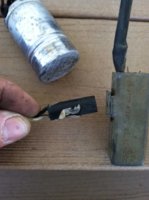
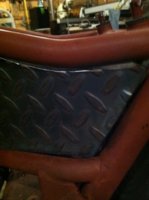
Tonight I made the electronics box. I been dreading this. did not really know what I wanted. Got some
14gage steel diamond plate and some 16 gage aluminium plate. I have not welded much aluminium so that was not going to work. Its pretty though. Any way I do not know how much room to make for the electronics but I built it big enough Im sure I made it to mount under the seat like everyone else. I shaped it so it follows the coutures of the back bone and seat rails. Its not finished I still need to make a top for it. I have a plan and hope to get it done tomorrow. And I also have to weld mounts on the frame to bolt it to.
It had been laid down, barely ran. It was a rear wreck. I got a peanut tank mid mount and a seat done by Birdman seats. I did not document much during this. Ive got alot to do yet but its been fun.
I bent up some seat rails rather than buy them, I had the tube and I figured why not give it a try.
Cut off the original and welded mine in. Added mounts for the rear of the seat and made my own for the front. Its going to hinge so I can get to the electronics. And I also put springs under the seat. I know no one else does this if they have shocks why put springs under the seat. Well I want a better ride been there done that.
Last night I mounted the gas tank, I had to make some spacers to bring the tank up a quarter inch to clear my upper engine mounts. Drilled and tapped holes for 1/4 20 bolts.
Tonight I made the electronics box. I been dreading this. did not really know what I wanted. Got some
14gage steel diamond plate and some 16 gage aluminium plate. I have not welded much aluminium so that was not going to work. Its pretty though. Any way I do not know how much room to make for the electronics but I built it big enough Im sure I made it to mount under the seat like everyone else. I shaped it so it follows the coutures of the back bone and seat rails. Its not finished I still need to make a top for it. I have a plan and hope to get it done tomorrow. And I also have to weld mounts on the frame to bolt it to.
Attachments
Last edited: