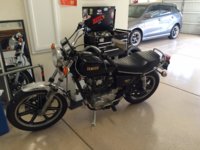
A cafe for the ages

pnedac

XS650 Addict
Messages
154
Reaction score
1
Points
18
Location
Elk Grove, CA
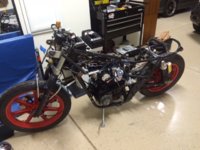
Finally getting around to doing a cafe that I intend to keep. I have done a few other XS650s, but now that I am more familiar with the bike it is time to just make one for me self.

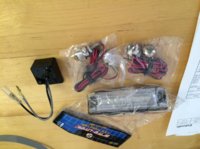
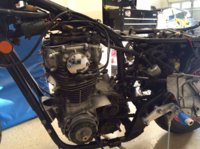
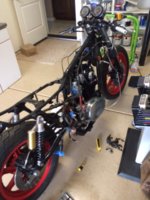
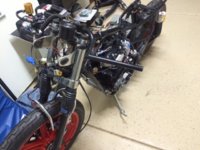
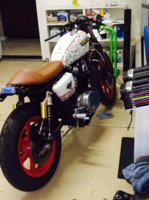
I will try and keep track. I got this bike about a month ago and I am tearing it down and rebuilding. So far I have done all the suspension and swing arm/neck/forks work.

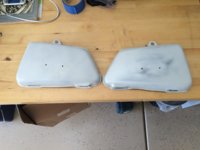
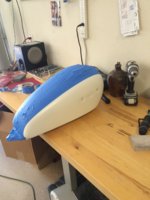
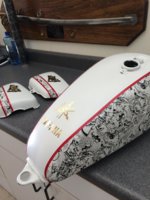
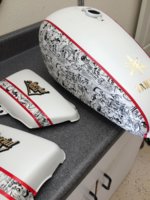
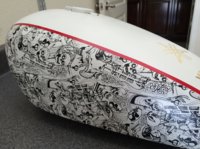
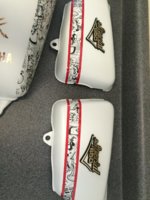
Now I've got a chance to work on the paint so here is the journey. Thought I'd so something a little different. It was the standard black and it was in good shape, but for the rust in the tank. I figured I would get this ready for clear coat this weekend.

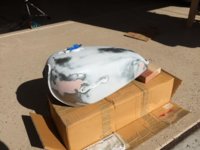
Lots of sanding, bondo, primer, sand, you know the drill.

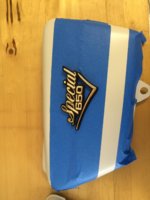
I will keep up as the build comes along.
 

Attachments

  • 2015-03-17 17.06.58.jpg
    2015-03-17 17.06.58.jpg
    215.3 KB · Views: 345
Here is the before/During of the paint prep. There we're a few big dings I discovered after stripping the tank and covers. Took a couple days to get it ready. I decided to use hydrographic printing a little bit to make these have a little bit of a different look. Anyway here is the before and during.
 

Attachments

  • 2015-05-01 16.40.49.jpg
    2015-05-01 16.40.49.jpg
    145.6 KB · Views: 304
  • 2015-05-01 16.41.03.jpg
    2015-05-01 16.41.03.jpg
    203.9 KB · Views: 272
  • 2015-05-02 13.30.26.jpg
    2015-05-02 13.30.26.jpg
    157.4 KB · Views: 280
  • 2015-05-02 14.37.28.jpg
    2015-05-02 14.37.28.jpg
    159 KB · Views: 268
Here is the final look as far as my part is concerned. I will take it to my friend's place tomorrow as he is a painter and can do the clear coat nicely. I think it will look killer when it is all back together. I was on the fence about going with the red pin striping (instead of black) on the tank and covers, but the wheels are the only thing on this build that will be red so something has to compliment them. I think it was the right move. For me anyway.

Cheers!

Pnedac
 

Attachments

  • 2015-05-03 17.33.38.jpg
    2015-05-03 17.33.38.jpg
    233.2 KB · Views: 295
  • 2015-05-03 17.32.45.jpg
    2015-05-03 17.32.45.jpg
    285.5 KB · Views: 298
  • 2015-05-03 17.33.56.jpg
    2015-05-03 17.33.56.jpg
    306.8 KB · Views: 412
  • 2015-05-03 15.53.53.jpg
    2015-05-03 15.53.53.jpg
    266.1 KB · Views: 298
I think the red was the way to go. makes the edge of the hydro into the plain nice contrast. The side covers, maybe a thinner line? anyways, killer.
 
I had a chance to get some more work done on this bike. I got the body work off to clear coat and that should be done by Saturday so that is pretty exciting!

In the meantime I received an order that I'd been waiting for so now I can work on the engine and carbs more. I replaced the stator with a Sparx setup ( I am well aware that there are much cheaper options, but I have used these and other less expensive PMA setups and the Sparx is the best and most reliable for me).

Now I need to figure out how to tie in the new REG/REC while removing the regulator, rectifier, safety relay, and reserve lighting components. I hate to even think it, but as always I see a complete rewire in my near future. I also found a new speedo that I had planned to use for a bike I made for a neighbor, but we went a different direction and now I can contemplate using this to clean up the front end, but we will see. That nearly ensures I will be digging deep on the wiring.

Fortunately the PO (to my utter astonishment) left the original wiring totally complete and intact. I can't say I have ever seen that before.

I have the wiring diagram of course, but the new REG/REC has less wires total than all the other pieces. I can just see myself redoing it all. Oh well. Gets you nice and intimate with the bike :thumbsup:

Here is a picture of the LED brake light and the LED turn signals that I am planning on using. Small little guys, but super bright.

The other picture is just of the left side now that I am diving into it.
 

Attachments

  • XS650 Light setup.jpg
    XS650 Light setup.jpg
    118.2 KB · Views: 323
  • XS650 left side regrec issue.jpg
    XS650 left side regrec issue.jpg
    153.5 KB · Views: 322
So I started to install the new ignition (Boyer) and found a very unpleasant surprise. the RH spark plug was jammed into the head all sorts of sideways! So what can be done? I got it out but I see that the original owner must've cross threaded it and just kept going. I don't think the bike could ever have been running if the sparkplug wasn't sraight in would it?

So I picked up a reverse tap tool and I will be trying that first because it does look like the last few threads in the bottom are okay so I will give this a try before pulling the head.

Bikes are always full of surprises I tell ya.

On a good note I got the tins back from getting a nice clear coat and they look killer. Now if I can just manage to get this spark plug issue corrected I might be able to move forward again.

We shall see this evening!

Hi pnedac,
it would have run that way, not perfectly but it would have run so long as the skewed plug still kinda sealed.
I hope the reverse tap salvage works for you but perhaps you could Helicoil the plug thread by turning the motor to the valve overlap position and hooking up a shop vac to the exhaust port to suck the debris out?
And the switch to LEDs will mean the stock flasher won't work the LED turn signals, did you get an LED-compatable flasher?
 
Hi fredintoon,

I would have thought that the plug would be extremely dangerous as it might shoot out, but who knows? I will give it a shot and make a god of it. I did indeed get an LED compatible flasher, but I notice the new flasher relay has two wires and the original one has three. I always get confused by extra/fewer wires. The new unit is the little black box in that picture. Suppposed to work like a charm, but that'll be determined well after sorting these current issues.

Wish me luck!
 
Yeah, the stock flasher's 3rd connection works the self-canceller.
A 2-pin replacement plugs in the stock 3-pin socket 2 ways; one works, tother don't.
your little black box has 2 bullet ends which I suppose gives 6 connection options? You'll need to experiment to find the one that works.
 
Very good to know fredintoon. I will fiddle with it and I think in the end I willl end up making other bullet connections or the spade type. I've collected an array of electrical bits over time so it shouldn't be too much trouble. Definitely appreciate the heads up!
 
Welp, the good news is that I was able to get the spark plug issue handled with little trouble. I just slowly worked the back tap and greased/regreased a few times and soon I was able to get the spark plug in nice and straight. I would say that while it did go in straight (the goal) I did have to use the socket so I am wondering if when a person gets into this situation if the threads will maybe never be quite the same as they were before. Ideally you would be able to hand spin the plug all the way, but in this case it only hand spun into the hole about 2/3rds of the way and then I gently used the socket. I guess time will tell.

Also, I ended up getting a new set of VM34 Mikuni carbs and I got them mounted up last night (pictures to follow). The original carbs were in need of everything to include diaphrams so I made the decision to get new ones since it was about $100 more than I would have spent in parts and I had success with the 34s in the past on a different XS.
 
I do have a wiring question though. I am going to use a SPARX and a combined REG/REC and I know that using that setup will allow you to remove the regulator and the rectifier and the safety relay, but then what do you do with all the extra wiring? These new parts only have 5 to the 14 that those other components have combined. I can definitely see a complete rewire coming my way.

I might just have to find peace knowing that it IS going to be the right thing to do at the end of the day given the age and condition of bike. The connectors so far haven't just come apart, they've disintegrated lol. Crumbled. Oh brother here we go again.
 
Well, I knew it was going to happen. I tore the whole wiring harness apart. Of course it revealed a whole mess of stuff that has been messed with over the years so I am glad I did.

Maybe it is just the way I stay organized or something, but unless I can see what needs to happen it will be a mystery.

I was reading this article: http://www.bikeexif.com/motorcycle-wiring and just thought the right thing to do was start fresh.

I will order up a few spools of wire and a connector kit from Vintage Connections.

We'll have to wait for that stuff to get here and in the meantime we're going to (attempt) climb Mt. Shasta. I will throw in a picture of that adventure just for fun.

Here we go!
 

Attachments

  • XS Wiring2.JPG
    XS Wiring2.JPG
    125.1 KB · Views: 306
  • XS Wiring.JPG
    XS Wiring.JPG
    63.1 KB · Views: 262
  • XS Wiring1.JPG
    XS Wiring1.JPG
    132.3 KB · Views: 270
Got back from the climb of Mount Shasta and that was a blast. Since then I see that the electrical supplies I'd been waiting for have arrived. I guess that means it is time to buckle down and start getting this nee harness thought out and put together. Here we go!
 

Attachments

  • Electrical Day one XS650.JPG
    Electrical Day one XS650.JPG
    120.6 KB · Views: 249
You'll be fine. just do one circuit at a time. I had to totally rewire my bike 3 times before it stopped looking like a rats nest! I bought 20' of 3 conductor cord, the stuff that is used for grinders and skill saws, etc. 10 feet of 4 conductor. looks nice and tidy. each wire thru the cord is double insulated, and at the ends, I stretched over the smallest heat shrink I could get on there and sealed it up. Use good connectors, and solder.
 
Right on Angus67. The good news is that this is not my first rodeo, but of course I am no pro. It always works like a charm when I am finished, but there is a lot of staring and head scratching in thew process. I think that is the natural flow for me.

The biggest thing for me is that I not try to manipulate the original harness into being what I need it to be. 1) It is older than I am and should probably be replaced any way and 2) I am just not good at visualizing how to get rid of pieces of circuits and keep the rest of it working properly. Not to mention that the final product in that scenario will look like hell. Seems like it is a lot easier to just start from scratch, circuit by circuit. Slow is smooth; smooth is fast.
 
You will be happier knowing that it is all new wires wires without mouse chews, corroded crimps. The hard part for me was the lay out. This wire runs down here from the bars, back to the flasher, back to the turn box, back to the signals. Every time it ran, it just looked like spaghetti. Once I had it nice enuf, I realized I forgot my neutral feed. I have a random blue wire , and I'm ok with that. Got to know when it's good enuf
 
Spent a little time trying to reason wight he original harness, but there is little point other than to have the original diagram on hand for reference. I started making my new harness today and didn't get too far. I am waiting on the headlight assembly and the new ignition switch, which brings me to my question.

Any suggestions on where to relocate the ignition switch? I usually have done it where the side covers go and just weld in a tabs for it to work, but this time I am keeping the original side covers because their in great shape. Should I figure something out to go on the down tube of the front of the frame or something?

Hmmm. This is the head headscratching and staring at the diagrams phase and it is always the most time consuming. All good though.
 

Attachments

  • XS Wiring Mess.jpg
    XS Wiring Mess.jpg
    161.1 KB · Views: 260
Kind of thinking about how the seat should be when this is all said and done. I am asking for a few thoughts on this brown seat. It is either I use this seat and get brown/tan grips to give it a little extra or I just get this seat reupholsetered to black/red stitch.

Thoughts??
 

Attachments

  • XS 650 Seat Thoughts.jpg
    XS 650 Seat Thoughts.jpg
    143.3 KB · Views: 350
Back
Top