Easy way to fix the cylinder while installing the pistons.

BigBoreSwede

XS650 Addict
Messages
219
Reaction score
1
Points
18
Location
Middle of Sweden
Hi.

Today I reassembled the pistons and cylinder fort the first time ever. Fun and a little scary.
As many here at the forum suggest I´d put the pistons in the cylinder before before mounting them at the rods. Worked just fine! The issue was to fix the cylinder "floating" while push the pin in.....( "push the pin in" he he he he, sounds funny)

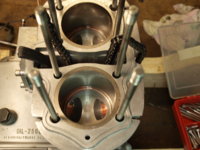
So I came up with an idea using some hose clamps on the studs. After some simple mesuring I bolted them on and after the pin was in place I just took them of and slide the cylinder down. The whole procedure took about 10 min.

Now I know there´s a whole lot of good ideas around this subject and they are GOOD:thumbsup: But I think this was really fast and you don´t need to mesure much.

I do have one question: In one pic you´ll see a screwdriver pointing at the base gasket. This area in between the barrels, it don´t really make any sense huh?? Why is the gasket shaped like that?


/BigBoreSwede
 

Attachments

  • FB218926.JPG
    FB218926.JPG
    263.6 KB · Views: 387
  • FB218928.JPG
    FB218928.JPG
    277.1 KB · Views: 334
  • FB218931.JPG
    FB218931.JPG
    251 KB · Views: 289
  • FB218933.JPG
    FB218933.JPG
    247.6 KB · Views: 290
  • FB218936.JPG
    FB218936.JPG
    249.2 KB · Views: 303
  • FB218942.JPG
    FB218942.JPG
    250.9 KB · Views: 309
i found a 2x4 chunk of wood was the perfect height to hold the cylinders up while i slid the piston pin in, but the hose clamp idea definitely leaves more room to work.

i just assumed the gasket was made that way to help keep its shape...
 
I used two pair of vise grips to hold up the jugs.
I think the gaskets are made that way to be easier to cut out. I used to run a machine that cut packaging out of printed sheets. A diecutter. Ran one for 15 years.
Certain shapes cause more trouble during the machines operation.
Leaving those center parts inplace will improve the movment of the sheet of gasket material through the diecutter. The two large round holes won't jan up as much as the odd shaped hole cutting those center parts out. The easier the machine runs the more you can get done in the same amount of time and you won't waste near as much raw materials.
 
I have special wood blocks made up, connected with a length of all-thread, works great .....

JugBlocks2.jpg


JugBlocks3.jpg
 
What are the measurements of those wood blocks?

The wood blocks look like they work good.
Those Wood blocks would be good to make and keep as a tool if rebuilding lots of xs650 motors. I'll be assembling another top end here in about a month.
Previously,
I cut 4 small 1 inch pieces of rubber hose and then cut splits down the sides of each one and wrapped them around 4 of the stud bolts then tightened hose clamps around each piece of hose. Then lowered the cylinders down to rest on the hose/clamps while pushing the pins thru.
Then I reused the hose pieces/clamps and put them ontop of the cylinders to hold them down so when i turned the crank to raise the pistons higher into the sleeves, the cylinders wouldnt lift up. If you dont do this, the whole cylinder base might lift up as you turn the crank to raise the pistons and then you'll probably rip the base gasket. (Like I did the first attempt, lol)
 
hello 650 peeps, could someone tell me how to know if the connecting rods need to be replaced? Im in the process in rebuilding the top half, i just pulled the jugs with the pistons still inside the cylinders and noticed that the hole on the top half of the connecting rod where the pin goes through the piston has wear, will i have to replace the connecting rods or is there a way to check them? thanks:shrug: :eek:
 
Remove the piston pin from the piston and fit it into the rod. Check for any play or "wiggle" - there should be none. It should be a nice, snug slip fit.

Scobman, dimensions for the wood blocks are in the "Homemade Tools" thread in the Tech section.
 
OK guys heres a easy way to do it and cheap. I use to a long time ago do it your way but there is 1 problem. If you miss with the clip it falls in the motor and i also see you broke the cam chain in half and they are a bitch to make sure 100% that the link is right. So for $2.00 go buy yourself big hose clamps that fit around the pistons and close the rings in but not real tight. Then just slid your pistons into the cylinders. (there is a tool for this too) the hose clamps will slide down and come free after rings are in and just unscrew them and you are done. I found a set in a auto parts place that are wide enough to cover all the rings and it is the easy way to go. No hassle and i use no block or anything but if you want to you can take a wooden broom handle and slide it under the pistons and that works fine too. Work SMART AND EASY I have had cam chain links NEW come apart so i like useing link free or doing it before i put it in motor. JUST ME
GOOD PICTURES
 
Thank u 5twins, well, i went out and checked for play in the connecting rod with just the pin and there seems to be just a very very little wiggle to them, so i guess i will have to spilt the case and replace the rods, or i look for a running motor, my rebuild piggy bank is losing weight,ha ha
 
Back
Top