Water injection will eliminate detonation and allow optimum timing.
A valve that opens to both the intake and exhaust of a roots sc will eliminate all heat and pumping losses while the engine and sc are under vacuum, commonly called a bypass valve by Eaton.

Tt
 
Water injection will eliminate detonation and allow optimum timing.
A valve that opens to both the intake and exhaust of a roots sc will eliminate all heat and pumping losses while the engine and sc are under vacuum, commonly called a bypass valve by Eaton.

Tt
Water injection seems like overkill/too much of a hassle... Bypass valve is already plumbed in
 
Ok here's some progress...
Pretty stoked with how it turned out.
This was done with POR 15 product, if your not familiar- they make rust preventive coatings, but also topcoats. Their tank sealer is top notch. Did my last bike with their spray bomb finish, and have been so impressed with how well it's held up. This time around I have proper spray equipment and access to a booth at work, I decided to try their two part polyurethane paints. pretty impressed with the results, for a relatively not expensive paint.

It's doesn't really show up in the photos, but the aluminum bits- rearsets, brakes, triples, etc- are a silver base with kandy red. Looks sharp if I say so myself...
IMG_20200220_154944_0.jpg
IMG_20200220_154836_6.jpg
IMG_20200217_132650_1.jpg
IMG_20200217_132615_0.jpg
IMG_20200216_212643_1.jpg
IMG_20200217_140643_1.jpg
IMG_20200220_154649_4.jpg
 
The microsquirt works pretty good. That's what I've got on mine. I used chevy LS coils, since the micro can drive them direct. Fuel pump was a pain for me, the DT tank didn't leave much room for an intank set up. For triggering it I used a 2" 36-1 wheel mounted inplace of the advance unit. Throttle body and injectors depend on where you want to mount it.

Have fun with it. Mine made 45 wheel hp with a damaged cylinder.
 
Don't discount water injection. Water injection made the most difference, besides the Eaton SC. To keep detonation from holing pistons the timing had to be retarded with a horrible reduction in power and throttle response. With water injection I could move timing back to optimum. The pressure on the boost gauge may increase as well. I'm not sure exactly why. It could be rotor tip sealing or the water flashing to steam. Another thing, water has 6 times more cooling than gasoline! You will not need to run excessively rich.

Tt

BTW, your bike is really interesting. Great job! I'd like to see more about the sc drive and how it is mounted.
 
Last edited:
Don't discount water injection. Water injection made the most difference, besides the Eaton SC. To keep detonation from holing pistons the timing had to be retarded with a horrible reduction in power and throttle response. With water injection I could move timing back to optimum. The pressure on the boost gauge may increase as well. I'm not sure exactly why. It could be rotor tip sealing or the water flashing to steam. Another thing, water has 6 times more cooling than gasoline! You will not need to run excessively rich.

Tt

BTW, your bike is really interesting. Great job! I'd like to see more about the sc drive and how it is mounted.
Interesting, but I'll have to do without. There really is no space left anywhere.
Between the cold air intake, intercooler, bypass valve, copper head gasket, cooler plugs and reduced static compression, I'm feeling optimistic. Getting close to firing it up now, so I'll find out soon enough.
 
Ok wow, almost a year since I've updated anything here. (And what year....)
So "meanwhile in Toronto..."

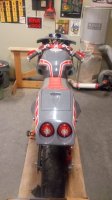
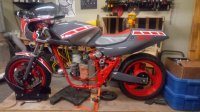
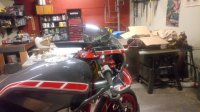
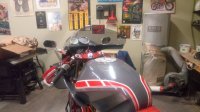
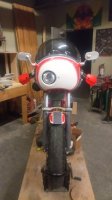
I've decided to repaint the bodywork as I wasn't really happy with the initial results . Got that done just before the weather turned, and I'm happy I did.

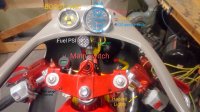
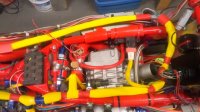
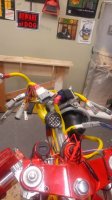
Wired everything up. Yet to be tested but I'm pretty confident. Tried to keep it simple but it ran away on me. What I ended up with: RFID ignition lock, manual headlight switch, DRL, hazard lights, "pass" high beam button, self canceling turn signals, alarm, kickstand safety switch, tip over switch... on top of all the stuff necessary to run. I have some photos of he wiring loom in progress, I'll have to dig them up sometime. it was quite the spaghetti. I should do a seperate post about the electrical system, I found some pretty neat gadgets and modules for it.
IMG_20200805_183751_4.jpg
IMG_20200906_153841_8.jpg
IMG_20200926_173038_2_1.jpg


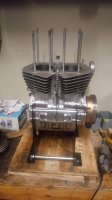
Got all my engine bits- rebuilt/rephased crank and matching Shell#1 cam and all new valve train bits.
IMG_20201206_132835_5.jpg
IMG_20201206_173454_2.jpg
IMG_20201206_170431_3.jpg

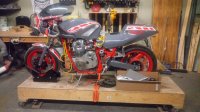
I've now managed to put it all back together and last weekend I stuffed the (mostly complete) engine back in the frame. This is my last week to work before Christmas hiatus, so with any luck I'll be ready to fire it up before long.
IMG_20201122_181046_6.jpg

IMG_20201122_181027_6.jpg

IMG_20201122_175425_6.jpg

IMG_20201122_175206_0.jpg

IMG_20201122_175149_5.jpg
IMG_20201121_194306_8.jpg
IMG_20201213_194535_4.jpg

What remains is to install a battery and test the electrical system, close up the engine cases (waiting on some clutch parts), and terminate and attach the sensors that mount to the engine i.e crank position and cam sync.
Wish me luck...
 

Attachments

  • IMG_20200926_173038_2_1.jpg
    IMG_20200926_173038_2_1.jpg
    139.1 KB · Views: 128
  • IMG_20201121_194306_8.jpg
    IMG_20201121_194306_8.jpg
    114.6 KB · Views: 141
  • IMG_20201213_194535_4.jpg
    IMG_20201213_194535_4.jpg
    160 KB · Views: 135
  • IMG_20200805_183751_4.jpg
    IMG_20200805_183751_4.jpg
    143.1 KB · Views: 130
  • IMG_20200906_153841_8.jpg
    IMG_20200906_153841_8.jpg
    133.7 KB · Views: 133
  • IMG_20201206_173454_2.jpg
    IMG_20201206_173454_2.jpg
    115.4 KB · Views: 122
  • IMG_20201206_132835_5.jpg
    IMG_20201206_132835_5.jpg
    110.5 KB · Views: 128
  • IMG_20201206_170431_3.jpg
    IMG_20201206_170431_3.jpg
    107.7 KB · Views: 132
  • IMG_20201122_181046_6.jpg
    IMG_20201122_181046_6.jpg
    142.3 KB · Views: 142
  • IMG_20201122_181027_6.jpg
    IMG_20201122_181027_6.jpg
    139.9 KB · Views: 133
  • IMG_20201122_175425_6.jpg
    IMG_20201122_175425_6.jpg
    141.2 KB · Views: 123
  • IMG_20201122_175206_0.jpg
    IMG_20201122_175206_0.jpg
    125.5 KB · Views: 131
  • IMG_20201122_175149_5.jpg
    IMG_20201122_175149_5.jpg
    108.8 KB · Views: 127
So... Would you be willing/able to send me a copy of your tuning files? Would sure beat starting from scratch...


The microsquirt works pretty good. That's what I've got on mine. I used chevy LS coils, since the micro can drive them direct. Fuel pump was a pain for me, the DT tank didn't leave much room for an intank set up. For triggering it I used a 2" 36-1 wheel mounted inplace of the advance unit. Throttle body and injectors depend on where you want to mount it.

Have fun with it. Mine made 45 wheel hp with a damaged cylinder.
 
Yeah. You'll probably have to change timing signal, double check injector size, it's already set up for a rephase. It should get you idling, but make sure to go slow when adding boost. Here's a pic of my trigger wheel.

Send me a PM with your email and I'll send it to you.
20180601_195937.jpg
 
Yeah. You'll probably have to change timing signal, double check injector size, it's already set up for a rephase. It should get you idling, but make sure to go slow when adding boost. Here's a pic of my trigger wheel.

Send me a PM with your email and I'll send it to you.View attachment 180777
That's slick man. I'm taking the tach signal off a crank sensor with cam sync from he points so I'll have to adust for that but the fueling and spark tables to get idling will be VV helpfully. PM sent
 
Just some progress shots. So close I can hear it :)
Plumbing:
IMG_20201223_170836_4.jpg
Crank sensor/clutch slave:
IMG_20210110_181425_8.jpg
Full frontal:
IMG_20201122_175149_5.jpg
Broadside:
IMG_20210131_162138_5.jpg

Remaining on the "to-do" list:
*Run vacuum lines
*Rewire headlight relay array (had some minor bugs on first test)
*Install starter motor delete
*Install cylinder head temp sensor
*Install horn
*Chain+belt guards
*Swingarm chain slider
*Fill/bleed hydraulics
*Test/calibrate sensors.

*TEST FIRE!
 
I would probably keep the estart until you know if the EFI will start with the kicker. I've got the stumpy RD400 kicker for looks and it's terrible to try and kick.
 
I would probably keep the estart until you know if the EFI will start with the kicker. I've got the stumpy RD400 kicker for looks and it's terrible to try and kick.

I just ordered an RD kicker , necessary to clear the rearsets!
The decision to go kick only was made a long time ago, and the more time goes by the more pointless that seems... Part of it is the starter button on my xs500 broke years ago and I never bothered replacing it as the kick starter was always the more reliable option, and I've just gotten used to kicking. In this case the 8 cell lithium battery Im using has more than plenty juice to turn it over, and it should be a pretty reliable starter.

At any rate, I had the foresight to leave provisions for e-starter in place i.e. I left the starter gear in the engine and have wired the starter switch leaving a capped off wire in the harness. If it becomes evident that I need the e-start, it's just a matter of installing the motor and wiring in a solenoid.

But I still want to see if I can kick it over!
 
Back
Top