bul_racer
XS650 Addict
Yeah, but it won't go in any further than 2 turns. If I try to force it I'll just end up stripping the head.Use the screw you have, keep on running it in with a bit of thread lock, call it done.
Yeah, but it won't go in any further than 2 turns. If I try to force it I'll just end up stripping the head.
I didn't see a lip to pry so I found another way. I don't much care what you think of my skill level. Help if you want to, or not.Lol, i don't doubt your skill levels when it come to working and fixing hard problems concerning motorcycles or a lot of things, I do question the skill level of someone who can't prize a bezel lip loose.
What could go wrong..............the screw head burs before it seats. An easy thing to do when trying to.............well you know i don't have to explain
Thanks Gary. I know how to do that but these pieces are so small I can't see how they mesh, esp. with my big fingers blocking the view.Compare the two screws thread pitches, with bright light behind them, do they mesh, line up?


Gary, Thanks for doing this. I guess I'm incurably old-school as I never think of using my phone for stuff like this. Great idea though. Having said that, I will tell you that I was able to install the screws. Couldn't get it in using a screwdriver so I gripped it with a pair of pliers. Doing this I was able to force the screw in. I don't think I stripped anything so not sure why I couldn't get it to work with the screwdriver but sometimes these things remain life's little mysteries. Apparently, the threads were correct after all but just a really tight fit. Once I had the screw in using pliers I removed it and was able to install a fresh one using the screwdriver. Spray a little black paint and it doesn't look too bad. I'll save the hacked up screw to use on the speedo if needed.Some 3mm screws shot with my phone and blew up the image a bit
View attachment 244500
View attachment 244499
Where there's a will, there are relatives.
I didn't see a lip to pry so I found another way. I don't much care what you think of my skill level. Help if you want to, or not.
If I understand correctly you think it will come apart as a product of putting it together? Or you think it won't withstand the stress of vibration over time?If I explain why the join will b pulled apart when assembling the gauge to the cup b helping.
It will pull apart
I didn't see a lip to pry so I found another way. I don't much care what you think of my skill level. Help if you want to, or not.
Thanks for posting.2M posted the link to dismantling and repairing gauges that i made up with a tutorial of my own and of any threads relating to the repairing of gauges that other member had posted. Covers gauge from 70-83..............this also did, (now past tense), include the Rusty pile butchery thread, where i think you got the idea to get into your gauge................I did help indirectly + with posts, where one i questioned the advice given, (as you also pointed out the problem with the advice). Brute force won over the problem of a small piece of grit in a screw thread that could have turned out real bad. Lucky it didn't
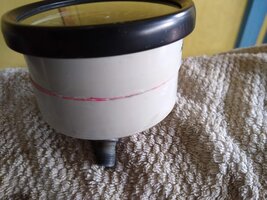
When attaching the cup to the Gauge the bezel of the gauge is pulled hard against the cup, (damper), when the nuts on the bottem are tightened, it's Pulling the bottom away/against the top.................if i am not explaining it well. You will understand when assemblingIf I understand correctly you think it will come apart as a product of putting it together? Or you think it won't withstand the stress of vibration over time?
Yes, we can agree on this.Yea the whole project is a learning curve.
Main thing i have learned in my life when working on anything is. ................................If i never made a mistake i have never done anything......................any mistake i did make, (and there are plenty), it was/is the quality of the fix, and have i made the repair to a standard where the mistake cannot be seen...............that is where the quality of workmanship shows, or doesn't if done properly done
Yes, because of the rubber O ring. Which I don't have because mine have disintegrated. I will have to find something to put in there.When attaching the cup to the Gauge the bezel of the gauge is pulled hard against the cup, (damper), when the nuts on the bottem are tightened, it's Pulling the bottom away/against the top.................if i am not explaining it well. You will understand when assembling
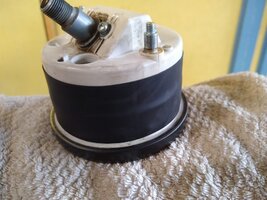
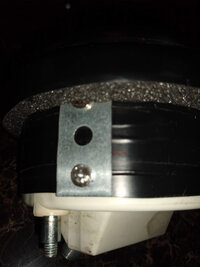
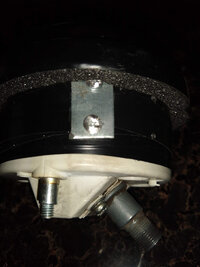
Skull, I am taking your advice, sort of. I've decided you're correct that what I had won't be strong enough to hold up so I am reinforcing the connection between top half and bottom half by strips of plumber's tape cut to size and attached with screws. Don't know yet if this will hold as it might be possible for the screws to work their way out. I've used thread locker and will also run a strip of electrical tape around to keep screws in place. Well, you don't know if you don't try. When I get ready to work on the speedo I will try to use your method of disassembly.When attaching the cup to the Gauge the bezel of the gauge is pulled hard against the cup, (damper), when the nuts on the bottem are tightened, it's Pulling the bottom away/against the top.................if i am not explaining it well. You will understand when assembling
")