Help w/plastic bumper repair?

haxto

haxto 81 hardtail
Messages
30
Reaction score
1
Points
6
Location
Long Beach, CA. USA
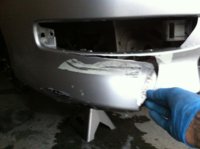
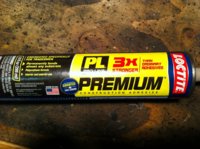
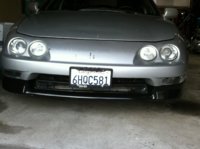
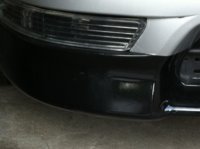
Need some good advice/tips on repairing the cracked plastic bumper cover on my '99 Acura Integra. First, and foremost, this has gotta be on the super-cheap! Id rather buy an exhaust kit from TC Bros than car parts! :) I watched a few Utube vids on it, but mostly they buy these "repair kits", Im not sayin that's wrong, its just that if I'm buying a kit I'd just following the instructions instead of watching someone else do so. More ingenuity here, so any tips, tricks, cheap short cuts, don't-do's? How about painting the plastic afterwards? Ain't gotta be perfect. Im thinkin of sprayin that thin (about 4 inches) panel along the bottom where its cracked with black plasti-dip. The car is silver, but that's just a thought, plasti-dip might be high maintenance from rock chips, I don't know. Thanks for any pointers, Guys.
 
The two part bumper epoxy from farm and fleet is good stuff I used up the last of the "one use" tube (use # 4) to shorten and reglue my UNI filters. Glued foam to rubber? they have been gas and oil soaked since and the glue is there forever. It's black so a can of plastic paint to blend it into the car color will help. Int Menards has my area's largest selection of spray paint by a long shot, with many colors of plastic paint in stock. otherwise there is probably a body shop supply in your area or on line that can custom mix bumper paint. Heat helps reform the pieces. don't over do the heat though. the plastic can sag out. A hair dryer is safer, a heat gun can distort the plastic or make a puddle of bumper goop in your driveway. Wear some leather gloves to help work and reshape the plastic, it will be too hot to hold with bare hands.
 
The two part bumper epoxy from farm and fleet is good stuff I used up the last of the "one use" tube (use # 4) to shorten and reglue my UNI filters. Glued foam to rubber? they have been gas and oil soaked since and the glue is there forever. It's black so a can of plastic paint to blend it into the car color will help. Int Menards has my area's largest selection of spray paint by a long shot, with many colors of plastic paint in stock. otherwise there is probably a body shop supply in your area or on line that can custom mix bumper paint. Heat helps reform the pieces. don't over do the heat though. the plastic can sag out. A hair dryer is safer, a heat gun can distort the plastic or make a puddle of bumper goop in your driveway. Wear some leather gloves to help work and reshape the plastic, it will be too hot to hold with bare hands.


Thanks, good stuff. But I had already plowed ahead. I wanted to avoid tossing $ into a "repair kit", plus your grades of sand paper, primer, ect. can catch you putting more $ into a repair than a new bumper cover cost, at least for a Honda, which is what my Acura is.
While my cars down anyway for axel replacement (waiting on parts shippment) I pulled that front clip. With a flap wheel on a drill I removed all paint around it and beveled the edges of the crack (more so from inside the bumper) Then I taped it (on the front) using that aluminum tape? The stuff they use on vents, strong stuff that'll hold things in place while repairing the back. With the edges beveled allowing a "fill area" similar to welding, I generously laid in construction adhesive I had on hand from lock-tight. After filling the "V" I applied a mat about 2" wide over it. Then took some burlap-like fabric, (again, scrounged shit available) and laid it over the adhesive, pressing it down with a cheap sponge-type 1" paint brush. Then liberally wiped on another coat of adhesive over that fabric making sure it penitrated and was obsorbed into it. After letting it cure, I flipped it over and tried to fill the much smaller front gaps. The adhesive does not lend itself to sanding and I gave up on that and filled in the small gaps on the front with bondo. Thats where Im at today. Tomorrow I'll lightly sand the front and spray my primer, tape off so I can paint the bottom lip black and see what happens. I'll update
 

Attachments

  • IMG_1731.jpg
    IMG_1731.jpg
    188.9 KB · Views: 114
  • IMG_1789.jpg
    IMG_1789.jpg
    187.8 KB · Views: 101
  • IMG_1782.jpg
    IMG_1782.jpg
    192.1 KB · Views: 101
  • IMG_1769.jpg
    IMG_1769.jpg
    255 KB · Views: 101
By the way, the methods I obtained by picking and choosing from "How To" utube vids, the materials I went my own direction with using things on hand. I did buy a pack of assorted wet/dry sand paper at Walmart for a couple bucks cause I didn't have any 320 and $7 for spray primer. Doesn't mean my Loctite adhesive will work, hope so! Considering I slapped silver duct tape on it 3 yrs ago when I bought the car, (already cracked) figured this has gotta be an improvement. What took me so long? :) Yea, well the XS build is turning into a good ole daily rider, look at all the shit I've been neglecting!
 
By the way, the methods I obtained by picking and choosing from "How To" utube vids, the materials I went my own direction with using things on hand. I did buy a pack of assorted wet/dry sand paper at Walmart for a couple bucks cause I didn't have any 320 and $7 for spray primer. Doesn't mean my Loctite adhesive will work, hope so! Considering I slapped silver duct tape on it 3 yrs ago when I bought the car, (already cracked) figured this has gotta be an improvement. What took me so long? :) Yea, well the XS build is turning into a good ole daily rider, look at all the shit I've been neglecting!

Well this a follow up. The repairs to the plastic bumper cover (there were 4 cracks thru and thru) are finished. The painting I was/am a little concerned about, I mean if it starts peeling off its gonna look like shit. That why I carefully sanded, taped, primered, and laid down 4 coats following instructions. They say to wait 2 weeks, blend and smooth with rubbing compound, then wax. I will. I pleased with it so far, and plan to repair hood damage and paint a fat black stripe on the hood.

Posted via Mobile
 

Attachments

  • image.jpg
    image.jpg
    185.8 KB · Views: 95
Last edited:
Back
Top