Just another Fong Bros wannabe.... long on time, short on cash!

A5HLEY

XS650 Enthusiast
Messages
83
Reaction score
1
Points
6
Location
Calgary, Alberta Canada
Given that I creeped on this forum for 2 months before I had the cajones to buy and chop a bike, I figured I'd take this opportunity to introduce myself and to thank everyone who has inspired me....particularily Denis Jenkins of the notorious Fong Bros outfit. Some may say that my bike's a copy...I say it's a tribute. Either way, you know what finger you're gonna get as I salute you on the other side of the broken white line.
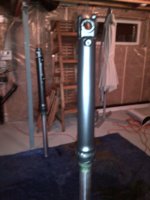
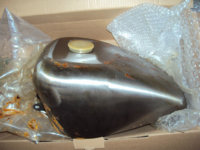
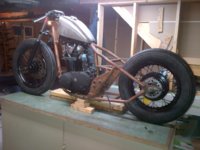
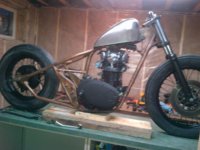
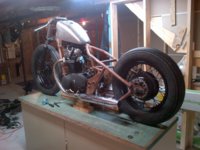
 

Attachments

  • image.jpg
    image.jpg
    253.5 KB · Views: 418
Last edited:
Here she be prior to the introduction to my angle grinder. 1979 Yamaha 650 XS-SF-II...better known in the streets as the Special II. She sure had a good run...........
 

Attachments

  • 1979 XS650.JPG
    1979 XS650.JPG
    77.7 KB · Views: 251
Last edited:
Given that it's the middle of winter up here in Calgary, Canada... building a bike in an unheated garage is not an option. Next best thing...an unfinished, heated basement.

Step 1. Strip off all of the crap that you don't need.
Step 2. Take off the wheels, handlebars, gas tank, seat, rear swing arm, forks and other heavy bits.
Step 3. Employ the services of your dad and brother to muscle the remaining frame and engine across your brand new hardwood floor and down the stairs of your freshly carpeted and painted stairwell.
Step 4. Scratch hardwood and paint.
Step 5. Experience the wrath of your wife.
Step 6. Feel shame.
 

Attachments

  • Roberts chop shop.jpg
    Roberts chop shop.jpg
    58.5 KB · Views: 239
  • Roberts chop shop 2.jpg
    Roberts chop shop 2.jpg
    63.5 KB · Views: 274
Last edited:
Thanks to the interwebs...we found a crafty way to lay the bike on its side to remove the engine. Simply unbolt all of the mounts on the top side (once its laying down on its right side) and pull the frame away. Voila.
 

Attachments

  • Roberts chop shop 4.jpg
    Roberts chop shop 4.jpg
    39.1 KB · Views: 208
  • Roberts chop shop 5.jpg
    Roberts chop shop 5.jpg
    54.9 KB · Views: 228
Last edited:
Like Demi Moore, don't stop stripping....the frame has to be bare!
 

Attachments

  • IMG-20121224-00255.jpg
    IMG-20121224-00255.jpg
    187.2 KB · Views: 196
  • IMG-20121224-00249.jpg
    IMG-20121224-00249.jpg
    194 KB · Views: 211
Last edited:
Ah.....the postman.......my favorite guy after spending oodles of money online.
Here is the TC Bros hardtail mocked up to my frame prior to the welder arriving to perform surgery. Keep in mind that the only tools that we've used to date are a socket set and angle grinder and about 3 cutting discs. Yes cutting discs....they are not the same as a grinding discs.

*Note the threaded rods ensuring the frame's alignment. Once you hack off the rear bits, the frame will twist...making the welding job that much harder. It's a $5 insurance policy against a whole lot of remeasuring down the road.
 

Attachments

  • IMG-20121227-00258.jpg
    IMG-20121227-00258.jpg
    181.9 KB · Views: 301
Last edited:
Like a select few, I opted to keep the stock footpeg mounts. Mainly because I think that they look rad and I hate the gaping hole left behind the engine on a lot of choppers and bobbers. This ads a lot of extra work, as they have to be cut completely off and then hacked and grinded, made to fit and welded back onto the hardtail.

The beauty of it all when it's said and done is that your footpegs, rear brake and gear selector foot peg thingy can all be bolted right back on. If you don't do this, you're gonna need a set of mid or forward mounts for your foot controls.
 

Attachments

  • IMG-20121230-00260.jpg
    IMG-20121230-00260.jpg
    200.9 KB · Views: 287
  • IMG-20121230-00261.jpg
    IMG-20121230-00261.jpg
    201.6 KB · Views: 294
Last edited:
Here's were we put the rat in the rat-bike look. I elected to use VHT paints for the engine and Duplicolor for the wheels.

It's not that I'm against thousand dollar metal flake Harley paint jobs, its just that I think rattle cans are cheaper, easier and more authentic of the chopping and bobbing spirit which was to customize bikes to make them your own on a shoe string budget.

Because it's winter and i wouldn't be riding my bike for several months, i didn't use engine enamel b/c it needs to be baked on. Instead I used VHT cage and roll bar paint which still withstands high heats but doesn't need to be cured. Keep in mind that if a paint has to be cured, you either need to run the engine or have a place big enough to bake that bad boy.

For the sidecovers, I used VHT wrinkle paint with resounding succcess. You can search 'wrinkle paint' here on the forum for more details about the process and why my barbeque came into play. The Yamaha lettering wasn't removed by the unreal magic of Chris Angel (straight face), rather it was filled with JB Weld and sanded.

"Sidecovers...it's what's for dinner!"
 

Attachments

  • IMG-20130106-00277.jpg
    IMG-20130106-00277.jpg
    182.7 KB · Views: 210
  • IMG-20130106-00279.jpg
    IMG-20130106-00279.jpg
    217.4 KB · Views: 212
  • IMG-20130106-00276.jpg
    IMG-20130106-00276.jpg
    259.4 KB · Views: 187
  • IMG-20130106-00275.jpg
    IMG-20130106-00275.jpg
    299.7 KB · Views: 209
Last edited:
Because EVERYONE has a black frame, I elected to showcase mine by painting it an old rust color. I did this by purchasing 3 or 4 different colors of gold, brown and hammered copper paint. By spraying them on in layers and using steel wool to selectively rough up joints and welds, you quickly get that old rusted look.
I also bought a 'rust patina' kit at Michaels craft store which I haven't yet finished applying. It's a brush on iron oxide which when later coated with a solution (similar to vinegar) will actually rust the metal iron fillings in the paint. What you get is 100% genuine surface rust.
 

Attachments

  • IMG-20130105-00270.jpg
    IMG-20130105-00270.jpg
    172.4 KB · Views: 309
  • IMG-20130104-00265.jpg
    IMG-20130104-00265.jpg
    212.9 KB · Views: 291
  • IMG-20130104-00266.jpg
    IMG-20130104-00266.jpg
    200.7 KB · Views: 296
Last edited:
Yes, really. For the tires and wheels I caved and bought throwback replica Coker Firestone Tires.
They are gnarly expensive, but I really, wheelie wanted them. Here in Canada, they set me back about $500.00, shipped, mounted and balanced. :yikes:

I didn't think the stock Dunlop tires looked the vintage part, so they had to go.
I ended up with 5 x 16 in the rear and 4 x 19 in the front. Don't forget to order tubes when you are placing your order. Anyone want to buy mint condition Dunlop's?

To paint the spokes and rims, I used satin black Duplicolor wheel paint. For anyone that's ever painted rims before, you know it's next to impossible to get tires on them without scratching them after they've been painted. I tried to take the tires off with spoons (thanks flybird) but my girly arms couldn't muscle them off. In the end, it was $75 well spend to have them professionally mounted. You're going to have to have them balanced in any event. Once the new tires are mounted, I deflated the tires and put playing cards in between the rim and the tire. Re-inflate the tire to ensure that the cards don't move when painting. When you are finished, deflate the rim again, remove the cards and Bob's your uncle! He is? Why didn't you tell me?
 

Attachments

  • IMG-20130115-00287.jpg
    IMG-20130115-00287.jpg
    213.4 KB · Views: 205
Last edited:
Not too much rocket surgery involved here (shameless Ricky quote from the Trailer Park Boys). Follow the links in the Tech section to learn how to lower your forks. My dad and I even invented the required fork tool from the nuts and bolts already found on your bike. While the correct $5 tool (17mm hex) isn't hard to find at the parts store....finding a store open over the Christmas holidays is.

All of the fender tabs are shaved and the forks are sanded to within an inch of their life. This time, Duplicolor matte black automotive paint.

Spoon? Na, fork please.
 

Attachments

  • IMG-20130116-00296.jpg
    IMG-20130116-00296.jpg
    170.4 KB · Views: 227
Last edited:
Given that my stock tank is sitting outside in a snow bank...it was time to mock up the new/old Harley Davidson sportster king tank. The 'king' refers to the fact that this tank holds almost a gallon more of fuel than standard sportster tanks. I found this beauty on eBay for $75. Don't forget that you have to get a new single 22mm petcock as the dual vacuum petcocks that came with the bike don't work for this application. Haha, pet-cock.

To seal the tank, I bought Red-Kote. I've heard a lot of bad things about Kreem and not a single bad thing about Red-Kote. I've got lots left if you are in Calgary and need some for your build.....holla!
 

Attachments

  • Harley Tank.jpg
    Harley Tank.jpg
    40.3 KB · Views: 192
Last edited:
Looking good guys. I like the uninstall and re-install of the original foot peg support area. I'm curious as to how much added rigidity that adds to the tcbro's tail....Mine is a pogo stick without that part.
 
The best day in every wannabe bike builder's build....the roller!
Here she is in all her glory! I have no intention of adding fenders so the only thing I really need to do from here is get all of the controls and electrical working. The handlebars are simply turned upside down for that old Indian look.

Enjoy the pics....I do!
 

Attachments

  • IMG-20130116-00297.jpg
    IMG-20130116-00297.jpg
    195.7 KB · Views: 299
  • IMG-20130116-00301.jpg
    IMG-20130116-00301.jpg
    193.2 KB · Views: 363
  • IMG-20130115-00289.jpg
    IMG-20130115-00289.jpg
    207.6 KB · Views: 282
  • IMG-20130116-00300.jpg
    IMG-20130116-00300.jpg
    206.6 KB · Views: 279
Last edited:
I've been talking with Ryan from Travelingman seats (www.tmcustomseats.com) and he's shipped me a polished kingpin seat and tweezer action spring. I've been anxiously waiting by the mailbox.

Instead of using more traditional springs, his concept was to use a tractor leaf spring to give the seat a floating look. I'm told you can ride 1000 miles a day on this seat, which is about 900 miles more than I ever plan to ride in a single day on this rigid.

Here are some pics of his seat. What a guy, he ships the seat to you and if you like it, he asks that you send him back a money order. To date, he's never had anyone return the seat and he's never had anyone stiff him. Ryan my man, that's the true spirit of bike building.....a tilt of my cap to you. Now...about your money.....:D:D:D
 

Attachments

  • Tweezer seat 2.jpg
    Tweezer seat 2.jpg
    144.2 KB · Views: 263
  • Tweezer seat.jpg
    Tweezer seat.jpg
    270.2 KB · Views: 335
Last edited:
Do you have a link to the seat guy? I might like that more than the one I already have.
 
Back
Top