I should have started this thread a year ago. But I knew it was going to be a slow build.
Over a year ago I decided to build another bike. I looked around at what I had and found a titled XS2 frame. That's a good start. Since this is going to be a sorta resto-mod not everything is going to be 100% XS2 stuff. Found a 73 front end, added that to the pile. Kept looking and came up with most everything to build a bike.
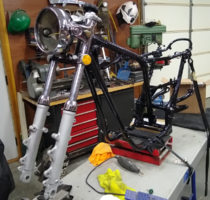
Started with the frame. Had it sand blasted brought t back home. Decided to do some reinforcing on it. Made some pieces to reinforce it. Welded them in. Then had the frame and swing-arm powder coated.


Cleaned up the front end parts and assembled. Went with chrome headlight and fork ears. You may notice the fork legs are not polished. I decided to do a no polish build. Aluminum pieces will be bead blasted and then Cerakoted. It gives a different type of finish, I like it.
Built a set of wheels. Since it's a resto-mod I got new aluminum rims and stainless spokes.

Next up gauges and controls. Put new face plates in the speedo and tach.


Tires, fenders and a few other things and had a roller.

Next thing was engine. Had a 75 engine with around 10k miles on it. Wanted a 750 but with stock jugs. All it took was a heat gun and sleeves came out. Could have had machine shop remove them but I wanted to see how hard they were to get out. Not hard at all.


Sent parts to machine shop to have the 750cc sleeves installed and bored/honed for the pistons, also had the a valve job done on the head. While that was being done cleaned up the engine. Replaced the sump filter and installed a @gggGary 8 plate clutch with new springs plus a few other odds and ends. Got parts back and assembled.
Installed engine. As it sits now. First start tomorrow.

Over a year ago I decided to build another bike. I looked around at what I had and found a titled XS2 frame. That's a good start. Since this is going to be a sorta resto-mod not everything is going to be 100% XS2 stuff. Found a 73 front end, added that to the pile. Kept looking and came up with most everything to build a bike.
Started with the frame. Had it sand blasted brought t back home. Decided to do some reinforcing on it. Made some pieces to reinforce it. Welded them in. Then had the frame and swing-arm powder coated.
Cleaned up the front end parts and assembled. Went with chrome headlight and fork ears. You may notice the fork legs are not polished. I decided to do a no polish build. Aluminum pieces will be bead blasted and then Cerakoted. It gives a different type of finish, I like it.
Built a set of wheels. Since it's a resto-mod I got new aluminum rims and stainless spokes.
Next up gauges and controls. Put new face plates in the speedo and tach.
Tires, fenders and a few other things and had a roller.
Next thing was engine. Had a 75 engine with around 10k miles on it. Wanted a 750 but with stock jugs. All it took was a heat gun and sleeves came out. Could have had machine shop remove them but I wanted to see how hard they were to get out. Not hard at all.
Sent parts to machine shop to have the 750cc sleeves installed and bored/honed for the pistons, also had the a valve job done on the head. While that was being done cleaned up the engine. Replaced the sump filter and installed a @gggGary 8 plate clutch with new springs plus a few other odds and ends. Got parts back and assembled.
Installed engine. As it sits now. First start tomorrow.
 I like the look of the aluminum finish you’ve got going, and the double disc front end and chrome headlight and the custom exhaust and………I’ll have to look around some more to see what else you’ve done.
 Oh well I have spare parts. Engine sounds good. Need to run it through a few more heat cycles and re-torque the head. Then install the head steady, also recheck the valves may have one a little loose. Charging system works. I really like the sound of the exhaust. Not near as loud as I thought it would be. Might be a little louder than the full size commandos on my other XS2.

 It's not the same as the green BBK gasket I used on my original XS2.