LED headlight conversions, ideas; good and bad

How are you adjusting the height of the light? What I usually do is get behind a car, about stopped at a light distance, and move it up or down until the top of the low beam is barely lower than the rear window. That gives you the maximum practical "throw". I'm sure that would vary from light to light, so maybe some of the weaker ones in the test could be adjusted better.
 
A larger bucket alternative could be the XS750-850 Special one. And '79 and later ones use a factory H4 light. The chrome ring is the same as the 650 so that tells me the headlight is the same size .....

1UMSkTI.jpg


4WmR6RY.jpg
5T - good find! Quick look at eBay for XS750/850 headlights shows this "bulge" one advertised as '79 and '78's no bulge, so prospective buyers, be careful what year to look for. '79 headlight fiche does not show a P/N for just the shell, so I couldn't compare year-to-year to see if '78 has different P/N.
 
How are you adjusting the height of the light? What I usually do is get behind a car, about stopped at a light distance, and move it up or down until the top of the low beam is barely lower than the rear window. That gives you the maximum practical "throw". I'm sure that would vary from light to light, so maybe some of the weaker ones in the test could be adjusted better.

I've tried the measuring and using the garage door to aim lights, not the greatest. I get on a flat straight road at night and adjust the high beam till I can see the farthest, the low beam falls where ever it will, that's what works best for me.
 
I do need to enlist my brother to take it for a ride so I can see what the headlight looks like to oncoming traffic. From what I can tell so far, I don't believe it will be an issue.

That's a good point about oncoming traffic, especially when using a bulb in a reflector that it wasn't specifically designed for.

Lately I have had oncoming pickups come at me with those blue tint lights that have made me go "HOLY SHIT" and have to pull over on the side of the road, blinded so much that I'm not really knowing where the pickup or road actually is. Worse yet would be a vehicle behind me that is blinded from seeing me.

Scott
 
I adjust them that way so it won't blind the car in front of me, especially at a stop light.
 
^That would be fine, except that the first thing is you don't want to blind people you're sitting behind, so adjust on low to the highest level that doesn't blind them. FWIW it seems to put the high beam at a good level too. If it didn't, I'd have to get a different light. OTOH, if your only concern is how far your brights reach, then adjust it for that, and if it doesn't coincidentally work out like I said to adjust in the first place, expect some road rage :)
 
About a month ago I rode the RSV (7" reflector Broview S5) about 4 hours at night. I had to stop and adjust headlight as i was getting flashed,
adjustment stopped the flashing. Great to ride behind a quality light. I also rode Madness with the Broview the last 3 hours home from Arkansas in the dark, also good. The trip to Peoria in rain, resulted in water in the reflector/ lens. revealed the importance of a good bulb/reflector seal, After some testing, it turns out the problem was a poor lens to reflector glue joint on the "made in india" headlight, Those these bulbs don't fit the stock rubber shield, slit, install and electric tape the shield, seems to do the track. Need to rain test the fix but not rushing out to do it. :whistle: Got a good 20-30 hours on this set up, no issues with overheating, takes just a bit of pushing n shoving to get everything in..
DSCN2864.JPG DSCN2863.JPG
 
Last edited:
I installed one of those LED bulbs in my headlight and my Voltage went up to 16 Volts Yikes!!
Had to pull it out, not enough draw and the Regulator (not stock) couldent compensate for the
much lower draw.I also run an LED break light bulb.Not sure how to solve that but the light was much better
than the stock unit with out a doubt.That was last year, still have the bulb if anyone wants it.To bad as
I waited almost a month to get it.Was the same unit on the first page of posts I believe.As it is now my Voltage
will still run up to 14.7 even 14.8 spikes.In my Chlymer manual it states ok up to 15 volts is acceptable.
I run at 13.2 at idle well warmed up after a ride which is good I believe.
Throw in a 27watt ceramic wound resistor or two into the headlight circuit? Commonly sold for LED turnsignal conversions.
 
Hi gggGary thanks for sharing all this information, very useful to see how these products actually perform. Did you use manual mode on your camera when taking the photographs?
 
Spooky! I just read this whole thread earlier this morning. My experience with the LED headlights is cheap are not particularly good except for a daytime warning to on coming traffic. Although I have not tried a Broview LED it seems to fit my opinon of what an LED H4 needs to be designed like:
  • The individual LEDs are very small so give a better approximation to the incandescent bulb filaments. This is important for correct focusing in the head light reflector/lens.
  • The shift from Hi to Low is achieved by using different sets of LEDs in different locations which mimics the filament bulbs so again gives better focusing. The cheap bulbs usually only dim the LEDs by using a resistor in series, so no focal adjustment actually takes place.
  • They have a power supply (step up voltage converter) which provides the correct voltage/current for optimum light output irrespective of the voltage on the harness. This means the light is stable and bright at 12V during idle or 14.5V at higher rpm. Without this power supply the bulb would probably flicker at idle because the voltage is near the cut off point. The supply is a bit more bulk to deal with but at least it is on a lead so can be fitted external to the headlight bucket.
  • That flexible heat sink gives options where to locate in a crowded headlight bucket.
I have since cut up my cheap LEDs and used them to make a bright higher level stop light for my bike and reverted to 35/35W H4 halogen bulbs for now.

Note: For the experimenters the LED power supplies can be bought on Ebay if you search for "Voltage Converter". I have seen 6Amp ones for about £5 and all you need to do is set the output voltage. I use them in my metal detector to give me 9V and 18V all from a single rechargeable 4.2V Lithium cell.
 
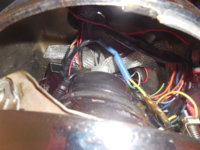
Looks like I reached the post limit above, so here are some details. In the upper photo, the connector on the left joins the box to the "bulb." The connector is waterproof and can be located outside the shell. The 3-way spade connector on the right is made to plug into the headlight socket. I cut it off, doubled and twisted the small gauge wires, and crimped on 3.5 mm. bullet connectors and covers, bulking up the wires a bit with shrink tube to give the covers a good seal. I unplugged the OE headlight socket,removed the the switch wires from the shell, crimped on 3.5 mm. socket connectors and covers, and plugged in the bullets from the box. I also fabricated a shroud to cover the connectors for a little added protection and water resistance. The only potential "gotcha" is that the OE high beam wire and the Broview low beam wire are yellow, so plug Broview yellow to Yamaha green, Broview red to Yamaha yellow. And yeah, I know, I put sockets where Mama Yama, for some perverse reason, put bullets. Bad idea, Ma! A loose bullet connector on the hot end can ground, but socket covers won't let that happen. Do it right and put sockets on the hot side!

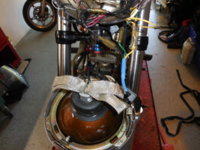
The lower photo shows the headlight tilted down to show the installation. The box is supported on zip ties for vibration damping, and the box and cooling mesh are pretty well hidden when the headlight is aimed. Wires and cooling mesh exit the shell through a 3/4"x1.5" slot lined with split plastic tubing. (And yes, guys, that's a Honda repop key switch in the top hole of the shell--don't hurt me!)
 
Last edited:
Back
Top