Do either one of those buffers have way to lock the arbor in place to change wheels cause the one, I have I have to hold the shaft with a grip pliers
-
Enjoy XS650.com? Consider making a donation to help support the site.
XS650.com receives a small share of sales from some links on this page, but direct donations have a much greater impact on keeping this site going.
You are using an out of date browser. It may not display this or other websites correctly.
You should upgrade or use an alternative browser.
You should upgrade or use an alternative browser.
Nylon polishing wheels
- Thread starter Dom
- Start date
You would think that the company's would put a little button to hold the arbor like my angle grinder
I'm glad it's not just me
me
I'm glad it's not just
meWhat I do is grab the other wheel with my hand to hold the shaft. Then snug up the nut on the wheel I'm putting on. Works for me.
Grab a shaft with vice-grips. Peanut would be proud.
Grab a shaft with vice-grips. Peanut would be proud.
with the clockwise / counter clockwise threads it got to be a pain
I think when I was just trying to use the side with the CCW thread alone by itself
I think when I was just trying to use the side with the CCW thread alone by itself
Like I said it works for me. At least on my buffer the nuts just need to be a firm snug.with the clockwise / counter clockwise threads it got to be a pain
I think when I was just trying to use the side with the CCW thread alone by itself
The ones I was looking at wind onto a tapered thread
When I rub down with sandpaper, I use 240 grip in a random orbiatl sander. but I only use that when the surface needs to be flattened. The white paper I find the best.
I use nylon fibre wheels a lot, they can remove a surprising amount of material in a very short time, so you need to be vareful. The wheels I have are measured 1-9, rather than grits.
Sisal wheels and black compound I find the best for removing scratches left over from nylon fibre wheels.
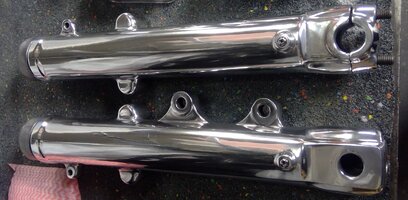
These forks were done using 240 grit in a random orbital sander after removing the caliper and mudguard mounts, then a sisal with black, sewn cloth with white, loose cloth with white and finished off with a swansdown loose leaf and green.
I only use nylon fibre when the surface is extremely rough. Very rarely do I use sandpaper and only when flattening. i rely on sisal and black mostly.
I find rubbing down with sandpaper too time consuming and a total waste of time, unless flattening. Besides that my elbows don't like it!
Rome wasn't built in a day.
If you think polishing with calico and sisal wheels is messy, don't use swansdown: You get fine fluff all around the workshop, takes me a full day to clean up afterward. If you are shy on swansdown, I find thin (sub1") wheels that have had a wire brush run over them work quite well with green compound.
I use nylon fibre wheels a lot, they can remove a surprising amount of material in a very short time, so you need to be vareful. The wheels I have are measured 1-9, rather than grits.
Sisal wheels and black compound I find the best for removing scratches left over from nylon fibre wheels.
These forks were done using 240 grit in a random orbital sander after removing the caliper and mudguard mounts, then a sisal with black, sewn cloth with white, loose cloth with white and finished off with a swansdown loose leaf and green.
I only use nylon fibre when the surface is extremely rough. Very rarely do I use sandpaper and only when flattening. i rely on sisal and black mostly.
I find rubbing down with sandpaper too time consuming and a total waste of time, unless flattening. Besides that my elbows don't like it!
Rome wasn't built in a day.
If you think polishing with calico and sisal wheels is messy, don't use swansdown: You get fine fluff all around the workshop, takes me a full day to clean up afterward. If you are shy on swansdown, I find thin (sub1") wheels that have had a wire brush run over them work quite well with green compound.
Attachments
Last edited:
Yup an old welding helmet with only a clear plastic lens lives on a hook by the grinders n buffers protects eyes and reduces the amount of crap getting to nose n mouth.
Good place to use an impact wrench.Do either one of those buffers have way to lock the arbor in place to change wheels cause the one, I have I have to hold the shaft with a grip pliers
I don't find that at all: i wear a bunny suit, gloves, a balaclava and a full face faceshield or goggles covering the eye holes in the balaclave, but still end up looking like Bill Cosby's brother!
I should have said I'm using 400 grit wet and dry, probably should try some 320 first if I had it. I've just tried a final finishing wheel with green compound and can get a really good mirror like shine but the scratches left by the wheel are still evident if looking closely, I think I'd spend a long time getting them out.
My buffer has flats machined into the shaft do you can hold it with a wrench when loosening and tightening the nuts.Do either one of those buffers have way to lock the arbor in place to change wheels cause the one, I have I have to hold the shaft with a grip pliers
Here‘s my rig. It normally hangs from the collar ties in the garage and I clamp it in a Black and Decker Workmate when needed. Saves space this way and the Workmate is quite stable.
}
Last edited:
What? i just grab the spindle with my hand and I've got fused fingers and no elbow joint. Hmmm, maybe that's why I have fused fingers and no elbow joint!Yep, that's what I have to do as well, grab the shaft with vice-grips.
i have an old GMF 8" grinder I converted for polishing, I lostnthe left side tapered thread years ago,unfortunately, the threads on the grinder spindle are UNC, tapers not available in Oz with that thread, so I use a nut and large washers on the left side.
RH side has a nut, LH has a tapered thread which is rather handy, quick and esy to change mops. Cuz it's got the power I tend to stack and run double disks on each side. There's a 1/3 HP VFD fed buffer on the stand below this one.
Last edited:
Wow look at the space shuttle controls you have to control that beast!View attachment 235124
RH side has a nut, LH has a tapered thread which is rather handy, quick and esy to change mops. Cuz it's got the power I tend to stack and run double disks on each side. There's a 1/3 HP VFD fed buffer on the stand below this one.
I'm big on buying 3 phase equipment on the cheap and powering it with a VFD run from 220 single phase. There's two VFDs one for each buffer. They DO have a lot of programable functions, few of them needed for a simple motor like this. Bonus; they have a dial that lets you control the speed.Wow look at the space shuttle controls you have to control that beast!
Turn down the wheel speed and polishing plastic like a tail light lens to a brilliant shine is easy peasy with no melting the plastic. Hint use a spritser bottle of water, keep everything wet when working with plastic. Low speed also makes it easier to get into corners and narrow spots on aluminum without mailman-ning parts. ;^)
" My buffer has flats machined into the shaft"My buffer has flats machined into the shaft do you can hold it with a wrench when loosening and tightening the nuts.
Here‘s my rig. It normally hangs from the collar ties in the garage and I clamp it in a Black and Decker Workmate when needed. Saves space this way and the Workmate is quite stable.
View attachment 235149
}
Even that would be helpfull !
Just thinking (and I don’t do much of that), if you get the appropriately sized shaft collar, you could mill or grind flats on the collar then install it on the shaft. Only one would be needed. They you could hold the shaft with a wrench." My buffer has flats machined into the shaft"
Even that would be helpfull !
Here is my buffer room. Completely enclosed with filtration (1 inch pre filter and 4 inch behind it). I still wear a suit with mask. You dont need to hold that shaft with a wrench just wind the nut up to the plates, grab the buffing wheel and snug up the nut. I bought the Jet buffer last year which has variable speeds (3 speeds or 100 rpm increments) best investment I made in a long time. 1hp (115-230v)
 which is plenty but I can still slow it down a bit if I really am pushing
I've found a 375watt grinder at my parents, ordered some sisal, close stitched and a loose wheel. This had better work!
Similar threads
- Replies
- 20
- Views
- 2K
- Replies
- 9
- Views
- 916