Impact driver and J.I.S. bits. If ya don't have one then put one on your list of tools to get, 'specially if you see a P.O. has been gluing screws down.
-
Enjoy XS650.com? Consider making a donation to help support the site.
XS650.com receives a small share of sales from some links on this page, but direct donations have a much greater impact on keeping this site going.
You are using an out of date browser. It may not display this or other websites correctly.
You should upgrade or use an alternative browser.
You should upgrade or use an alternative browser.
Stator/alternator disaster
- Thread starter ABill
- Start date
ABill
XS650 Enthusiast
So I did some playing around put in the new brushes, rewired the connectors, but she still not starting. I have no idea what I did wrong here. The main fuse Blew as well. And she definitely won't start. Help please!


Attachments


Um I don't see the TCI pickup installed???? the brushes etc have nothing to do with the bike starting.
The pickups are pretty important for brrm brrm noises.

The pickups are pretty important for brrm brrm noises.
ABill
XS650 Enthusiast
So what if I told you that when I opened the case originally that wasn't there, but it ran fine before hand.. .Um I don't see the TCI pickup installed???? the brushes etc have nothing to do with the bike starting.
The pickups are pretty important for brrm brrm noises.
View attachment 118177
Then it doesn't have a stock 80-83 TCI ignition. Lets see a pic inside the LH cam cover.
ABill
XS650 Enthusiast
Then it doesn't have a stock 80-83 TCI ignition. Lets see a pic inside the LH cam cover.
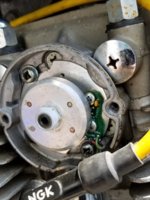
so I had absolutely no idea that the bike had a pamco. I know I probably should have checked, but the previous owner said it was stock. I'm not too familiar with all of this Electronics stuff, so now I think this opens up a whole different world of confusion. Here's a pic
Attachments
I'd say someone switched to a points or Pamco ignition?
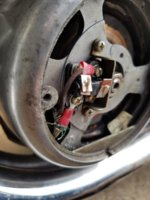
Boy, remind me never to let you near my bike with a wrench in your hand, lol. Your brush mounting looks just terrible and, on top of that, is totally wrong. Your brushes aren't connected to any wires (and they need to be). Each one of your brushes needs to be flipped around so the screws holding the wires also mount the brush assembly. Also, those Bakelite insulation squares should be better fitted under the brackets, and the brush wires should wrap around the sides of the brackets not the top and bottom. Notice the little notches on the brush block at each outer side. They are for the wires to run through. Here's what it should look like .....

Boy, remind me never to let you near my bike with a wrench in your hand, lol. Your brush mounting looks just terrible and, on top of that, is totally wrong. Your brushes aren't connected to any wires (and they need to be). Each one of your brushes needs to be flipped around so the screws holding the wires also mount the brush assembly. Also, those Bakelite insulation squares should be better fitted under the brackets, and the brush wires should wrap around the sides of the brackets not the top and bottom. Notice the little notches on the brush block at each outer side. They are for the wires to run through. Here's what it should look like .....
ABill
XS650 Enthusiast
Yeah tell me about it it's my first project of sorts and I've since fixed those after I realized my mistake! I do have a pamco I'm realizing. Never trust the PO is wringing in my head. So what's the next step?I'd say someone switched to a points or Pamco ignition?
Boy, remind me never to let you near my bike with a wrench in your hand, lol. Your brush mounting looks just terrible and, on top of that, is totally wrong. Your brushes aren't connected to any wires (and they need to be). Each one of your brushes needs to be flipped around so the screws holding the wires also mount the brush assembly. Also, those Bakelite insulation squares should be better fitted under the brackets, and the brush wires should wrap around the sides of the brackets not the top and bottom. Notice the little notches on the brush block at each outer side. They are for the wires to run through. Here's what it should look like .....

Well, as mentioned, all this brush stuff is for the charging system. It shouldn't keep the bike from starting or running. It won't run long if it isn't charging, only until the battery runs down, then it will quit, but it can run. I guess the next step would be to verify that the ignition timing (Pamco) is set close enough to run. You can't accurately set a Pamco not running. It needs to be set with a timing light while the bike is running. But you should be able to get it close just by experimenting, close enough to start the bike. In your Pamco pic, note the 2 large Phillips screws that hold the back plate with the little circuit board into the housing. Those screws fit into slots and that is your timing adjustment. Yours looks to be turned fully in the CW direction. Try loosening the screws and rotating the plate so it sits about in the middle of it's adjustment range. See if it will start then. If not, tweak the adjustment in small increments, say maybe by 1/8", and keep trying to start again.
open other cam cover and shoot a pic.
5twins is SO diplomatic, but he DOES know his stuff, LOL Far left on a pamco isn't unusual, if it was running fine before I'd look elsewhere first pull plug wires, put grounded plugs on BOTH wires, crank motor you got spark? ....
5twins is SO diplomatic, but he DOES know his stuff, LOL Far left on a pamco isn't unusual, if it was running fine before I'd look elsewhere first pull plug wires, put grounded plugs on BOTH wires, crank motor you got spark? ....
ABill
XS650 Enthusiast
Here a pic.open other cam cover and shoot a pic.
OK thanks, so it's a Pamco with e-advance. Usually pretty reliable. do tests i just asked. You can remove and use the plugs in the motor for the tests.
ABill
XS650 Enthusiast
Tried to no avail. This thing is kicking my assWell, as mentioned, all this brush stuff is for the charging system. It shouldn't keep the bike from starting or running. It won't run long if it isn't charging, only until the battery runs down, then it will quit, but it can run. I guess the next step would be to verify that the ignition timing (Pamco) is set close enough to run. You can't accurately set a Pamco not running. It needs to be set with a timing light while the bike is running. But you should be able to get it close just by experimenting, close enough to start the bike. In your Pamco pic, note the 2 large Phillips screws that hold the back plate with the little circuit board into the housing. Those screws fit into slots and that is your timing adjustment. Yours looks to be turned fully in the CW direction. Try loosening the screws and rotating the plate so it sits about in the middle of it's adjustment range. See if it will start then. If not, tweak the adjustment in small increments, say maybe by 1/8", and keep trying to start again.
look for fuses, get a tester and check that they all are good. (NOT just look good, LOL)
Is battery charged up?
Yeah tell me about it it's my first project of sorts and I've since fixed those after I realized my mistake! I do have a pamco I'm realizing. Never trust the PO is wringing in my head. So what's the next step?
Hi Bill,
a next step that would help us to help you is to post some photos of the complete bike and what you know of it's history.
Also add the bike's description (year, model, meaningful modifications etc.) to your signature line to avoid those bandwidth-wasting "what year?" posts.
ABill
XS650 Enthusiast
Yep.Is battery charged up?
To think all of this started with some handlebars. I just wanted to check brush length as the battery kept dying. Could it be the wiring I did? Maybe it's not cutting it?look for fuses, get a tester and check that they all are good. (NOT just look good, LOL)
Yes, I suppose it could be that, or any of the other old original wiring. Maybe some of the wiring connections are corroded or dirty. These bikes are so old that you really need to go through ALL the wiring when you get one, clean and inspect all the wiring and connections. But do check for spark first thing like Gary said. And I'll repeat his warning - you must ground the plug caps at all times when doing this or you can damage/fry the ignition system.
The red wire that goes to pamco, e-advance and coil needs to be +12 there may be a separate fuse on that wire. Pamco recommends installing a 7 amp fuse for ONLY that circuit. OK you said handlebars do tell; what did you do at handlebars??? The ignition power wire runs through the RH switch. Clues Watson! I can smell the clues floating on the gentle summer breeze.!
Last edited:
Similar threads
- Replies
- 26
- Views
- 923
- Replies
- 5
- Views
- 287