As can be seen from the photo of my failed attempts, one screw is never enough, (somehow that just doesn't sound right). With the brass screw in the drill, and holding it against the belt sander, it's fairly easy to sand out what sort of looks like the bushing. Using the old bushing as a guide, you can sand away everything that doesn't look like it belongs. Hold a hacksaw blade against the spinning screw to get a nice square edge on the bushing head. My first failure was sanding the diameter to small. The bushing should be an interference fit, and will have to be pressed into the metal arm that holds it. If it's the right size, you will have to press it into the support arm with your bench vice, and two pieces of wood. You techno geeks may even have a Michael (just plain mic if you're friends) to measure it with. Eyeballing is sort of hit or miss. Don't press it in until you have drilled the hole for the shaft
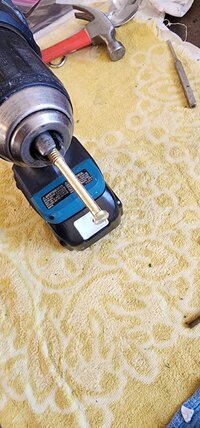
Drilling the proper size hole to the correct depth was the hardest part. Being a professional machinist, I went where all professionals go, Harbour Freight, and bought a variety pack of really little drill bits. I determined the correct size bit by trial and error. Drill a hole in the end of a spare screw, and test it for fit. Once again, a mic would take some of the guess work out of the process, but what fun is that! The cordless drill won't clamp down on the bit because they are too small, so just squeeze the bit in your bench vice, sticking out the side. Now here's the hard part. After you have determined the center of the bushing, and center punched it, put the screw in the drill, and drill the hole by pressing the rotating screw against the stationary drill bit. The hole needs to be very shallow so don't over do it. After the hole for the shaft is finished, cut the screw / bushing to the proper length by holding a hacksaw blade against it with the drill on. Hopefully your new bushing won't fly off, and disappear down the floor drain. More to come.
Drilling the proper size hole to the correct depth was the hardest part. Being a professional machinist, I went where all professionals go, Harbour Freight, and bought a variety pack of really little drill bits. I determined the correct size bit by trial and error. Drill a hole in the end of a spare screw, and test it for fit. Once again, a mic would take some of the guess work out of the process, but what fun is that! The cordless drill won't clamp down on the bit because they are too small, so just squeeze the bit in your bench vice, sticking out the side. Now here's the hard part. After you have determined the center of the bushing, and center punched it, put the screw in the drill, and drill the hole by pressing the rotating screw against the stationary drill bit. The hole needs to be very shallow so don't over do it. After the hole for the shaft is finished, cut the screw / bushing to the proper length by holding a hacksaw blade against it with the drill on. Hopefully your new bushing won't fly off, and disappear down the floor drain. More to come.