Attachments include all I have in my files on swap of 650 tank for 750.
I'm including here another file on tank prep/paining that had an extension my computer wouldn't allow.
Send me a photo of your project.
Charlie
Painting MC Tank
PAINT STRIPPER: Mask everythijng you don’t want stripped....gas tank filler, petcocks etc. use AIRPLANE brand. Wear real good protecticvve mask with charcoal filters, safety goggles and gloves and apron..watch your shoes..this stuff eats everythiong..don’t breathe it or pick your nose while stripping paint. Apply thick coat with single strokes. Let it bubble up, then use super dull scraper to remove gunk. Then apply a second coat and remove that down to bare metal with 8- grit steel wool. Examine for rust spots and fix them. then finish sand 200-400 grit
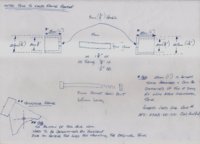
what I do is keep the paint back from the edge. The paint won't be effected by the gas, but if the gas gets below the paint you have a problem. So don't give it the chance to get up under it. Keep the paint edge back, say 3/8" or so. I never have problems like that when I do it this way. This is assuming the type of tank that has a short neck coming up for the cap. Either way, wherever the cap seal hits, keep the paint back from that area.
I usually take some 2" tape and lay it across the top of the filler neck then use a razor blade to trim the excess tape from around the outer diameter of the filler neck. [[[Phil..I have had paint lift at the cap when using top of the line urethane materials. That is why I keep it back now.]]]]If the tank is bare metal then a medium coat or two of epoxy primer is good insurance. Follow that with a couple coats of 2-K primer if the tank has some surface imperfections that need to be sanded flat. If the tank is bare metal and in excellent condition then there should be no reason to shot 2-K high fill urethane primer on it. A couple coats of epoxy and you can paint right over that. Most of the problems with gas causing the paint to lift around filler necks was because lacquer primer was used which was poros and the gas would penetrate that primer causing delamination problems. The new primers are pretty much bullet proof as are the urethane clear coats (or urethane single stage color coats).
For a really secure fix...I have applied a very thin film of 2 part epoxy (from the syringe type) inside of the filler hole and just coming over the top of the paint. It sealed the edge so that the gas/fumes would not get under the paint and start lifting. Used my finger to spead it around. The gas has not affected / broken down the "household" epoxy mix.
Kept the paint about a quarter inch from the filler neck,NO bubbling.lifting,etc.
when i re-painted my motorcycle, i taped off about 1/16th-1/8 back from the opening in the tank. when i removed the tape i put clear fingernail polish up to the little raised lip of the tank opening. then i used CARLINI brand paintsavers. the paint savers are a chrome trim ring that have a nitrile gasket to seal, and they keep liquid and fumes away from the surface. these paintsavers look awesome too. i bought mine from Jireh cycle for under 40 bucks. hope this helps
Wh eventually wrinkle when exposed to gasoline. I usually just mask
When you're satisfied, next comes color. I used Duplicolor Perfect Match Dark Cherry Metallic, supposedly a "perfect match" to the GM color of the same name. Start the spray past one end of the work and move it quickly across, and then past the the other end of the work, and go back the other direction. Overlap about 50% as you move up. Maintain a distance of about 9" from the work. The color will look very dull, and maybe mottled as well. That's ok, we're putting on the metallic paint "dry". Give it several coats about 1/2 hr apart, until the color is uniform. The surface reflectivity doesn't have to be uniform, but the density of color should be. Don't sand between coats of color. If the final color coat is very rough, give it a light sanding with about 800 grit, and then follow that with a final coat that you don't sand. You don't want to sand the final coat of metallic color.
Break out the Duplicolor Perfect Match clear. Give it about two or three coats, wait 1/2 hr, and sand with 800 grit then rinse and dry. For this sanding I made pads of corrugated cardboard cut from a box and wrapped the sand paper around it. When it's wet it conforms to the curves while still distributing your finger pressure. Don't sand into the color. Don't sand raised areas or edges or you will go through the clear. Repeat this process until the shiny spots where the sand paper doesn't hit disappear. The objective with the repeated clear and sanding is to eliminate those small spots - build up the finish, sand it down as much as you dare without hitting the color, then repeat, until the spots are gone. When the spots are gone to your satisfaction, give it one final coat of clear. If you sanded through to color, it's not a big deal, just apply more color if needed, followed by clear and sanding to that place.
Let the final clear dry two or three days. Now comes the fun part. The irregularities will all disappear and you will get a uniform mirror shine. This is where shortcomings due to spray cans disappear. Get some 2000 grit paper, it must be 2000 grit, and begin sanding the final coat of clear using the cardboard pad. Rinse occasionally. When it is all sanded and the spots are gone, give a thorough rinse. Break out the Turtle Wax Rubbing Compound. Cut a piece of bath towel and wrap it around a cardboard pad. Use the rubbing compound until the surface won't get any shinier. This will take maybe 20 minutes with a side cover. Rinse it very thoroughly. Now switch to Turtle Wax Polishing Compound. You do not want to get rubbing compound mixed with the polishing compound so use a fresh piece of towel and pad. Polish until it is shiny as it will get with this compound, about another 20 min. If you want you can follow this with Turtle Wax swirl remover, for an ultimate shine.
The Tank.
The tank is basically the same but there are a few differences. I didn't go to bare metal because I didn't want to invite adhesion problems. I prepared the existing finish and painted it, the way they would paint your car.
For the chips in the tank paint, I used a putty knife and enlarged them until the paint became hard to remove. Some tiny chips turned into some quarter size ones that way as I got the loose paint off. But it was the paint separating from the primer, with most of the primer remaining on the tank still. I followed up with high build primer on the chips. I used a rigid block to sand those areas made from a little slat of wood like you could break off of a ruler. Prime, sand, repeat until the chips are filled. Then give the whole thing a good coat of primer, and begin with color as before.
Ah - taping off the tank. Put masking tape where the petcock goes, extending outside of where the o-ring goes, to keep gas away from the paint. Tape the filler opening about 1/8" down from the top of the opening.
Continue with the clear as on the side covers. For the final clear you will probably want to use fuel proof clear. I used Spraymax 2k, which was interesting stuff. I used Duplicolor clear for the first clear layers on the tank to build it up at less expense. When you get ready for fuel proof clear, remove the tape from the filler and re-tape it with the tape straight across the opening. This will help prevent fuel from getting under the clear.
With the Spraymax, I put the tank upside down and sprayed several coats a few minutes apart on the bottom. I let it dry a couple of hours and then forgot about the bottom and put it on a box on my stand, so that it was only in contact with four points. I used a whole can on the tank with about maybe 15 minutes between coats. There was enough for five or six coats. There was a lot of orange peel, not overspray but uniform orange peel which I wasn't expecting. Not chemical reaction, just something to do with application.
The next day, the Spraymax was about as hard as the lacquer had been, so I did final sanding and polishing on it, exactly the same as with the side covers. The Spraymax is so hard now a couple of weeks later, that it might be hard to sand and polish.
The Turtle Wax products work with hand polishing. Some other brands are only good for machine.
When ready to remove the tape from where the petcock was, cut it around the periphery first, so it won't tear the clear.
So, nothing wrong with cans if you do it right. No reason to feel like second class citizens. Smooth and shiny is smooth and shiny, no way to tell whether it came from a can or a gun. I think it was probably under $75.and spray some epoxy or brush a little over the edge under the gas cap
If you don't put some kind of fuel proof clear on the tank, it'll eventually get messed up. The only fuel resistant one in a can that I know of is the Spraymax 2k. It is reportedly dangerous stuff. I worked outdoors, wore coveralls and rubber gloves, worked upwind, and didn't breathe. Before I started I realized I could hold my breath long enough to get a coat on, then step upwind and breathe some.
If you wanted to put a coat of that on you could wet sand what you have with about 800 grit and go at it. The next day or the day after you'd have to sand and polish like you already did. I'd test it first on the bottom of the tank just to make sure there was no reaction with your brand of lacquer. I was reading everywhere about people putting it over Duplicolor lacquer so I wasn't worried about that.area-works fine. Bob
When you get the sanding all done use epoxy as a sealer before your paint and when the paint is done seal your paint edge at the fuel filler hole with a coat of epoxy. A good epoxy primer is very fuel resistant, ver the edge under the gas cap area-works fine. Bob