dirtystanchez
XS650 Enthusiast
So, I was at a crossroads when my mac 2-into-1 exhaust wouldn't clear my TCBros forwards. And the more I looked at it, the clearance the bike lost if I did run the mac would be a little more than I was comfortable with. Since I lowered my bike I didn't want to be rubbing the mac on anything. So....... I decided to make something out of the stock pipes for my 81.
I thought I would share my quick-n-dirty solution with all of you since I recently read some threads where other members were asking how to do it. One member told another that you can "slip" on a 1-1/2" I.D. pipe over cut stock pipes. Just as others found out, the stock pipes, at least on an 81+, are a little bigger O.D. than 1.5". Here's what I did....... pics included. Here's what I bought.
Oreilly Auto Parts:
2 x 1-3/4" I.D. tail pipe extension (18 inches long) $12
1 x 1-1/2" I.D. coupler. (1-1/2" I.D. on both ends) $3
1 x Rust-oleum High Heat paint (2000 F) $9
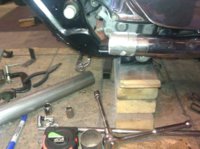
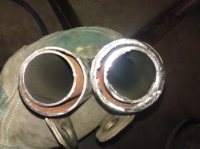
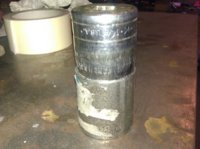
1. I cut the stock pipes 1-1/8" past the stock mounting bracket.
2. When you cut them, there is the outer ring left over. Grind the weld off and I used a good ol chisel and hammer to peel the outer ring off.
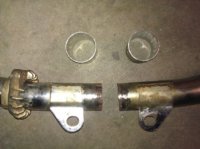
3. The 3rd pic shows the top one done and the bottom pipe just after cutting off the rear section.
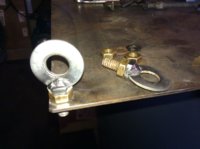
4. Now cut the 1-1/2" I.D. coupler in half. This gives you two pieces about 3-1/2" long.
5. I used a 1-1/8" socket and with the help of my BFH, I drove it into one end of the coupler pieces which spreads the hole out to an exact fit to slide over the end of the cut stock pipes. Home-Brew pipe expander.
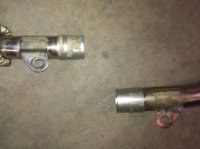
6. See the Pic of both pipes cut, outer ring removed and the two couplers - now adapters - sitting on the floor.
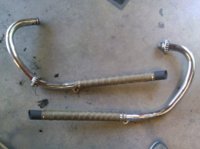
7. The next pic is with both couplers on the ends of the pipes.
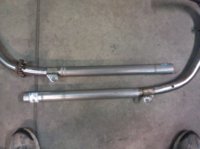
8. The next pic is with both 18" tail pipe extensions slipped on. The smaller end goes towards the front of the bike, and the flared end (1-3/4" I.D) is facing towards the rear of the bike. The non flared end of the 18" tail pipe extension is just right to slip over the unmolested end of the coupler.
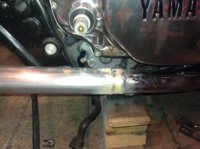
8. The other pics are of how it looks when fitting pipes on the bike. And my blingin' side cover!!
I'm not finished yet........ I will weld the inner exhaust tube to the outer so that it won't rattle. Now that I have tight joints, I will weld each joint together, clean up, spray with the high heat paint, and wrap the pipes with exhaust heat wrap material from the mount all the way back. I'll angle cut the ends of the pipes as well.
Hope this helps out. It's just my version of what $25 can do for exhaust pipes. I think that it will work out well, if not, it's just $25 and some elbow grease lost.
I thought I would share my quick-n-dirty solution with all of you since I recently read some threads where other members were asking how to do it. One member told another that you can "slip" on a 1-1/2" I.D. pipe over cut stock pipes. Just as others found out, the stock pipes, at least on an 81+, are a little bigger O.D. than 1.5". Here's what I did....... pics included. Here's what I bought.
Oreilly Auto Parts:
2 x 1-3/4" I.D. tail pipe extension (18 inches long) $12
1 x 1-1/2" I.D. coupler. (1-1/2" I.D. on both ends) $3
1 x Rust-oleum High Heat paint (2000 F) $9
1. I cut the stock pipes 1-1/8" past the stock mounting bracket.
2. When you cut them, there is the outer ring left over. Grind the weld off and I used a good ol chisel and hammer to peel the outer ring off.
3. The 3rd pic shows the top one done and the bottom pipe just after cutting off the rear section.
4. Now cut the 1-1/2" I.D. coupler in half. This gives you two pieces about 3-1/2" long.
5. I used a 1-1/8" socket and with the help of my BFH, I drove it into one end of the coupler pieces which spreads the hole out to an exact fit to slide over the end of the cut stock pipes. Home-Brew pipe expander.
6. See the Pic of both pipes cut, outer ring removed and the two couplers - now adapters - sitting on the floor.
7. The next pic is with both couplers on the ends of the pipes.
8. The next pic is with both 18" tail pipe extensions slipped on. The smaller end goes towards the front of the bike, and the flared end (1-3/4" I.D) is facing towards the rear of the bike. The non flared end of the 18" tail pipe extension is just right to slip over the unmolested end of the coupler.
8. The other pics are of how it looks when fitting pipes on the bike. And my blingin' side cover!!
I'm not finished yet........ I will weld the inner exhaust tube to the outer so that it won't rattle. Now that I have tight joints, I will weld each joint together, clean up, spray with the high heat paint, and wrap the pipes with exhaust heat wrap material from the mount all the way back. I'll angle cut the ends of the pipes as well.
Hope this helps out. It's just my version of what $25 can do for exhaust pipes. I think that it will work out well, if not, it's just $25 and some elbow grease lost.
Attachments


Last edited: