Help!! RPM's Crazy and out of control!

Rexxis

Almost there...
Messages
247
Reaction score
4
Points
16
Location
Oklahoma City
Running the 750 kit w open intake and exhaust. Nearing the end of my build and this is the first time the bike has ran since I bought it. Bike revs crazy high on start-up. No tach but I'd guess it's around the 5k range.

Throttle cable is good and slides are sitting at bottom and return when pushed up. Diaphragms are good and slides fall slowly when the crescent shaped port at top of intake bell is covered. Idle screws are turned 2.25 turns out. Factory setting for my year. Any other settings I should be concerned with?

Jet sizes currently
Main 140
Pilot 30

Originals that were in my carbs(carbs are not the originals that came w my motor)
Main 135
Pilot 27.5

I checked and the bike was previously using the factory size jets so that means I definitely only went 2+ on mains and 1+ on pilot. I was worrying that maybe a PO had already upped the jets and I was upping it even more but this is not the case.

The change in jetting wouldn't cause such a drastic increase in RPM's would it? I would think that changing the main by two sizes might increase the RPM's a little but to nearly what I would guess is around the 5k range.. I think something else is going on. I really don't know though as my experience is next to nothing.

Could a vacuum leak cause such a drastic response to RPM? My carb boots were abt as hard as rocks.. New ones just arrived and will replace soon as air barb plugs and proper hose clamps arrive. I've got the gaskets between head and boots but I didn' use any gasket glue, should I use some kind of gasket glue? I just hate scraping gaskets so when the carbs have to come off again(which I know they inevitably will), I didn't want to have to scrape and replace the gaskets every time.

I'm hoping one of you gurus will see this soon and maybe be able to get me pointed in the right direction. I'm pretty much stumped right now and I have a feeling the new boots aren't the solution, but hey, I needed new ones anyway.:confused:
 
Last edited:
You didn't need to post this question in 2 threads, but since you did, I know how to copy and paste as well.

The usual suspects for a hovering high idle are: air leaks, sticking ATU,carbs not sychronized. Its important that both butterflys in the carbs can go fully closed.

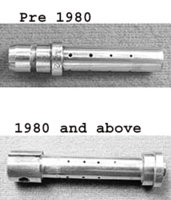
I recently had my rpms hovering high, and found that one carb had a worn out O-ring on the needle jet. Once I replaced the O-rings with new ones, I no longer have the hovering. I was able to actually see raw gas being sucked up around the needle jet.

The picture shows the 70 to 79 needle jets. The groove is where the O-ring lives.

Leave your air box/pods off, and with engine idling, use a mirror to view the needle jet.

The O-rings may or may not be your problem, but if they are original, then they are worn out and should be replaced anyway.

Also, you don't need to take the intake manifolds off each time you want to remove the carbs. Just undo the clamps and take the carbs out of the manifolds. Remove the dipstick, the camchain adjuster nut, and the throttle cable bracket on top of the left carb. Its a little tight but the carbs will then comeout on the right side. Lubricate the rubber intake manifolds (I use dielectric grease) and they will pop in and out quite easily.
 

Attachments

  • needle_jets_xs650_546.jpg
    needle_jets_xs650_546.jpg
    51.8 KB · Views: 243
Oh man, I hadn't even thought abt the needle jets and o-rings. It's been a year or so since I rebuilt and just now getting to actual testing. The kits I bought from Mike's didn't come w the needle jets or rings so that may be the culprit.

How do I access the needle jets? From the drain plugs, behind the mains?

I'll be tearing into the carbs today after work. I'll report back in w what I find.
 
I had the similar issue, it would not rev high on startup like yours, but if you turned the throttle it would rev high and stay there. Chased after carb issues but in the end I replaced the ATU and that solved my problem.
 
Oh man, I hadn't even thought abt the needle jets and o-rings. It's been a year or so since I rebuilt and just now getting to actual testing. The kits I bought from Mike's didn't come w the needle jets or rings so that may be the culprit.

How do I access the needle jets? From the drain plugs, behind the mains?

I'll be tearing into the carbs today after work. I'll report back in w what I find.

Remove the carbs from the bike. Remove the float bowls. Its optional if you want to remove the floats..............it gives a little more clearance to work. You may now be able to pull on the emulsion tube (needle jet) if its not stuck. Its easier to remove the top aluminum diaphram cover, and remove the diaphams/jet needles. Use a small punch to tap on the jet needle from the top, and it will come out on the bottom side.
 
Your needle jet is a push fit up into the main carb body and is held in place by the float bowl. You'll need to remove the bowl to access it. The needle jet is the large brass tube in the center in the pic below .....

PilotInletBS38.jpg


Place your finger over the top of it and see if it will wiggle in it's mounting hole. If it does, that's a good indication that the o-ring has perished or worn to the point of needing replacement. Most BS38 carb sets I work on need them.
 
Ok, Perfect. Big thanks guys. Will update this evening on how it turns out. Stay tuned.

Btw, atu is new, pamco ultimate. Springs work properly and everything snaps back in place when I let go, I greased up the shaft :wink2: nicely before installation as well.
 
To answer another of your questions, larger mains shouldn't make the RPMs race like that. If you actually pull the carb set off, hold it up to a good light and look through the bores from the engine side. You want to be seeing a small crack of light at the bottom of each butterfly plate, just a sliver and it should be the same in each carb. If one is open more than the other, your carbs are out of sync.
 
Ok, the plates are sitting pretty much identical when I looked two days ago. I was referencing them to the little set of three holes though and not looking through them at a light source. I will do that this afternoon. If I'm not seeing any light then how would I adjust that? The screws that hold the plates to the shaft? I tried removing them when I first rebuilt my carbs but they were set tight and I was unable to break them free w/out fear of buggering up the slots in the screws.
 
The cable arm stop screw on the left carb sets the opening of both plates in unison. It is your overall idle speed adjustment screw. The sync screw on the linkage between the carbs adjusts the right carb's butterfly plate only so you can match it to the one in the left carb.

AdjustScrews.jpg


When you match the butterfly plate openings with the carbs off like this, you're doing what's called a "bench sync". The way I do it is by backing off the idle adjust screw on the left carb until it no longer touches the cable arm. If the carbs are in sync, both butterfly plates will be completely closed and show no light. If one or the other does, the carbs are out of sync. I adjust the sync screw until the open plate closes. I keep turning it until the other plate starts to open. Perfect sync is somewhere between those two points. I re-set the sync screw to about the midway point between the two plates beginning to open. I then turn the idle speed adjustment screw back in until both plates open just a hair and show a sliver of light.
 
Ok, needle jets were snug, no play at all. So, they may not have been the problem. Here come some pictures and MORE questions. Thanks for everyone's patience.

I removed the needles jets anyway to to have a look at the o rings, will be replacing them. They were smushed flat
e8bf0cf2.jpg


Plates are set exactly even but no gap at bottom whatsoever. I couldn't see a trace of light except for the tiniest specs near the side at the shaft. So I should adjust for a tiny gap yes?
Left
6d8034b6.jpg

Right
fc903421.jpg


Abt my slides and diaphragms, One is new bc the diaphragm was missing when I got the carbs so I bought new. The old one seems good to me but is slightly stiffer than the new.. Could this be an issue when I get to tuning?
5579aaae.jpg


Needle clip positions
2d20c2d7.jpg


I had no idea how to plumb the carbs when I got them bc they were off the bike, I don't think they are the original ones that came with the bike from the factory. The letter on the bottom of the bowls is an O. The fella at the Yamaha shop briefly told me how to plumb them. Is this correct? All hoses disappearing out of the bottom of the picture are ran out the bottom of the bike, they are vent tubes he said. Are the two smaller tubes that are criss-crossing in the center of the photo supposed to be bridged to each other or are they supposed to be independent of each other?

Thanks guys.
71fc1607.jpg
 
That's not a '78-'79 carb set. From the looks of it, it's a '76-'77 set. Jetting was way different than the '78-'79 set. Based on that and what was stock for the '76-'77 set, your mains may be too big, pilots too, and the mix screw setting was 1.5 turns out. Here's a chart I drew up listing the stock jetting for the various years. As you can see, you're way big on the mains compared to the stock 122.5 for that carb set .....

CarbSpecsReducedSize.jpg


The limiting factor for main jet size in your carb set is going to be that very large Z-8 needle jet. It will probably limit your mains to the mid to upper 130s. You're also going to need to lean your needle setting a step.
 
All your plumbing is right. The small hoses between the carbs are float bowl vents. The small hoses out the bottom are float bowl overflows.
Leo
 
Well shit.. Ok, thanks 5Twins!

Ok, I was hoping the fix was as simple as the hoses needing to be bridged.. Damn. Thanks Leo.

So then the jets that were in the carbs when I got them (main was a 135 and pilot was 27.5) may be a good fit for my setup? Looks like somebody jetted them same as the '78-'79 factory settings. To lean the needle means moving the clips one notch up yes? Still though, jetting is likely not the cause of the problem.

To answer another of your questions, larger mains shouldn't make the RPMs race like that.

I'll turn my idle screws in to the correct setting for the carbs but I messed with the idle screws before and it had no effect as far the high RPM's are concerned so that probably wont fix my problem either.

Do the o-rings on the needle jets look bad enough to be causing the high RPM's?

Any other possible causes for this besides carburation?

Frustration levels rising..
 
I've read it more times than I care to remember. I used it as my main resource when I rebuilt these carbs this last winter. Priceless information to be had there.

Well I got my carb boots in and guess what.. The guy sent me the wrong damn ones. So now I have to wait even longer to get everything back together.

Earlier when I said that I messed with my idle screw and that it made no difference, well that's not quite true bc I was turning the small screws that are right by the choke plunger. :doh: Air screws? They should be what, abt 1 1/2 turns out? I will double check the idle screw once the carb boots come in and I can get the carbs back on the bike. With the carbs sitting here on my desk, the idle screw is adjusted so that the plates are fully closed.
 
You'll want to turn the idle adjust screw in until both plates open a hair or the bike won't idle. That's what controls the idle speed, the plates being open a little bit - the more they are open, the faster it'll idle.
 
Could my float height play a part in any of this. They were adjusted incorrectly by 1mm when the problem was occuring. Originally, I had to adjust my tabs quite a bit to get to the 24 mm mark for a '78-'79 carb. Now that I know my carbs are '76-'77 I need to readjust to 25mm
 
The float height does effect the mixture. More fuel in the bowl, the bike runs richer. The one mm difference should be ok. It should run ok, just have to adjust the mix screws a bit to compensate.
The small screws by the enricheners is the idle air mix screws.
They should be set to 1.5 turns to start. Once you get the bike running then you can fine tune the mix screws with the dead cylinder method.
Leo

How do you go about "fine tuning" if you have a pamco? (not sure if the OP does) but i'm curious because i'm having this same issue but have a pamco and can't pull a plug
 
Back
Top