looking for broken Tach Needle solutions

DogBunny

Motorcychologist
Top Contributor
Messages
3,788
Reaction score
5,048
Points
513
Location
Austin, Texas
I would appreciate suggestions from those who have already actually done this fix.
My tach needle broke in two. Part of it is still attached to the mechanism and still works.
My idea is to take a toothpick, paint it red-orange, and glue it onto the part of the needle that is still working using clear epoxy. Or, maybe I should cut a new needle out of an old credit card instead.
Does anyone have a better solution, or any tips or suggestions? Any better ideas regarding what glue to use?

The real bummer is that I just opened up this same tach about a week ago. The tach came on a new acquisition, and the face and inside glass surface were dirty and fogged, so I went inside and cleaned them up. Now I have to go inside it again.
 
DogBunny, I've got a tach from my 78'SE that I replaced a couple years ago. It looks great, not faded or fogged. I replaced it because it was acting sluggish. If you want it you can have it for shipping. PM me your address.

ps. does not include chrome bucket.

roy
 
nj1639, I will look into the swap. Has the superglue fix held? Did you just superglue the two halves back together, or did you make a new needle to overlay on top? I'm afraid that the needle will just break again in another spot if I glue the two original pieces back together.

Royboy, thank you for the offer, I have sent you a PM.

I would still appreciate any further suggestions. I actually have at least two other gauges with broken needles.
 
I've had fantastic luck with the new 'gorilla' superglue, the one with the rubberized ingredients. Read the ingredients label to be sure. It is especially good on rubber parts 'cause it'll flex, not crack like original stuff...
 
two part plastic bumper epoxy is worth having on the pegboard. (it is black...)
I used orange string trimmer line as a tach needle along time ago. The KZ1300s needles would bend, heat, careful reshaping and orange paint were the fix but the paint fades quickly. Used tachs are dime a dozen IMHO don't repair, replace.

Tips on opening the glass?
 
I tried popping the broken needle off, and I think I might have permanently destroyed that particular tach mechanism. It didn't pop off, it broke off. I think it could be glued back on, but I'm not sure if it would still be calibrated/pointed in the original position. No big deal, I have several units to play with.
Good ideas from all. I am interested in trying both the non-cracking Gorilla superglue and the bumper epoxy. If not for this application, then for other uses. And I like the needle reinforcement idea.

Removing the glass is fussy and takes patience, but is very doable. I know there are whole threads on it, but I just dug in, starting with a small sharp screwdriver on the folded-over edge of the bezel. Once you get a foot-hold, you work your way around with the small screwdriver, and then work your way up to larger screwdrivers, and needle-nose pliers. I'm sure everyone will do it a little differently depending on their tools, skill, and patience. After I re-attached the bezel and assembled the bucket and damper, you could never tell that the glass had ever been disturbed. What I did was to slowly work my may around the bezel tapping with a hammer and flat punch. Unfortunately, all that tapping dislodged particles which settled on the glass that I had just cleaned. On the next one, I am going to try crimping the bezel back down with Channel-Locks, using something to protect the front of the bezel from tool marks.
 
I hack sawed the bezel off by cutting in two places and then used 4" diameter heat shrink tubing to replace it. For the needle, I used a very small colored heat shrink tube to join the two pieces of needle without removing the stub from the shaft.

Here's a pic of another speedo that I took apart to replace the glass and clean up a bit using the 4" heat shrink tubing trick to replace the bezel:

shrink.jpg
 
I took a little piece of aluminum foil coated with epoxy and used it as backing for the two halves of the needle stuck back together. When dry, trim with something very sharp. Worked great, but broke again.

The reason it broke both times is due to vibration and swinging of the needle. I found that if you replace the foam gaskets between the bezel and the case the needle stays as steady as one on a car. They are still available new from dealers.

650skull came up with a simple way of removing and replacing the bezel. It is very easy, much easier than you'd think just from looking.
 
pamcopete, good trick.

I found the 650Skull album that xjwmx referred to, it is excellent and is here:
http://www.xs650.com/media/albums/1728/
I basically did the exact same thing except for making the special bent screwdriver tool, which I think is an improvement.
I still think there has to be a better way to re-press the folded-over bezel lip back down. It takes a tremendous amount of tapping to complete the job, and you are going to dislodge little particles of crud that will wind up in the worst places.
BTW, the gasket between the gauge and the bucket was in excellent condition, as were the the two little damper rubbers on the mounting bolts, and everything was assembled correctly and in good condition when my needle broke. My needle was very steady. It still broke.
 
I still think there has to be a better way to re-press the folded-over bezel lip back down. It takes a tremendous amount of tapping to complete the job, and you are going to dislodge little particles of crud that will wind up in the worst places.

It doesn't take any tapping at all. You press it back down, using the same screwdriver. It's very easy; the bezel is very thin metal. If you tap it, yes you will break something.

Regarding the cause, I've had three of them break. I fixed the first one before I realized it isn't worth it. I got replacements with good needles and replaced the gaskets with new ones, and have several thousand highway miles with no problems.
 
nj1639, I will look into the swap. Has the superglue fix held? Did you just superglue the two halves back together, or did you make a new needle to overlay on top? I'm afraid that the needle will just break again in another spot if I glue the two original pieces back .


Mine broke right at the base so there was a bit of strength by adding a bit of glue to the base. Not sure how it would work out in the middle or towards the point. A re-in forcement on the underside might be the trick.
 
It doesn't take any tapping at all. You press it back down, using the same screwdriver. It's very easy; the bezel is very thin metal. If you tap it, yes you will break something.

Regarding the cause, I've had three of them break. I fixed the first one before I realized it isn't worth it. I got replacements with good needles and replaced the gaskets with new ones, and have several thousand highway miles with no problems.
In 650Skull's album, he taps, he does not use a screwdriver. However, I can see how using a screwdriver would work.
I tried the Channel-Locks with a plate and a piece of inner-tube to protect the front of the bezel, it worked okay. I want to do a final press with something I am going to try and buy on Monday. I actually have bunches of these things to fix, so I don't mind making a final press tool.

I am fairly surprised that you don't think this repair is worth it. It's not that hard to do, and good looking gauges usually get a minimum of $40 on eBay.

I want to remind everyone to lock-tite the two tiny screws that hold the dial face onto the unit while it is opened up. I have a couple of gauges where they have rattled out, and like the broken needles, this seems to be fairly common too.
 
^I think it's not worth it because the needle repair is like trying to repair a broken egg, although the taking the glass off part is easy. You work hard enough you'll get the egg back together but it won't look right and it will be fragile.

Unless you're working on a year that's real different from mine, the way to do it is a corner of the curved screwdriver lifts up a bit of the lip and you continue around in several passes lifting a little at a time. Takes less than six passes. The curve in the screwdriver is what gives it bite and gives it a fulcrum. To put the bezel back on, just push the crimping back down with the screwdriver. Maybe you're working on one that's different from mine.

Now - if somebody was set up to mold replacement needles (along with the center hub), they'd be onto something. That should be up your alley. You would sell all you could make. There are many hobby casting plastics out there.
 
I have played around with removing the needle from a XS400 Special gauge, (Has the needle stop in the back mechanism), and it is a pain and a little scary. Got 2 bent screwdrivers and levered evenly from each side. I was concerned how the face was bending with the levered pressure and if i was damaging it by scratching. I moveed around the spindle to hopefully relieve the tension. It finally come off and once it was, it was easy to replace and remove again. maybe they lock tight them from the factory. Be prepared to brake some.

On the Gauge face removal.
When i first done this i was concerned that the vibration of the tapping would or could cause something to get damaged inside the speddo/tac. It did, the reflector/tunnel for the instrument lights vibrated loose, that is why i now superglue them before installing the gauge back into the cups.

I thoroughly clean the cups and the back of the drive mechanism with a small brush to remove as much of the loose/any dirt that may have accumulated in there. Yea sometimes i haven't got it all and it falls out to the front but it soon goes back to the bottom of the gauge. It cant cause any probs there.

I used the tapping method so the metal would be put back evenly, and as you see in the second to last pic by doing it on an angle for a start, ( the 3/8th drive screwdriver is convex on the bottom), the bezel metal gets put back over the lip to make a good seal. My main concern was getting creases in the bezel if things weren't done in small increments and to get the best waterproofing seal as i could,. I couldn't get a good seal by hand pushing.

74/75 Gauges have a metal casing, then from 76 on they are plastic. the 74/75 gauge has the needle stop in the back mechanism so removing and replacing the needle doesn't affect the spring tension. On the 76 and later gauges the needle stop is on the face, so the spring tension has to be held or, before removing the needle, mark the drive at the back for reference. The 74-78 Standards have a metal needle so swapping those over and painting may be an option.

What difference does the weight play? I don't know, the articles on speddo accuracy when tested new wasn't real hot, so i guess a couple of more mph out wont matter.

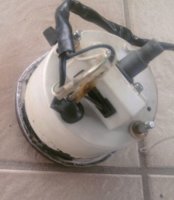
Pics of a gauge i bought that was sold to me as in, "Very good condition", When i queried the seller he was like, "whats wrong with it". lol. A good example of how not to remove/replace a bezel

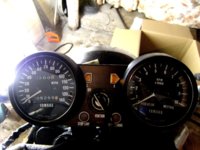
A pic of my 74/75 Gauges i cleaned the face on. They aren't real flash, but just cleaning the glass made them look real fresh and looked a million dollars better. The smudges are from the lanolin oil i use for protection/cleaning.
 

Attachments

  • Photo082.jpg
    Photo082.jpg
    57.8 KB · Views: 241
  • Photo081.jpg
    Photo081.jpg
    57.2 KB · Views: 227
  • Copy of DSCF7046.JPG
    Copy of DSCF7046.JPG
    106.5 KB · Views: 249
Last edited:
As for accuracy, someone made a mark on something inside that rotates with the spindle, while the broken needle is pointing at say 50mph, and another mark on something inside that's fixed. Then all you have to do is line up the marks and push the new needle on in the 50mph position.
 
Back
Top