rode....,
Well, the regulator and rectifier come to mind. The stock regulator is junk, even when it was new 30 + years ago. The rectifier uses technology that is no longer in use. The end result of this is a shortened life for the battery and rotor because they are working harder than they need to.
The rotor is $125 and the battery is $40. You can replace the reg and rect for under $20, so It's a no brainer.
Here's the scoop on the regulator:
This regulator requires you to modify the connections on the brushes of your alternator to work like the brushes on a '80 to '84 model.
1. Got to
www.napaonline.com or your local NAPA store.
2. Search for part NAPA MPEVR38SB $14.99
3. Remove the ground connection from the inner brush.
4. Replace the three screws on the brush holder with nylon (not plastic) screws (M4-12)
5. Run a wire with a 7.5A inline fuse from the now isolated brush to a source of +12 volts from the ign switch (brown wire)
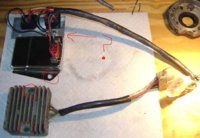
6. Install and wire the regulator as shown. The wire connections to the regulator use female bullet terminals.
7. The regulator does not have a ground wire. You must ensure that the case of the regulator is grounded. The battery box, where the stock regulator mounts, floats on its rubber mountings and is not a ground.
In the process of testing this setup for the '80 to '84 models I modified my bike as above and installed the regulator. Works the same as the VR291.
This regulator was used on virtually all Chrysler products from 1970 to 1989. It supplies a regulated ground on the green wire to the rotor brush instead of battery so if the rotor shorts out to ground it will not fry the regulator or blow the main fuse. I like it because it is technology from the same era as my '78 XS650 and it's available everywhere for a very low cost, not because it's a cheap product, but because there are lots of them out there and the auto stores are interested in selling them. Advance offers a
one year warranty.
The wire connections to the regulator use female bullet connections, but you should remove the protective plastic from the connections for better contact.
Note: Also available from NAPA as their part number MPEVR38SB for $16.69 or from your local "retired vehicle" yard for $5.
Here's the deal on the rectifier:
Here is a suggested replacement for the rectifier on 1970 to 1979 XS650's. Go to Radio Shack and buy 2 #276 - 1185 Full Wave Bridge Rectifiers for $3.29 ea.. Wire and mount them as follows:
1. Fabricate an aluminum plate approx 3 X 2 inches. Use .125 aluminum. This is the heat sink.
2. Mount the Rectifiers per the drawing, using heat sink compound between the bottom of the rectifiers and the plate.
3. Solder wires per the diagram.
4. Recommend that you eliminate the plug and connector as they are toast and you have to solder anyway.
5. Solder the wires from the Rectifiers per the diagram to the existing white wires going to the Alternator and plus / minus (Red / Black).
6. Use a heat sink when soldering the wires to the rectifiers.
7. Mount this assembly in the same place as the original, using either the center hole (as shown) or one of the mounting holes for one of the rectifiers.
8. Note: Do not ground the black wire on the mounting screws. The battery box is floating, it is not a ground.
The Radio Shack rectifier is rated at 25 amps. Two of the three white wires go to one rectifier and the other one goes to the other rectifier, so about 10 amps max is going through one rectifier at full load, with the remainder, 5 amps, going through the other.
The "N/C" terminal can be used as a spare in case one of the diodes shorts out in the future. You could "pre solder" a short wire to it so if you have to use it you can just cut and splice the affected white wire to it.....don't even need a soldering iron!
Life is simple: Ride. Enjoy.


 ....a used replacement? Like, the used replacement will also be 30+ years old.
 where else can we get the parts