You got it buddy!
-
Enjoy XS650.com? Consider making a donation to help support the site.
XS650.com receives a small share of sales from some links on this page, but direct donations have a much greater impact on keeping this site going.
You are using an out of date browser. It may not display this or other websites correctly.
You should upgrade or use an alternative browser.
You should upgrade or use an alternative browser.
Mailman’s XS2 a full on restoration
- Thread starter Mailman
- Start date
yamageddon
XS650 Addict
http://blog.garagistry.com/2012/04/the-mystery-of-marvel-mystery-oil.html
"Oil of wintergreen - for the scent and is also a cleaner. May aid lubricity."
On another website they say it's for the fragrance, so I don't think it's enough for the rubber parts...
")
.PDF alert:
http://www1.mscdirect.com/MSDS/MSDS00011/00140145-20170210.PDF
Meddy
XS650 Addict
This is what we are charged for a 1 (US) Gallon of Simple green from our Amazon Australia
Check out Bunnings Skull, $10.00 for a litre of concentrate.
https://www.bunnings.com.au/simple-green-1l-green-concentrate-all-purpose-cleaner_p4470509
Photos as promised sir!
QUOTE="gggGary, post: 545351, member: 743"]
 [/QUOTE]
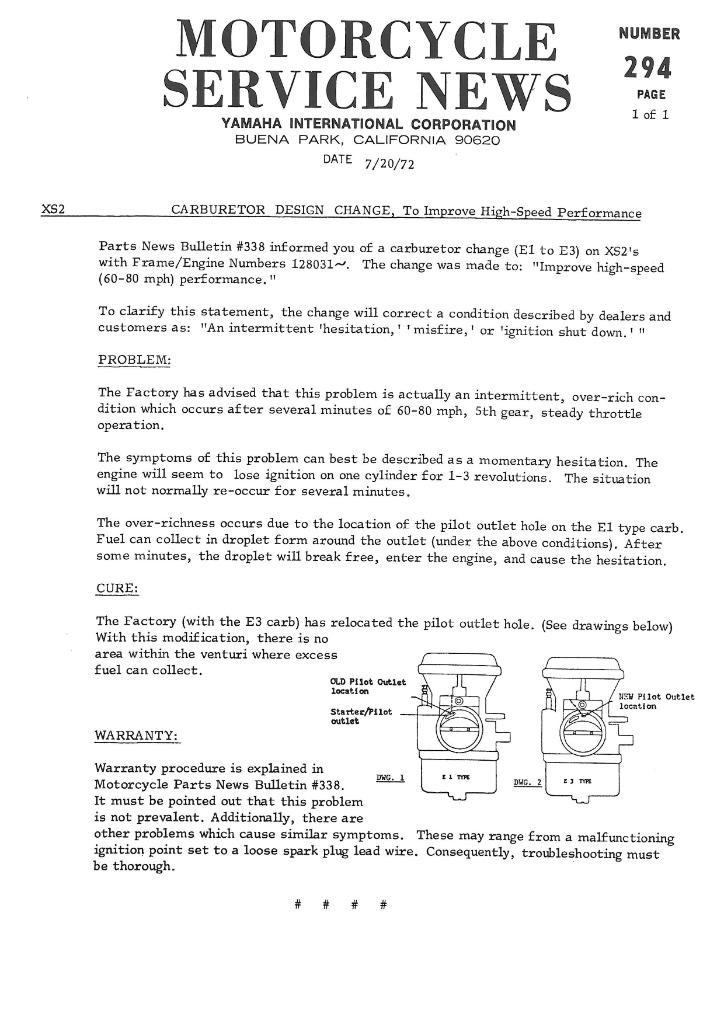
My carb was prior to the redesigned pilot jet port.


I will send you a few more photos in a PM.
QUOTE="gggGary, post: 545351, member: 743"]
My carb was prior to the redesigned pilot jet port.
I will send you a few more photos in a PM.
Bob,I guess the drip problem isn't a big deal although it could make one do all sorts of trouble shooting trying to find the stumble if this wasn't known. What if the edge, (in the carb throat), was rounded off so the drip couldn't build up against???
Bob,I guess the drip problem isn't a big deal although it could make one do all sorts of trouble shooting trying to find the stumble if this wasn't known. What if the edge, (in the carb throat), was rounded off so the drip couldn't build up against???
That would probably actually work. It wouldn’t take much. I’m not terribly concerned though, I have no intentions of doing any prolonged storming around on this bike. This will be used mostly just for short , easy rides.
OBSESSION,
What is it that drives us to spend countless hours perfecting old parts that no one will ever see? I worked for hours to make sure that the inside of my carburetors were shiny....THE INSIDES!
Today, I worked on my centerstand, most of the day. It was a cruddy , rusty, acid etched mess.

I scraped the crud off and wire brushed it. Then I washed it in hot soapy water. Then put paint stripper on it, waited, washed it again. Then I went all over it filing down nicks and scrapes, cleaning welding spatter off, grinding welds smooth, then I wet sanded the whole thing. Finally I wiped the whole thing down with paint thinner and let it dry.

Then hung it in my rotisserie tree and spray painted it.

All of that effort for a chunk of iron that hangs under the bike collecting oil fumes and road spray and you wanna know the kicker? One of the legs still had some contaminate on it because the paint is full of bubbles. I will have to let it harden and re sand and spray that leg.
What is it that drives us to spend countless hours perfecting old parts that no one will ever see? I worked for hours to make sure that the inside of my carburetors were shiny....THE INSIDES!
Today, I worked on my centerstand, most of the day. It was a cruddy , rusty, acid etched mess.
I scraped the crud off and wire brushed it. Then I washed it in hot soapy water. Then put paint stripper on it, waited, washed it again. Then I went all over it filing down nicks and scrapes, cleaning welding spatter off, grinding welds smooth, then I wet sanded the whole thing. Finally I wiped the whole thing down with paint thinner and let it dry.
Then hung it in my rotisserie tree and spray painted it.
All of that effort for a chunk of iron that hangs under the bike collecting oil fumes and road spray and you wanna know the kicker? One of the legs still had some contaminate on it because the paint is full of bubbles. I will have to let it harden and re sand and spray that leg.
That would probably actually work. It wouldn’t take much. I’m not terribly concerned though, I have no intentions of doing any prolonged storming around on this bike. This will be used mostly just for short , easy rides.
With your camera............
With your camera............
Yes! Absolutely!
It looks like your 'tang' on the center stand is already braced...was this originally
done and if so, why not do this for the later years? More cost, perhaps?
Yes, it’s all original. Who can say why they do what they do? These early years had lots of changes and one off pieces.
I might have to give the Captain OCD title back....All of that effort for a chunk of iron that hangs under the bike collecting oil fumes and road spray...
Haha! No no no! There are different levels of OCD. I bow to the master!
Ha! I just had to show this to you guys. I rolled my bike out for what I figured would be a real battle.
Removing my rear swing arm. I did no preparation for this, no penetrating oil, nothing.
The zerks came right out. The swing arm nut spun right off. I checked the swing arm for play....nothing. The swing arm easily moves up and down.
Now to remove the swing arm bolt. I have read horror stories in this forum about these things being so frozen in there they had to beat for hours!
I gripped it with my finger tips and just slid it out. No corrosion, well greased, the bolt is shiny and the grease looks fresh. Unbelievable!
Looks like it was your day to eat the bear.....

Ya gotta love it when things go your way
Ya gotta love it when things go your way
Looks like it was your day to eat the bear.....
View attachment 116619
Ya gotta love it when things go your way
Haha, I love it!
If the original swingarm bushings are still good, there's no need to change them. Those much-hated plastic bushings actually work quite well and last very well too if kept greased - and yours apparently were.
I will mention grease fittings for the centerstand pivots ..... and be gentle on that flat sided grommet for the front pin on the chain guard. Those things are N.L.A. and one of the rarest parts on the bike, lol.
I will mention grease fittings for the centerstand pivots ..... and be gentle on that flat sided grommet for the front pin on the chain guard. Those things are N.L.A. and one of the rarest parts on the bike, lol.
Looks like someone already put bronze bushings in.....
