1974 BS38 Carb enriching system

cbuckle

XS650 Enthusiast
Messages
40
Reaction score
4
Points
8
Location
Ontario, Canada
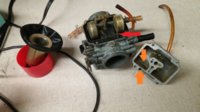
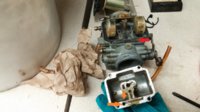
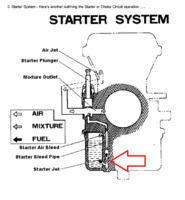
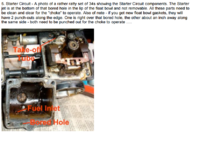
Winter project was to dig in and clean carbs to have them ready for spring and I noticed the fuel pick-up for the enriching system in the left carb bowl is plugged. I inspected the right carb bowl and it was plugged as well. I have been following http://www.amckayltd.com/carbguide.pdf and on page 29 (shows a picture) where it appears this tube (or starter jet) is very narrow. Can someone tell me what gauge wire or drill bit I should be poking down there. Page 31 shows a take-off tube/needle jet which I have, but only on the left carb. I am assuming the right side does not need one because of the inter connecting tubes? Also assuming the left and right bowl are identical incase the operator mixed them up. Just looking for a little clarity/reassurance
 

Attachments

  • left Carb with fuel enricher.jpg
    left Carb with fuel enricher.jpg
    146.4 KB · Views: 179
  • right Carb.jpg
    right Carb.jpg
    138.8 KB · Views: 213
  • starter system.PNG
    starter system.PNG
    204.3 KB · Views: 300
  • bored hole.PNG
    bored hole.PNG
    548.1 KB · Views: 214
You can't replace that starter jet so probing/poking isn't encouraged. Chemical cleaning (aerosol carb cleaner) and compressed air is recommended.
 
As weekender said the jet is not replaceable. After the holes are bored the jet is pressed down into the hole. I assume they made both bowls the same, not so much for us mixing them up as for the factory people not mixing them up.
Set the bowls upright. Spray carb cleaner into the hole going down to the jet as well as enough into the bowl so it covers the hole from the jet into the bowl. Let it soak for a bit, overnight works for me.
Then use a rubber tipped blow gun to blow air down into the jet from both sides. Pour out the cleaner first though.
This should clear the holes and jet, if not repeat till they are clear.
For probing these small holes and passages in the carbs I use a quick tie off a loaf of bread. The tie is a fine wire covered by paper or plastic. Strip about a 1/2 inch off one end. This fine wire is steel but very soft. It minimizes the possibility of gouging out the soft brass and alloy parts. You can still gouge these parts but be gentle.
Leo
 
Thanks for the advise. after a 24 hour soak I'm still not through. good thing I have most of the winter to work on it. I'm going to order Carb kit 48-1919 and replacement O-rings for the main needle jet Part #48-5020. Any other carb parts would you recommend replacing? The bike only has 2000 miles on it
Thanks- Chris
 
http://www.amckayltd.com/carbguide.pdf on page 13 indicates that each carb should have a tubular casting for the enriching system. My right Carb does not have this tube and I cannot seem to find it on mikesXS. Is the document misleading? or should I have two 'needle jets', one for each carb. I was under the impression that the right carb got its enriched fuel from the left carb through the tube. Also, the soak worked!
 
Yes there were a lot of changes to the BS38's as the years went by. You are right the 74 75 have just one choke circuit, rich mix sent to the other carb via a rubber tube.
FWIW soak blow from both sides of that float bowl orifice, alternating. I have a sharpened piece of SS safety wire to help CAREFULLY probe that hole..... You can sharpen a wire on a wet wheel. Pilot jets can be real SOBs to reopen also. If I wasn't so stubborn I'd just replace them. Probably should replace more brass than I do.
 
The carb guide is a "general" document and doesn't cover everything about every carb set. The page you reference and the appendage, in particular, is a later set of 34's. The jet in the bowl you just cleaned, in fact every part of what most refer to as the choke or enricher system, Yamaha refers to as the starter system of the carb. Few if any actually use Yamaha's terminology. Misleading? Maybe, but let's chalk it up to misunderstanding.
The needle jet is the tube the slide needle passes through. Every carb should have one.
Glad your clog cleared so quickly. I've soaked some carb parts upwards of a month.
 
Be aware that those carb kits you linked to contain the generic Y-22 needle. It won't work in your carb set, it's too short. You usually don't need to replace the needles anyway. You usually don't need to replace much of anything in there. A carb "rebuild" is 99% the thorough cleaning you give it. If you must buy kits, you may be better off with this one .....

http://www.ebay.com/itm/74-76-YAMAH...0CR-/131233451833?vxp=mtr&hash=item1e8e1f8f39

It gives you needles that may actually work, along with needle jets. It doesn't include a choke housing gasket but you only have one. Truth be told, I don't think I ever found the need to replace one. There's no need to pull the choke housing off the body. You can take the choke plunger out from the top and clean it.

Rather than pay Mike's near $2 for one o-ring, you might do better sourcing them elsewhere. The size used is 1mm thick x 4mm I.D.

https://www.amazon.com/Thick-Black-...rd_wg=qkPw1&psc=1&refRID=5G0X2N7YPNHWWZHPM2CZ
 
Thank you for the advise. I was after carb kit mostly for the gasket. As you can see from my pic they look pretty dry. Also I half striped the pilot jet head when removing it. (not sure if my stripping it will affect its performance??). I'm a newbie here and thought if I matched the year I would be getting the correct parts, but now see that is not the case. The carb kit does not even have the correct jet sizes to stock. (main #127.5, pilot #45). Last summer I got the bike running and safety for the first time in 30 year and it was running extremely rich (black spark plugs). I guess I am lucky it ran at all as I didn't even properly clean the jets. As far as I can tell everything is stock so I want to make sure I use the correct jets
 
Original gaskets are very good. Wet them down with some light lube before installing like WD40. That will soften them a little and puff them up. If they seal OK, they'll be fine to keep using. I still have the originals on my '78 carbs and they still work just fine. But, yes, it's good to have some spare parts on hand just as back-ups. Replacing the jets isn't a bad idea either. Jets don't really wear from the fuel flowing through them but if the carbs ever sat for a long period all gummed up, that fuel residue can eat away at the jets internally, making them larger. In particular, this happens to the needle jet. Since this jet meters your midrange, where you spend the majority of your time running, it can make for a very rich running machine if it's eaten away.

If you get the kit I linked to, you will want to check the included needle length. Hopefully, it will come with a different generic needle instead of that Y-22, a Y-31. Your stock 4N8 measures about 46mm from the top clip slot to the bottom tip. The Y-31 measures 45mm, close enough to work. To match the 4N8 length in use, you will need to run the clip one slot higher. Stock clip position for the 4N8 is the 4th slot from the top so a 45mm long Y-31 would need to be set in the 3rd slot to match.
 
5T, you have gave me a lot to read on and now I understand, thanks! Your carb kit listed above does not include any description of the needle or jet sizes. Is this the one for me? Also, this one is tricky to get shipped to Canada. Thoughts on this one http://www.power-barn.com/keyster-c...for-1974-1976-yamaha-xs1-tx650-xs650-ky-0489/ which has the Y-31 jet needle and extra parts if needed (but pricy). All answers came to me once reading thread http://www.xs650.com/threads/carb-id-help-and-2-in-1-throttle-cable-question.42420/
 
The Keyster kits would do. I actually bought a couple just to get a look at that Y-31 needle. But if all you really need is gaskets, you might be better off just buying them. All these rebuild kits are aftermarket and the quality can be hit and miss. The float needle and seat assemblies many times are crap. You're better off with genuine Mikuni parts for that stuff, jets too.

If you have the original 4N8 needles, I would continue using them. Same with the original Z-6 needle jets, as long as they're not eaten away. Unfortunately, you're dealing with the one needle jet not easily replaced. In that other thread, you probably read how the floor height was lowered in the '74-on carbs. This required a shorter needle jet. The longer Z-6 used in the '73 and older carbs has repros available but the short version in your carbs does not. About the only option is those generic versions offered in those couple kits.
 
Hey 5twin, i finally got my orings for my needle jet. Good thing i got a bunch because I've already destroyed 3. I have no issues getting the oring on the needle jet, but what is the trick to installing into the carb body. I push it in and it just wants to hop out. Tried 'screwing' it but does not want to stay seated. Any advise would be great!
 
...what is the trick to installing into the carb body. I push it in and it just wants to hop out...

Mine were also super tight. Used a q-tip to apply the thinnest possible coat of grease inside the carb's needle jet hole, and onto the needle jet's shaft and o-ring. A bit of finger pressure, and they popped right in...
 
Yes, they don't want to seat in easily, but that's usually OK. The float bowl presses against the lip on the needle jet and holds it down in place once mounted. So, lube things up as mentioned, lightly install the bowl over the jet, and let it sit a day or so. Take it off and you should find the o-ring has worked it's way in and seated.
 
Back
Top