1977 XS650

Got it. I had tried to push a small screw driver in that hole, but nothing seemed more likely to move and I didn't want to force it until I knew it was correct. I'll go give it another push and a little more wiggle and see if I can get it to let go.

Thanks
You'll likely find that the hole is packed with corrosion product from the aluminium and it's gripping the switch body. A gentle pry with a flat screwdriver whilst simultaneously pushing the retaining tab in will work. Once you have it moving it'll soon come out. I had the same on my 77 XS650D.
 
Got the brake switch disconnected (it was just gunked tight into place) and got the master cylinder disassembled and cleaned up. I'm going to grab a rebuild kit from somewhere (Mike's XS probably unless folks have another resource to recommend). Kind of a pain to get this thing apart 🥵
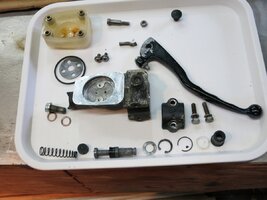
. In addition to the master rebuild kit, I'm wondering about sourcing a new o-ring between the reservoir and the bracket. I can't find a separate part number for it and wondering if anyone can tell me what it's supposed to be. I can measure the one I took out, but I don't know if it has changed from what it should be. Also, you can see the little spring that is supposed to live between the lever and the bracket is bent up. I don't know if this is a product of an aftermarket brake lever not matching stock or what could have caused it to mangle, but I'm going to try and find one of those too.

Was hoping to get a look at the regulator this evening, but there was a lot more work to get the crud off the master than I anticipated.

Cheers
 

Attachments

  • IMG_3923.JPG
    IMG_3923.JPG
    219.9 KB · Views: 25
  • IMG_3924.JPG
    IMG_3924.JPG
    234.2 KB · Views: 28
It's generally accepted here that any rubber bits from Mikes is sub par. Look for a K&L branded rebuild kit. At least I've always had good luck with 'em.
 
Just one small thing I'll mention - your lever adjuster screw is in backwards, lol. The head should be on the outside so you can adjust it.

MCFront.jpg
 
😅, 5twins, I didn't even notice that. I didn't take that bolt out of the lever. I'd like to think when I was putting it back together I would notice it, but I'm glad you pointed it out.
 
Tonight's update. I ordered a K & L master rebuild kit and a caliper rebuild kit (including piston) from Brake master. I touched up the paint on the brake bracket with some rattle can paint as it was pretty messed up from the leaking brake fluid. I cleaned up the oil on the front of the motor, but decided that before I retorque the head bolts, I would take a swing at the regulator. I did confirm it is/was cooking the battery. I started it and rev'ed it up and fluid was actually bubbling out of the top of the battery 😳 even though it is supposed to be sealed AGM. I was surprised it would be doing that after such a short period of running, but obviously a battery replacement in store. Maybe the fluid is just following a gap opened during a previous cooking 🤷‍♂️

@5twins, I was able to adjust the point gap to .35, but I couldn't figure out how the core gap adjustment worked. If I back out that adjuster screw the core gap increases, but I couldn't find any thing that moved when it was loose. When I tightened all the way to bottom, the gap returned to what it was previously (about 1.1mm). I'm guessing that I'm missing something there. In the mean time, I backed out the adjuster screw and current charge rates are between 13.16v and 14.5v so I'm reasonably happy with that. If I do need to fiddle with it any more, I'm going to need a 7mm wrench for that lock nut.

Hoping to pop off the gas tank and do the head bolts tomorrow, but the wife's body language is starting to imply that maybe she's a bit jealous of the time the new project is getting instead of her so we'll see what tomorrow brings. 😜

Cheers
 
If you loosen screw #14, that whole bracket with the points on it should slide up and down, and that will adjust the core gap.
 
If you loosen screw #14, that whole bracket with the points on it should slide up and down, and that will adjust the core gap.
I learned something new tonight. how to "quote" 🙌.

Thanks 5twins. I think it must have just been a bit "stuck". I will try again another night and see is can get it to move.
 
So I snuck out to the garage while the wife was napping, pulled the gas tank off and checked the valve clearances. I clearly need some new o-rings for the valve covers too as these had a bunch of silicone (i think) gooped on.
Looks like I have to take off the upper motor mounts to retorque the head. Is there anything I should be watching out for when I do it? Looks pretty straight forward, but I want to make sure nothing has a tendency to move and be difficult to line up again or anything.
Also, a quick question regarding the throttle cable routing. It was jut run down over the top of the spine under the tank (pic on PDF below), but it had a pretty significant notch worn into it. Is this normal or should it be routed differently?
Thanks
 

Attachments

  • throttle cable.pdf
    148.6 KB · Views: 15
That crossover of the throttle cable can be done at the front of the frame and then run along the left side following the harness, same with the clutch cable going on the right side.

First time I removed the top mount on my first xs it turned into a Chinese puzzle for a few moments when I went to put it back on.......now I set them aside put together - with the nuts off, of course.
 
Help!
I don't know what kind of witch craft people have used in the past to get a brake fluid reservoir back onto the bracket, but I'm losing my mind. I found on the tech thread where it said to use a 39.7x3.5mm o-ring and I picked up one of those o-ring sets from Harbor freight that has ten of them. When I got home, I found I can barely get the reservoir back onto the bracket without any o-ring and it's next to impossible with the 3.5 diameter (which is much bigger diameter than what was on there). I got desperate to the point were I worked up a jig to try and press the reservoir onto the bracket with my bench vice, but I think it is just squished the o-ring out of the groove or something because when I relieve pressure the reservoir just popped back out. I half expected to see the o-ring pinched and out of the groove, but it looks like it is fine with no evidence of pinching. I even tried throwing the reservoir in the freezer for a while hoping in might thermally shrink a little bit and help. I'm reluctant to lubricate with anything other than fresh brake fluid. Running out of ideas and scratching my head.
 
They make a grease (red rubber) that's brake fluid compatible. Any parts house will carry it. Try cleaning out the groove the o-ring sits in again. Trust me... it'll make a difference.
 
The groove is plenty clean and I did find that I have some red rubber grease in the garage, but something isn't right. I pressed it together in the vise again until the bottom of the reservoir was flush with the top of the bracket and once again, it just popped off. I have the reservoir in the freezer overnight and the oring stretched over a slightly oversized jar. I don't know if it is going to work, but I'm praying.
 
It's the same one that came out, isn't it? :er:
 
@Jim The reservoir is the same, but the o-ring is different. When I took it apart, I was convinced that it was leaking from the joint between the reservoir and the bracket (now I am second guessing). It was very difficult to pull the reservoir off and there was a lot of hard (almost plastic varnish like) build up under the reservoir and on the o-ring. Based on info from the tech string referenced above, I tried to replace with the 39.7x3.5 o-ring (I know nitrile isn't really for brake fluid, but others claimed success and made the claim that since it is captured, that brake fluid making is swell might be more of a feature than a bug. I got it back together this morning with a larger 44.4x3.1 o-ring squished into the groove in the bracket, but there is still a tiny gap between the bottom of the reservoir and the bracket. I put some teflon tape on a bolt to blank off the hole where the banjo bolt goes and filled it with fluid to "bench test" it. As mentioned previously, the cross section of the recommended replacement is quite a bit larger than the original (seen below). But the one that was in there seems thinner than it should be based on the groove in the bracket (which the 3.1 and 3.5 cross sections seem to fit into nicely. If, for some reason, this doesn't work and it leaks (either from the bench test or real world once it is back on the road), I am going to get a square section seal from a 44mm brake piston and try that, but fingers crossed this is done.
 

Attachments

  • IMG_3956.JPG
    IMG_3956.JPG
    237.7 KB · Views: 10
If it doesn't work out, it's no great loss in my mind anyway because many of us change the original out for one with a slightly smaller bore, something in the 11mm to 1/2" range. This gives more and better "feel" and modulation compared to the original 14mm one. They're also one cast piece so no issues like you have now .....

MyTTR225MC3.jpg


MCFront2.jpg


MCRear.jpg
 
Back
Top