tonyc
XS650 Guru
Yes. That is what I use it for but I made my own harness.
Yes. That is what I use it for but I made my own harness.
I attached it to the negative post of the battery and one one of the engine bolts. You may use the top engine mounting bolt.
Yes it's the starter wire. the one marked to starter in my picture.
If it was that loose, the locating pin may have come out. If that's the case, just tightening it won't do it.
John
Good deal. Maybe we can get together later in the summer. I have a lot of xs stuff, but the one I have in the shop is behind some of my two-stroke bike projects at the moment.
John
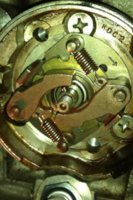
The notched ring that holds the advance on has a raised lip around the hole on one side. That should face out. If you face it in, the ring may not stay tight .....

That pin is part of the plate assembly and doesn't come out. It may or may not be on all advance units. I'm pretty sure this pic is the new unit from Mike's. The pin is a retainer of sorts that sticks out the back of the unit to help keep the locating pin in the cam from falling out .....

As you can see in this pic from an old shop manual, there was no pin on some .....