this is actually for a rare and related '83 GR650 but the process is identical. similar to a 2 into 1 setup i built for my TX500, and one of the trickier weld/fab projects you can take on.
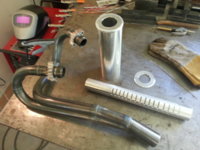
i start by making a pair of stubs about 3" long that must mate perfectly with the cylinder head, exhaust gaskets, and collars. then work out from there... it's 1 1/2" OD mandrel bend stock from Speedway Motors. plan the routing and aesthetics, and start marking and bandsawing. there is some guesswork involved on many cuts, so i usually leave a touch of extra material and finish on the belt sander. some guys have an extra pair of hands around which would make things easier in terms of tack welding in place. i have to use accurate scribe lines and tack on the bench. usually a couple pieces of duct tape will hold a joint for a few seconds...
the collector is made by cutting a couple straight sections into wedge shapes, being sure that the OD's match up on each end. once you've tacked that on you're committed, as the two header pipes must still match the head (also easier with an assistant). i had to do it on the bench. this particular setup was a real s.o.b. as the pipes didn't want to clear the dual frame downtubes. i knew it was going to be close but scratched the crap out of my paint job and fixed it later...
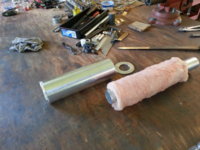
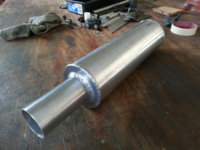
refer to pics for the aluminum muffler construction. very light, very high performance, great sound, loud enough to hear through earplugs but not annoying. the whole system was TIG welded of course. the hose clamp in pic locks on to a steel support just ahead of the muffler clamp joint. you don't want the system hanging in space.
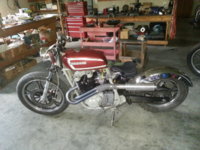
this motor absolutely rips. smoother and more top end than the two XS's i've built. all the head work i did (see other thread) really paid off. nailed the 34mm Mikuni jetting on the first try. still need to paint the gas tank and finish a few details...
i start by making a pair of stubs about 3" long that must mate perfectly with the cylinder head, exhaust gaskets, and collars. then work out from there... it's 1 1/2" OD mandrel bend stock from Speedway Motors. plan the routing and aesthetics, and start marking and bandsawing. there is some guesswork involved on many cuts, so i usually leave a touch of extra material and finish on the belt sander. some guys have an extra pair of hands around which would make things easier in terms of tack welding in place. i have to use accurate scribe lines and tack on the bench. usually a couple pieces of duct tape will hold a joint for a few seconds...
the collector is made by cutting a couple straight sections into wedge shapes, being sure that the OD's match up on each end. once you've tacked that on you're committed, as the two header pipes must still match the head (also easier with an assistant). i had to do it on the bench. this particular setup was a real s.o.b. as the pipes didn't want to clear the dual frame downtubes. i knew it was going to be close but scratched the crap out of my paint job and fixed it later...
refer to pics for the aluminum muffler construction. very light, very high performance, great sound, loud enough to hear through earplugs but not annoying. the whole system was TIG welded of course. the hose clamp in pic locks on to a steel support just ahead of the muffler clamp joint. you don't want the system hanging in space.
this motor absolutely rips. smoother and more top end than the two XS's i've built. all the head work i did (see other thread) really paid off. nailed the 34mm Mikuni jetting on the first try. still need to paint the gas tank and finish a few details...
Attachments


Last edited: