2003 Royal Enfield 500 Deluxe

Sorry Raymond, couldn't resist... :sneaky:


1701284816717.png
 
Using my new telescoping gauge, micrometer and the guidance shown by Jim https://www.xs650.com/threads/2003-royal-enfield-500-deluxe.60842/post-816588, today made a first attempt at taking bore measurements.

A little way down the bore, on the thrust face 3.3053"
At the same height, non-thrust face 3.3044"
Halfway down the bore, thrust face 3.3051"

Now, those numbers are not to be taken for granted! At the bottom of the bore, I measured 3.2983 which I think must be wrong because if my arithmetic is correct that is 7 thou smaller than at the top. Surely not?

Was a useful exercise in faffing about. I learned you either need more than two hands or use a vice to just hold the micrometer while measuring the t-scope. Will come at it again fresh tomorrow and see how my results vary from today.

The manual gives the bore size nominal 84mm, actual 83.96/83.97 which would be 3.3055 - 3.3059. The manual does not clarify manufactured size or the wear limit. I read it as specified size but all my measurements are smaller than wot the book gives.

What have I learned today? Notalot. Well, it might mean that the bore is still in spec for standard piston and rings. More helpfully, it means that if I buy Hitchcocks lovely forged piston in +20 thou there's plenty meat for the engineers to work with.

At the moment, this is on my shopping list https://accessories.hitchcocksmotorcycles.com/23261?cont_page=accessory-shop/cylinder&model=15
 
Last edited:
Using my new telescoping gauge, micrometer and the guidance shown by Jim https://www.xs650.com/threads/2003-royal-enfield-500-deluxe.60842/post-816588, today made a first attempt at taking bore measurements.

A little way down the bore, on the thrust face 3.3053"
At the same height, non-thrust face 3.3044"
Halfway down the bore, thrust face 3.3051"

Now, those numbers are not to be taken for granted! At the bottom of the bore, I measured 3.2983 which I think must be wrong because if my arithmetic is correct that is 7 thou smaller than at the top. Surely not?

Was a useful exercise in faffing about. I learned you either need more than two hands or use a vice to just hold the micrometer while measuring the t-scope. Will come at it again fresh tomorrow and see how my results vary from today.

The manual gives the bore size nominal 84mm, actual 83.96/83.97 which would be 3.3055 - 3.3059. The manual does not clarify manufactured size or the wear limit. I read it as specified size but all my measurements are smaller than wot the book gives.

What have I learned today? Notalot. Well, it might mean that the bore is still in spec for standard piston and rings. More helpfully, it means that if I buy Hitchcocks lovely forged piston in +20 thou there's plenty meat for the engineers to work with.

At the moment, this is on my shopping list https://accessories.hitchcocksmotorcycles.com/23261?cont_page=accessory-shop/cylinder&model=15
It seems unlikely that the bore would be under factory specs. Perhaps it went out of round? Check across several areas and see if it averages out. If that's the case then it's probably better to bore oversize.
 
Was a useful exercise in faffing about. I learned you either need more than two hands or use a vice to just hold the micrometer while measuring the t-scope. Will come at it again fresh tomorrow and see how my results vary from today.

It's a practice thing Raymond. Rest the mic on a workbench with the thimble hanging off the edge. One hand holds the T gauge and holds the mic down against the bench at the same time. The other turns the thimble. It's pretty natural once you get the hang of it.... practice, practice, practice.

Also.... The ratchet stop on some newer mics can be pretty stiff. Stiff enough that they'll actually compress the T gauge slightly, giving a false reading.
Try closing the mic on the T gauge without the ratchet clicking. That'll eliminate the possibility of the T gauge being compressed as you're trying to measure. That make sense?

Fwiw... my students would spend an entire day learning to use a mic and T gauge. I'd put various pistons, cylinders, bushings and a host of other stuff out on a bench. At the end of the day they were pretty consistent and competent. It all comes down to practice.

Also, don't discount the possibility your mic isn't correctly calibrated. Do you have anything with a known size you can compare it to? Did it come with a "standard?" Can you take it to a local engineer (mechanic) and have him compare it to one of his?


1702492968069.png
 
It's a practice thing Raymond. Rest the mic on a workbench with the thimble hanging off the edge. One hand holds the T gauge and holds the mic down against the bench at the same time. The other turns the thimble. It's pretty natural once you get the hang of it.... practice, practice, practice.

Also.... The ratchet stop on some newer mics can be pretty stiff. Stiff enough that they'll actually compress the T gauge slightly, giving a false reading.
Try closing the mic on the T gauge without the ratchet clicking. That'll eliminate the possibility of the T gauge being compressed as you're trying to measure. That make sense?

Fwiw... my students would spend an entire day learning to use a mic and T gauge. I'd put various pistons, cylinders, bushings and a host of other stuff out on a bench. At the end of the day they were pretty consistent and competent. It all comes down to practice.

Also, don't discount the possibility your mic isn't correctly calibrated. Do you have anything with a known size you can compare it to? Did it come with a "standard?" Can you take it to a local engineer (mechanic) and have him compare it to one of his?


View attachment 257414
I spent 25 years learning to use the mic and t-gage. I always, always took several readings to verify size. The other thing to be careful of is how much you tighten the screw on the gage. Too loose and it can slip back. Too tight and it can deform enough to affect the reading.
 
Thank you for the encouragement, @Jim and @Kojack. Definitely a learning curve, and as I've said repeatedly, don't really trust myself measuring things.

On your calibration question Jim, they supplied a 3" metal rod which I guess is for that purpose? So today measured that and with my cack-handed use of the mic found about 1.2 to 1.5 thou out. There's also a little spanner doodah which will be for adjusting the tool. Haven't got into that yet - my readings were so far outside that range of error, I felt I would be happy if I could just get more consistent readings.

However, holding the mic over edge of table, able to hold t-scope steadier, turning ratchet gently till it clicked, I am beginning to achieve more consistency.

Measuring near the top of the bore, roughly 3/4" down, I made a set of four readings at

3.3050
3.3049
3.3048
3.3052

I'l take that as 3.305 near enough. Translates as 83.947mm.

Manual quotes bore 83.96/83.97 and my measurements suggest .013 to .023 mm less than that, about .5 to .9 of a thou. Seems to me that's pretty minimal. The bike only has about 10,000 miles on it.

But then, tried measuring much further down the bore and went back to inconsistent readings. There might be slightly more wear down there, as surely no girl likes to hear, but for an engine that is normal? But by then, trying to keep focussed was taking it's toll and I gave up measuring to sit back and have A Think.

Because I could buy a forged piston in +20 confident there's plenty metal there for a rebore & hone. Or I could say, 'The hell with it, this is a pre-WW2 designed engine, I'll just buy a Std piston and she'll be fine'. Would save the expense and hassle of taking the job to an engineer, probably use Border Engines in Berwick, and then waiting for them to get around to it before going to collect.

Enough for today . . .
 
Last edited:
The 3" rod is a "Micrometer Standard" and is used to calibrate or "Zero" the tool
The spanner is used to rotate the body of the tool in relation to the frame till the readout is "0" when the standard is between the jaws and snugged by the ratchet or friction thimble, depending on the particular micrometer.
You comment that when measuring the standard the tool reads .0012"-.0015" off, which direct, plus of minus?
This might be enough to put you beyond tolerance for stock rings and a simple honing to create a fresh cross-hatch.
Don't be afraid to readjust the tool.
 
Or I could say, 'The hell with it, this is a pre-WW2 designed engine, I'll just buy a Std piston and she'll be fine'.
That would be my inclination Raymond. She's "close enough." You're not trying to set any speed records. I think the most I'd do is get a first over ring set and file those down for a good ring gap. Other than that, clean it up and press on.

Far as the calibration goes, yes, that rod is a standard used to set the accuracy. Tighten the caliper on it (using the ratchet) and use the little spanner to turn the barrel until you're set to exactly 3".
This video is a pretty good visual on how to do it.


Normally most wear is at the top of the cylinder. That's where the explosion hits the piston and creates all sorts of multi-directional forces on it. I never used the ratchet. It creates too many inconsistencies. I would definitely never use it with a t-gage. It takes a light, gentle touch. Keep on practicing.
 
Last edited:
Well, been having fun trying to zero the mic. Nothing is easy, or they'd all be doin it? Haven't actually counted how many times I've gently closed the mic on that 3" measure, zero'd, backed off, gently closed and . . . it's wrong again.


PICT0908.JPG


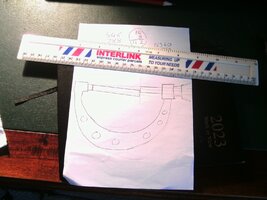
Quick n durty sketch what I think might be happening. If the anvils in the mic pick up on the measure just slightly squint - exaggerated on the sketch - then the gap is too big and next time I check we're off again. Sommat that lends credence to this hypothesis is that when the mic picks up on the 3" measure, it tries to turn and move it.

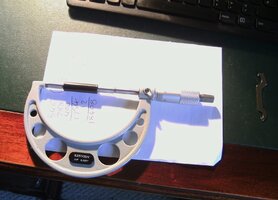
Eventually, arrived at this:


PICT0906.JPG


Light's not good but the zero lines up.

Gonna call that good. But even then you can see the measure isn't quite straight in the mic. Oh, been using the holding over the edge of the desk method to fiddle with the mic. How many of us have adopted the over the edge of the desk position for a bit of fiddling I wonder . . .

Enough for just now. As Jim and @Kojack both said, little bit of practice needed.

Good thing this isn't a rush job.
 
Well, been having fun trying to zero the mic. Nothing is easy, or they'd all be doin it? Haven't actually counted how many times I've gently closed the mic on that 3" measure, zero'd, backed off, gently closed and . . . it's wrong again.


View attachment 257986


Quick n durty sketch what I think might be happening. If the anvils in the mic pick up on the measure just slightly squint - exaggerated on the sketch - then the gap is too big and next time I check we're off again. Sommat that lends credence to this hypothesis is that when the mic picks up on the 3" measure, it tries to turn and move it.

Eventually, arrived at this:


View attachment 257987


Light's not good but the zero lines up.

Gonna call that good. But even then you can see the measure isn't quite straight in the mic. Oh, been using the holding over the edge of the desk method to fiddle with the mic. How many of us have adopted the over the edge of the desk position for a bit of fiddling I wonder . . .

Enough for just now. As Jim and @Kojack both said, little bit of practice needed.

Good thing this isn't a rush job.
Could you put the standard measure in a vice to hold whilst you adjust the mic?
Just a thought as I'm no engineering guru.
 
Just an FYI the cheaper hole gauges don't lock very well, after you measure and remove the gauge really crank down the locking screw before you try to measure it or your mic will close the gauge when you touch the surfaces giving you inaccurate readings. :thumbsup:
 
Raymond, I took a short video of using the standard as I described, but even after editing and cropping to make the file smaller the server here chokes on it so wasn't able to post it. Only 7 seconds of video.
All my personal micss are friction thimble rather than ratchet but I generally just turn the barrel and use feel.
 
Raymond, I took a short video of using the standard as I described, but even after editing and cropping to make the file smaller the server here chokes on it so wasn't able to post it. Only 7 seconds of video.

This site does not host...accept videos. Put it on Youtube or similar sites and link to it. That's the only way you can do it here.
 
"But even then you can see the measure isn't quite straight in the mic."

Raymond, I've seen two styles of standards. The cheaper ones have flat faces and should end up square in the micrometer. The better ones are ground on a radius. Those are somewhat easier to use, in my opinion. Both are accurate. Just be certain that all of the surfaces are dry and clean.
 
Back
Top