'79 Special Rear Caliper

Unfocused

I Love Boobies
Messages
413
Reaction score
4
Points
16
Location
Toronto, ON. Canada
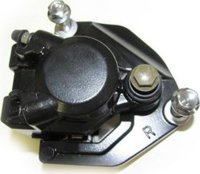
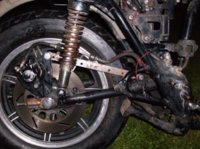
I'm having an issue bleeding out my rear caliper. I have a new master and line, and get fluid through the bleeder. I believe the piston to be stuck. I was planning on getting a rebuild kit to fix the issue. I was also looking for a new replacement, but all I can find are the fronts. Is the rear the same? Pads are, if the caliper is I'll just replace it and keep the rebuild as a spare.

I have done a quick search and came up with nothing on the topic of interchanging front to rear. Mikes shows a replacement front and if I can use that on the rear I'll go that route.

Anyone have the same issue? Thanks for your input.
 
HMMMM...I got a caliper but I can't tell if it is a front or rear either . It has an "R" stamped on the outside and has a "4" on the back .It would bolt on to the right side. I can't find anything in the factory service or the Clymer manual that shows a rear caliper ( I have a rear drum on my bike ) .

Let me know what the rear caliper looks like or the difference between front and rear .
 
MikesXS:

Brake Pad Set ( for 1 caliper ) - Fits: Front - XS650 D-K (1977-84) and Rear - XS650 (1978-84) - Kevlar Carbon compound. OEM Ref.: 1J3-20000-11/13, 3H5-W0045-00, 2MO-W0046-01

Brake Caliper Piston - Fits: Front or Rear Caliper on 1977-84 650's.

Brake Caliper Rebuild Kit - Fits:1977-84 XS650 Front or Rear Calipers. Contains caliper piston seal, dust boot, spring clip and bleed screw rubber cap. OEM Ref.# 1J3-W0047, 1J3-20000-20-00 Also fits: XS400 D/E/F 77-79 front and rear
 
Scrambled, the part of your caliper with the R on it is just the mount. The R means the caliper mounts to the right front fork. You can remove just the caliper from the mount, as a matter of fact that's how you change the pads.
The right side caliper and the rear caliper are the same body, just the location of the bleeder screw is different, When it's a front caliper the bleeder points straight up. When used as a rear caliper the bleeder points 90 degrees toward the front.
When I converted my 75 to a disc rear brake it was a bitch to get it bled. I took it all off the bike and bled the master with the reservoir held straight above the M/C. used my finger on the hole the banjo bolt goes in. Once bleed I hooked the line to it. Used my fingers to seal the end of the line and bled the line. I then hooked the line to the caliper then bled it at the bleeder.
I then put it all back on with out taking any thing apart. It was a PIA but I got great brakes on the rear.
Here's a pic of a front caliper on the mount. You see the bleeder scrw is pointing straight up.
Here's a pic of the rear caliper on my 75. You will see the bleeder is pointing at 90 degrees toward the front of the bike from what the front caliper is.
I doubt it will make much difference to bleed it right so if you can't find a rear use a front.
You might try looking at XS750, XS850 and XS1100's for a rear caliper. The mount won't work but the caliper will.
Leo
 

Attachments

  • 08-5001.jpg
    08-5001.jpg
    11.3 KB · Views: 234
  • LostFile_JPG_65197384.jpg
    LostFile_JPG_65197384.jpg
    56.7 KB · Views: 178
I went on boats.net to look at calipers, They list them as a caliper assembly. Not the caliper and mount separately. From what I could see in the pics was that the calipers themselves were the same, the bleeder was straight up.
I looked at the front and rear on the XS650, 750, 850 and 1100's. They all looked the same.
So from that I would say they interchange just fine, whether the bleeder points up or forward.
Leo
 
Last edited:
Looking at my calipers they are the same, but the rear calipers bleeder has been drilled into the side and the front calipers bleeder have been drilled into the top
 
I picked up the caliper today from Pat aka Scrambled. It was just as described and I even think it is in better than described condition. Thanks a ton man. Your bike is pretty kick ass too. It's always nice to find a fellow enthusiast in my neck of the woods. Hope to put in some riding with you next season once I'm up and running.

Thanks again and hopefully you'll make it to the show Jan 4-6 at The International Center.
 
Ok, got the caliper on and bled. Wow was there a lot of air in the curciut. Took a while to get it all out. Now just a simple question. How much pedel travel should I have? I have a new stock master/resivoir from Mikes, New Russell stainless braided line, and the OEM caliper. Pedal motion seems excessive although it works very well on the bench. If I crack the bleeder when at full stop, it only travels about 1" down from the stopped position to full travel (if you understand what I am trying to say). Is this correct?
 
I am trying to remember what the rear disc was like on my sr500s , ( they are the same as what you got I think ) . I always thought there was too much free play on them and a very long stroke on the peddle.They felt better when I put SS braided lines on , but you already have those.
 
Yeah, I've taken the slack out of the push rod. I have less than 1/8-1/16" of play between the rod and the master, just a hair away from contact. Just need some input as to how it should feel.
 
!" is what I have on mine. If the pads are new it will takw a while for them to seat in. Pedal may feel spongy and brake may not work well until they are.
 
This is a pic I got from my Yanaha Factory book that shows the parts to the rear disc brake M/C. #2 is the nut that locks #1 in place, break the nut loose. Adjust #1 to get the pedal 12 to 18 mm or .041 to .071 inch below the foot peg. As shown by #6.
Now adjust the push rod #4 by loosening nut #3 and adjusting the rod so the pedal has 13 to 15 mm or .051 to .059 inch free play.
This free play will give you some gap between the rod and the master cylinder. Your 1/8 to 1/16 play may be right, check it at the pedal.
With new pads you shouldn't have to worry about the warning at the top of the pic. The dimple is in the rod and you can't see it unless the pads are nearly worn out.
I got this from the 78 XS650 SE suppliment to the 78 XS650 E manual, page 3. The written part that goes with it starts on page 2. You can find a downloadable copy of this and all of the years of manuals here in the tech section and over at the Garage.
On mine the pedal moves about an inch or two to lock the brake.
Leo
 

Attachments

  • Rear brake adjustment 001.jpg
    Rear brake adjustment 001.jpg
    291.5 KB · Views: 175
Back
Top