A cafe for the ages

Hi pnedac,
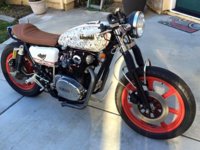
you can't see it when you ride and all your backside cares about is how it feels.
But for looks, reupholster in white with red piping or go with tan grips.
Mind you, Mr Cheap would see how black shoe dye worked out; I remember that the black shoe dye trick worked on a nasty green coloured dualseat that I got for a bargain.
 
I'm a fan of brown seats, but on your bike's color scheme, it looks "off" to me. I vote for black w/red stitching...or even white w/red stitching.
 
I will post some pictures of my progress tonight. I tooka few steps forward and I see that I will be taking a couple steps back (all in the name of learning I suppose). I finally did get it mostly together and just slapped on the new exhaust. I know that it is a little unconventional to use the Pandemonium Hot Rod exhaust on a cafe (haven't seen it used anyway), but I like the simple look of it and I think it'll add to the simple concept I have for this bike. Just need to make a few adjustments, give it a tune up, throw in some fuel and we will be seeing if this booger is ready to fire up!

Stay tuned.
 
Finally got the bike up and running after rolling through all the tune up procedures.

Cam chain tension was spot on already.

The valves were okay, but I changed them just slightly. I know that the manual has the setting of .004 for intake and .006 for exhaust, but I went with .002 for intake and .004 for exhaust. It is my understanding that it actually runs perfectly fine and it is quieter with no chatter. So far so good. I can also confirm that this guy's procedure indeed is much simpler and faster than any other:

I had done this a few other times per the manual and while it also works, this guy makes it much simpler and less hassle.

Had some trouble getting the timing set up and dialed, but I suppose that is the way it goes. Now that all the electrical is buttoned up I will get goijng on the rear seat hoop and I will need to vacuum synch the carbs and figure out how to make the brakes work better. They just seem so weak. They're properly bled and they've been completely rebuilt with ccaliper kits, new hoses and m/c, but still pretty lame.

Will likely wrap the exhaust too. It is LOUD and that is exciting.
 

Attachments

  • Getting there.jpg
    Getting there.jpg
    41.3 KB · Views: 316
- - - figure out how to make the brakes work better. They just seem so weak. They're properly bled and they've been completely rebuilt with caliper kits, new hoses and m/c, but still pretty lame.
Will likely wrap the exhaust too. It is LOUD and that is exciting.

Hi pnedac,
ooh! Pretty bike. First photo with the pipes on, common wisdom is that you'll have a swine of a job getting the bike to run nice with pipes cut that short and I'd say the only thing wrapping does for pipes is rust them out.
Brakes? Drill the snot out of the brake disks and fit a smaller diameter front master cylinder, go mebbe 13mm diameter. The stock m/c is way too big for a single disk set-up which is why it's just about perfect if you fit the leftside caliper.
 
I might cut the exhaust a hair shorter (cut the last inch where it curves downward) and weld on some glass packs or some short tips to quiet it down a bit and give it a bit more back pressure. We shall see. So far it seems to run pretty well though.
 

I watched this video and this guy says he has been running them at .002 since the 80s and has never had a problem. I will just give it a whirl and see how she runs for a little bit. If I run into any trouble I will be quick to go to factory spec, but so for so good and there is definitely no valve chatter as the guy in the video said.
 
Well I finally got the bike up and running, but not without some trouble of course. I can seem to get the timing to relax. I am running a SPARX and a Boyer Branson ignition and it starts and I ken get the idle to be okay, but as soon as I hit the throttle it jumps way higher in RPM and won't come back down unless I retard the timing, but then I am retarding the timing past where to needs to be and it'll die. Reset it and it fires right up. Then I get it dialed in and then I hit the throttle and it jumps up. Vicious cycle I am caught in here. Anyone have a suggestion on something I might be missing. I have ridden it and it will idle too high until I put it into gear and then it seems cool until of course I go back to neutral. Same vicious cycle. I am officially confused. Cam Chain set, valves set, white paint dot lined up behind the magnetic advance and engine at TDC. I am missing something?
 
Finally had a chance to make the seat hoop and mount the brake light. I think it turned out pretty well. I got a little ahead of myself and hadn't yet installed new chain and sprockets, but I am doing that now. Just needs some light tuning and she is up! Had to cut the kicker off and just make my own since it seemed like no matter what I did I could not get it to bend and clear the rearset like the TC Bros rearset instructions say. Who knows? It doesn't matter now at any rate. I still need to figure out how to mount the plate to something somewhere, but I will cross that bridge when I get to it I suppose.
 

Attachments

  • Almost Done.jpg
    Almost Done.jpg
    183.3 KB · Views: 236
Almost forgot about the chaneg tot he exhaust. I decided it was just a bit too loud so I cut the ends off and threw on a pair of SS mufflers and wrapped the pipes. It is still pretty loud, but not like it was before. Just might help performance a bit too.

I am building a 78 CB650 now too that I won't bore anyone with, but it is coming along quite nicely and it is very tasty looking. I will share a picture of it soon for S&Gs.
 
I have come to the conclusion that this bike would be happier (and prettier) with clip ons vs. the clubmans it has now. I realized that the clip ons will not go under the triple tree unless I get rid of that original sleeve that holds the headlight.

Then I thought about it and I think I can make it work. I just need to remove the fork sleeve/headlight holder, cut the 1 7/8ths inch off the bottom of it, slide the headlight down a bit and it should work. Can't wait to see if this is feasible.

If it does not for whatever reason work then I do have some headlight brackets that do not have a sleeve that I can use, but I prefer to use the sleeve as it is original. I will post the pictures when it is completed (if it works).

Cheers!

Bike is finally up and running pretty darned well. Found a couple bad gaskets, but replaced and we are on the road again. Sweet!
 
I have come to the conclusion that this bike would be happier (and prettier) with clip ons vs. the clubmans it has now. I realized that the clip ons will not go under the triple tree unless I get rid of that original sleeve that holds the headlight.

Then I thought about it and I think I can make it work. I just need to remove the fork sleeve/headlight holder, cut the 1 7/8ths inch off the bottom of it, slide the headlight down a bit and it should work. Can't wait to see if this is feasible.

If it does not for whatever reason work then I do have some headlight brackets that do not have a sleeve that I can use, but I prefer to use the sleeve as it is original. I will post the pictures when it is completed (if it works).

Cheers!

You could flip the ears upside down (and left/right) to get the headlight down...I did that at first on my build, and it worked/looked good I thought...but I came to the realization, like you did, that if you wanted to use clip-ons and keep the sleeves, you're going to have to cut them. When you take them off and look into cutting them, I think you'll find that you'll have an issue with them staying centered around the forks... I believe both top/bottom of the sleeves fit into cups that keeps them centered. Thus, when you cut them, I think they will be "floppy" (for lack of a better word).

I may be wrong?

Good luck.
 
You are and you aren't Brassneck. Yes there are those "cups" there, but they actually come apart and the top and bottom, leaving the exposed sleeves raw (thankfully). I just took them out, put the sleeves in the vice and grabbed the sawzall! Took one and one half inch off the bottom of each (which is the size of the clip on clamps) and put it all back together.

Happy to report that it turned out great! I like to mix the original parts with the new stuff when possible and this was a perfect opportunity.
 

Attachments

  • Clip ons done.jpg
    Clip ons done.jpg
    144.7 KB · Views: 199
  • Clip ons done1.jpg
    Clip ons done1.jpg
    154.2 KB · Views: 207
  • Clip ons done2.jpg
    Clip ons done2.jpg
    134.8 KB · Views: 211
You are and you aren't Brassneck. Yes there are those "cups" there, but they actually come apart and the top and bottom, leaving the exposed sleeves raw (thankfully). I just took them out, put the sleeves in the vice and grabbed the sawzall! Took one and one half inch off the bottom of each (which is the size of the clip on clamps) and put it all back together.

Happy to report that it turned out great! I like to mix the original parts with the new stuff when possible and this was a perfect opportunity.

Nice work! Looks great.
 
Back
Top