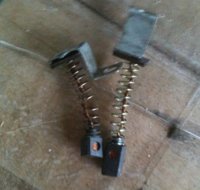
alternator brushes, wear limits and oddball way to stuff them in

emzdogz

Aunty Em
Messages
1,034
Reaction score
7
Points
38
Location
Tampa, FL
Got my bike running fairly decently, except for a noisy top end, but had noticed it was not charging. Only noticed this because multimeter between battery poles was not rising as I rev'ed it to 3 or so (checking for charging). I never have gotten to ride this bike yet, far enough to wear down a battery.

So, I've read through the Curly's guide and am looking to the simplest things first. Notice at the end of Curly's Guide that is says that most often brushes or a bad connection is the problem. <<seemed like a good starting point. :)

So I went to check alternator brushes. Got them out and noticed one was stuffed in kinda funny. Like on one, the little Z bracket that the retaining screw and ring go on has the copper wire, spring and brush on the wrong side? but sadly I didn't notice that until I went to put them back in. So I'm having a hell of a time getting one of them back in. One is fine, but one needs to be twisted in a way that seems it can't be good for it.

And yet I go on Mikes and I read "To install pull brush assembly around to opposite side of metal bracket its soldered to and then insert into holder."
So I guess that's normal??? that on one of the brushes there will be a bit of copper wire going "around" the little Z bracket. Strange.

Good news is one of my brushes is worn way down. It is worn so far down that on the carbon end, you see a copper dot on the end. It is definitely under 1/4" in length, and more like 3/16" in length. The other one, the one that had to be stuffed in funny is a bit longer still.

So I'm ordering new ones now - hope that turns out to be the issue, that the one real short brush was not allowing it to charge.

Anyone else have trouble with stuffing that one brush in - the one that has to be wrapped around to the other side of the "Z"?

here is a pic.
thx, any input welcome.
 

Attachments

  • brushes.jpg
    brushes.jpg
    95.3 KB · Views: 265
The one on the right, flip it over the top so the brush is on the other side. Those of us who've made our own brushes from parts sometimes drill a hole in that one part so the wire just comes straight up and thru.

When your new pair arrives, you'll have to flip them both over. They're made like that.
 
I hope a bulb comes on in my brain by the time the new ones get here, because I can't think of any way to do that so that the metal bracket and ring will lay flat to the plastic piece they screw to. On the ones i have in there now, one is fine. Anyway I guess I just need to wait and see what I'm able to do. thx
 
Ha ha. Ok. On the pic on the right, pull the spring and the little plastic piece downward, then wrap the wire itself around one side or the other until the brush itself is pointing up. Hold it in that position while you put it in the stator so it won't flip back around.
 
so, in other words, when installed you will see a tiny bit of copper wire wrapping around the side of the silver bracket? I'm thinking that's the only way.... hmm
thanks! really appreciate it. Just ordered the new ones.
:)
Wish I'd watched more closely as I was removing them!
 
so, in other words, when installed you will see a tiny bit of copper wire wrapping around the side of the silver bracket?

Yes.

I originally took both of mine out at the same time and they both flipped around and I'll admit I scratched my head for a second or two with that puzzle my own self.
 
The little fiber board piece only fits in the brush holder one way. It's a bit longer one way than the other.
Yes they can be tough to get in. After a few times it gets easier.
From looking at your pic those brushes have the same mounting strap. Those you can swap the inner to the outer and outer to inner to even the wear. Doing it every 5000 miles gets a bit more wear out of them.
Leo
 
hi Leo, thanks for that info - hadn't seen your post til just now.
So I got the new brushes stuffed in, and now I'm worried that it's over-charging.

I temporarily wired in a new Mike's bar-mount voltmeter and according to the meter, it would appear I am now OVER-charging?

Here's a little video of the "disco lights" situation I have going on now with this meter. Sometimes it stay in the green, middle area, but when revving it, the lights light up all the way over to the right, and a red LED at the far right lights up.

So..... I'm over-charging?

thanks in advance for taking a look. Here is the link:
 
From what your vidieo shows I might say yes, it's over charging. It flicked off for a split second, are the connections tight? Have you checked it with a regular meter to check voltage. It may just be a bad LED gauge.
If over chagring check for a possible short to ground at the brushes. A short there will put max voltage through the rotor, maxing out the output.
Leo
 
checked it with the regular hand-held volt meter across the battery posts, and it seems to be at right around 14, even at just over idle and then springs up to 16 or so when revved.

As far as short to ground at the brushes, might that be if one brush is not stuffed in all the way, and the spring is (very) slightly exposed? or would it have to be an actual metal to metal thing touching, that shouldn't be touching? (can't imagine what that would be. hmmm)

Anyway, thanks again.
 
It still reads high with your meter then it may be a bad regulator. On the brushes power is fed in on the brown wire, out on the green to the reg that controls the ground. It does this with a transister. When the transiter is "on" power flows to let power flow through the rotor making the alternator charge. It controls the voltage by turning the transister on and off.
If the green wire brush has a short as in the metal strap that holds the brush touches any metal part it "turns on" the power all the time leading to the overcharge. This is how you do the reg bypass test.
Check the brushes to be sure there is no shorts. If none then the regulator may be faulty.
Do you have another reg/rec you can try?
Check your reg/rec wiring, A bad connection or short aloig the green wire to the reg/rec can do the same as a short at the brushes.
Leo
 
ok, thanks again. Everything is going to be re-wired soon (this is just the "rough draft"). But for now I'll re-check the existing connections.

Even with the bike not running, the Mikes LED voltmeter lights up over 14. I attached alligator clips to the leads of the volt meter and un-mounted it from bars. With alligator clips attached to + at battery and to ground, without bike running, it still reads really high.

Also, I seem to have killed my regular volt meter by accidentally using it set to the "ohms" side. Now it's dead, won't move at all. LOL! good thing it was cheap. But before its death it was also reading 14-ish across the battery without the engine running.
 
Most meters have small fuse inside that protects the ohms side if you try checking volts with the ohms scale. Your meter may be ok, check the fuse. Usually in the battery compartment.
Leo
 
UPDATE: got it to stop over-charging. I replaced the little screws that hold the brush brackets tight, with the original screws. I think there's a chance I'd used a very slightly longer screw before, that came with the new plastic brush holder I also ordered. I ended up using my old brush holder though, as the new one cracked. The old one is fine - I really didn't need a new one anyway. But I think maybe the screw used in the lower brush was just a tad too long, and therefore grounding on something directly behind it. (it was butting into something on the other side)
I THINK that's it. Not certain.

So all I have to use at the moment is the Mike's LED bar-mount volt meter. It now no longer flings up into the yellow and red LED's at the far right. It sits either in the middle of the greens, or on the last green LED, which is right under marking "14". However, I'm still not sure all is well, because the LEDs don't "jump" when I rev it, and the headlight doesn't seem to glow any brighter when revved. But at high-ish idle it's on the highest green LED and then at higher RPM in the middle green LED. So it IS charging. But I don't understand why it would charge a little lower at higher RPM.

I guess I need to get a real multi-meter, or replace the fuse in my old one and check it with that - to see if the charging increases as revs go up.
 
Back
Top