Bike dies when stopping at light/stopsign

Well good to know exactly what I have now. Thanks for looking that up, you guys are all gurus. How tough is it to take apart the carbs on this bad boy?

Simple...and worth getting familiar with. Just take your time.

Getting them off is a sequence of events...remove the tank (Makes it a lot easier I think). Remove cables/hoses, remove airboxes (yours looks stock). Pulling the carbs, and getting it out of the frame could mean that you may need to remove the cam chain tensioner cover...and then twist/turn the carb as a set unit until it's free. Then work in an area where you won't lose parts!!! (when I'm not familiar with something, I take lots of pics so I can reference it when getting it back together).

Getting it back in the bike might be easier...although some find it more difficult the first few times.

Oh, you may want to check the rubber seals for the airboxes while you're looking at it...if they're old/hard...you may want to replace them. btw, if they are hardened, a little hot air (Hair dryer) will soften them up...helps with reassembly if you aren't going to replace them.

Good luck!

BTW, your bike looks good...despite it being a mix of standard/special parts! Do the side covers fit ok? I thought the standard frame brackets were set up differently than the specials...so that the special's wouldn't fit in those slots...or is it the other way around? I can't remember. LOL
 
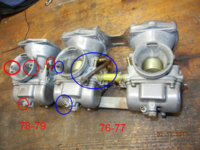
You will want to know what year the carbs are for sure I think from the pics they are 77...

This should help tell.

tappets carbs 010.JPG


CarbSpecsReducedSize.jpg
 

Attachments

  • tappets carbs 010.JPG
    tappets carbs 010.JPG
    225.1 KB · Views: 105
Simple...and worth getting familiar with. Just take your time.

Getting them off is a sequence of events...remove the tank (Makes it a lot easier I think). Remove cables/hoses, remove airboxes (yours looks stock). Pulling the carbs, and getting it out of the frame could mean that you may need to remove the cam chain tensioner cover...and then twist/turn the carb as a set unit until it's free. Then work in an area where you won't lose parts!!! (when I'm not familiar with something, I take lots of pics so I can reference it when getting it back together).

Getting it back in the bike might be easier...although some find it more difficult the first few times.

Oh, you may want to check the rubber seals for the airboxes while you're looking at it...if they're old/hard...you may want to replace them. btw, if they are hardened, a little hot air (Hair dryer) will soften them up...helps with reassembly if you aren't going to replace them.

Good luck!

BTW, your bike looks good...despite it being a mix of standard/special parts! Do the side covers fit ok? I thought the standard frame brackets were set up differently than the specials...so that the special's wouldn't fit in those slots...or is it the other way around? I can't remember. LOL

Thanks for the advice, I will really try to do this before riding season and see if that is the problem thats causing the bike to stall. AND the side covers fit...mostly. there is quite a bit of space between the hooks on the bike and the slits that the side covers hook onto. this space is taken up by the spaced age invention called electrical tape:laugh:. But dimension wise, they actually fit pretty well i guess. So im assuming it must be the other way around :)
 
Your problem could be some goo in your pilot jets
6ce32623a9bc621f41dd96e5c498ef83.jpg

It's good to have a tiny drill bit orfice cleaner to run through the hole. Plugged jets will make it lean and have a weak idle
 
How tough is it to take apart the carbs on this bad boy?
In addition to all the good advice in previous posts, dismantle one carb at a time. That way you will have a reference if you forget what goes where.
A picture of the relevant carb from the parts book is also a good reference.
 
Hi Fern,
like most have said, clean the carbs. If it still acts up, clean 'em again, you missed a spot.
Pay special attention to the slow running jets, needles, associated passages and the entire enrichening system (AKA "choke" although technically, it ain't one)
The smaller the passage the easier it gets blocked, eh?
Here's some carb cleaning tricks:-
Grind up the ends of screwdrivers so they are an exact perfect fit in the slots in those soft as butter brass jets and are less liable to wreck them.
If the dreaded PO has already effed 'em up so the screwdriver cams out, chuck a screwdriver bit in your drill press, block the carb up on the press base, bear down hard on the press feed handle to keep the bit pressed into the jet's slot and back the jet out by turning the chuck by hand.
Work on the carb in a big ol' cafeteria serving tray so it's rim can stop all those fiddly little parts from falling onto the floor and disappearing.
 
I got a perfect pin vice for modelling that will do the trick. JUst started up bike today and I thought it the bike was gonna blow up! done university this week and i got 4 days off till I start work so im gonna mess with the carbs (finally) and hopefully get her all cleaned out. Might take the petcocks apart to to make sure they are functioning correctly. Expect a post soon. sorry I didnt reply there for a while everyone!
 
Back
Top