RPC3
XS650 Addict
Now that I've got my PAMCO in and running I turned back to focus on tracking down my air leak. Bike is a 78 standard, bs38's, everything stock from a carb set up aside from a jetting change. I did replace the throttle shaft seals, so that shouldn't be the issue.
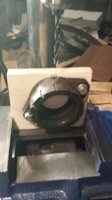
My bike starts fine and once it warms up (after 10 miles of driving or so) the idle will only settle down to about 1300-1500 rpm. When cold I can get it to idle at sub 1000, so the heat from the engine must cause things to open up just enough to allow for an air leak (or further pronounce). With the Pamco my bike is idling much more reliably, so I really tried to pin-point my efforts of spraying starter fluid to find the exact leak. Turns out the leak is coming from where the carbs sit in the intake boots. I tried loosening the metal clamp a bit, as I read here that over tightening can distort the seal just a bit, but that had no change (leak still present). I'm assuming my carbs are either cracked or slightly deformed on the carb to boot seal (engine side seals fine, barb doesn't have a leak on either side). So unless anyone thinks it could be installation or user error (and I'm pretty confident my carbs are seated properly, after having them on and off the bike a few times I've learned the proper feel of seating them - and I did so with the boots greased), I think I'm due for new boots.
So anyway, on to options for new carb boots. I've read enough about the MikesXS boots to know they're probably going to break down after a bit of use due to the rubber not being suitable for ethanol. That leaves me:
1) JBM Industries - seem expensive, would be roughly $83 after shipping, but the quality seems to be decent. No barbs unfortunately
2) Ebay used - I'd prefer not, can't see a used pair holding up any better than what I have
3) Ebay new - There are a few listings for K&L carb boots along with others that just say "made in japan" that are available. More for '74-'77, but I think they'd work fine with my carbs; I just wouldn't get the benefit of the vacuum barbs. As low as $40 with free shipping
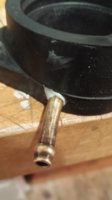
Anything else I might be missing? I'm kind of bummed that they're not making the bs38 boots with the barbs, as they'd be easy to cap off and a good feature for really any Bs38 set up. I take it I would just have to run my bike on prime full time if I switched to non-barb boots? I guess I could tap them and insert my own barbs as well, but I'd be a little nervous about ruining the new set. I know my carbs are balanced now as I just did that with my homemade manometer a few weeks back, but its a nice option to have. I don't know...just trying to cover all my bases before taking action.
Thanks
My bike starts fine and once it warms up (after 10 miles of driving or so) the idle will only settle down to about 1300-1500 rpm. When cold I can get it to idle at sub 1000, so the heat from the engine must cause things to open up just enough to allow for an air leak (or further pronounce). With the Pamco my bike is idling much more reliably, so I really tried to pin-point my efforts of spraying starter fluid to find the exact leak. Turns out the leak is coming from where the carbs sit in the intake boots. I tried loosening the metal clamp a bit, as I read here that over tightening can distort the seal just a bit, but that had no change (leak still present). I'm assuming my carbs are either cracked or slightly deformed on the carb to boot seal (engine side seals fine, barb doesn't have a leak on either side). So unless anyone thinks it could be installation or user error (and I'm pretty confident my carbs are seated properly, after having them on and off the bike a few times I've learned the proper feel of seating them - and I did so with the boots greased), I think I'm due for new boots.
So anyway, on to options for new carb boots. I've read enough about the MikesXS boots to know they're probably going to break down after a bit of use due to the rubber not being suitable for ethanol. That leaves me:
1) JBM Industries - seem expensive, would be roughly $83 after shipping, but the quality seems to be decent. No barbs unfortunately
2) Ebay used - I'd prefer not, can't see a used pair holding up any better than what I have
3) Ebay new - There are a few listings for K&L carb boots along with others that just say "made in japan" that are available. More for '74-'77, but I think they'd work fine with my carbs; I just wouldn't get the benefit of the vacuum barbs. As low as $40 with free shipping
Anything else I might be missing? I'm kind of bummed that they're not making the bs38 boots with the barbs, as they'd be easy to cap off and a good feature for really any Bs38 set up. I take it I would just have to run my bike on prime full time if I switched to non-barb boots? I guess I could tap them and insert my own barbs as well, but I'd be a little nervous about ruining the new set. I know my carbs are balanced now as I just did that with my homemade manometer a few weeks back, but its a nice option to have. I don't know...just trying to cover all my bases before taking action.
Thanks