Cafe build with RD400 tank

barncat

XS650 Addict
Messages
359
Reaction score
69
Points
28
Location
Candor NY
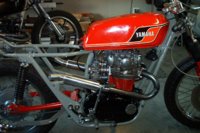
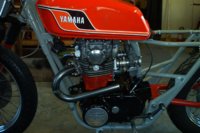
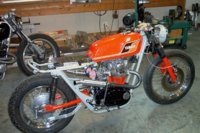
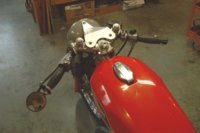
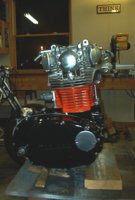
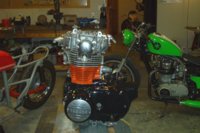
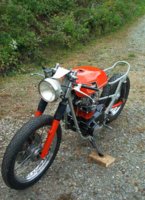
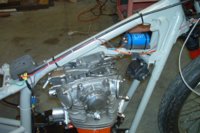
'73 TX about 70% done.

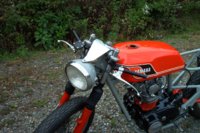
started with a couple of bikes and sold off the tanks and side covers and used a nice RD400 tank from the local vintage bike salvage. that required some careful frame mods to reset the rubber mounts etc...

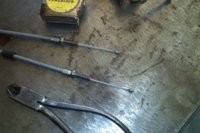
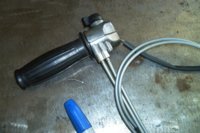
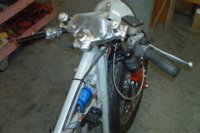
frame was de-tabbed, hardest part of that being removing the passenger footpeg sheet metal assemblies. they are a PITA. stock 34mm forks were also cleaned up, with new seals, and wire wheeled trees. clip on bars from a CBR (with shims), and a stainless brake line for firm response from the disassembled and cleaned caliper. recycled a pair of rear shocks lying around suitable for solo riding. cleaned up and used the great looking shouldered rim wheelset that had good tires already mounted :thumbsup:

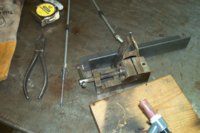
modded the footpegs with welded on knurled steel tube, redesigned the brake pedal, used a piece of aluminum bar stock for rear drum brake stay, and also added a little hook axle adjuster device i like to use to insure that the axle stays where you put it- and the wheel doesn't shift under hard accel.

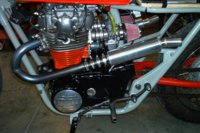
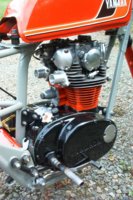
had a very good road tested 18K motor, so no rebuild. 40 hours of clean up, detailing, paint, adjustments, exhaust porting (you can hog out a fair amount of material from the outside if you know what you're doing...), new 7/6 clutch plates with socket screw mod and heavy duty springs, kick only PMA with 2nd generation welded stator bracket and slotted cover plate for cooling. miraculously, both oil filters were in great shape, with no crud in sump and just very minor debris in side filter- both thoroughly cleaned with new gaskets all around as required.

just as a note re using those Dorman freeze plugs to permanently block off the E-start hole: that is a procedure that could be frought with serious peril, as in busting your lower motor case. they DO NOT hammer right in as is, or at least not in a '73 motor. i know better than to wail away on such a relatively fragile casting. i've done two of these, and anything more than a .010-.012" interference fit is asking for trouble. i was able to chuck the plugs in my lathe and shave a bit off the plug OD, plus i use some copper based silicone gasket maker.......

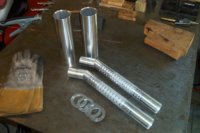
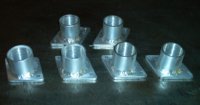
refurbished a pair of 34mm VM snowmobile carbs with proper brass. forgot to add pics... they will be installed with the aluminum intakes i fabbed and welded up today. made 3 sets for a couple other bikes.

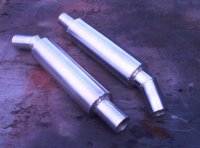
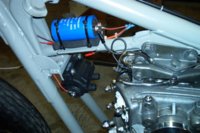
complete re-wire next with Andrews coil, custom 2 into 1 exhaust, seat pan, various details. hope to fire it up within 2-3 weeks. note the appropriate Halloween color scheme.
 

Attachments

  • IM004097.jpg
    IM004097.jpg
    269.8 KB · Views: 484
  • IM004308.jpg
    IM004308.jpg
    295.1 KB · Views: 440
  • IM004310.jpg
    IM004310.jpg
    244.1 KB · Views: 399
  • IM004306.jpg
    IM004306.jpg
    155.1 KB · Views: 357
  • IM004312.jpg
    IM004312.jpg
    234.7 KB · Views: 383
  • IM004314.jpg
    IM004314.jpg
    159 KB · Views: 373
Last edited:
Hey barncat,

The bike and engine are looking good. I like the color scheme.

I was just looking at the rear aluminium brake stay and had a couple of questions....

Is the stay attached back to the frame or the swingarm? Attaching to the frame might affect braking.

Also, is the Ali likely to get straightened when under braking loads and touch the tyre?

Cheers,
Phil
 
hey Phil- valid questions. the stay is indeed attached in the usual place under the swingarm though that can't be seen... it's a piece of aluminum that i adapted from a luggage rack off a GS1000 from a previous build. it's 1/4" thick stock, and is bent slightly convex to get around the tire. i've used 1/4" stock successfully on other builds, there is no appreciable flex.

i did put motor back in frame yesterday without much fuss. that would be even easier without the vestigial compression release valve cover that put one scratch in the paint. next time i'll just remove it first, or cut it down and weld over it. the best thing i've found for frame/paint protection for that procedure is padded plastic mailing envelopes wrapped and taped on.

will post some better pics later.

if anyone has a decent 2 into 1 header for sale i might be interested- to save time. don't need a muffler, will fab one.
 
Last edited:
a few more pics with motor in frame.

headlight installed with custom rubber mounted aluminum panel and inverted re-bent lower mount. decided to optimize handling and appearance by mounting clip-ons upside down and swapped right/left in between trees.

clutch cable installed. an otherwise good but slightly stretched cable can be reclaimed by cutting the bottom end off and TIG welding a new stub of 1/4" dia drilled steel... hit it with 15 amps, don't shorten by more than 1/2" total. don't forget to straighten that guide that goes into the motor cover. it creates a huge amount of cable drag.

carb intakes were installed without a gasket, just 3Bond.

there's a lot of air space under the tank that will hide the new reg/rec and capacitor. should look pretty clean. btw, Turtle Wax polishing compound is pretty amazing for safely freshening up vintage paint. there's a couple scratches in the tank i'd like to retouch, but maybe i'll just let it slide. i'm mostly about a race bike aesthetic for the street.
 

Attachments

  • IM004316.jpg
    IM004316.jpg
    305 KB · Views: 342
  • IM004317.jpg
    IM004317.jpg
    302.5 KB · Views: 377
  • IM004318.jpg
    IM004318.jpg
    318.6 KB · Views: 576
  • IM004321.jpg
    IM004321.jpg
    316 KB · Views: 375
  • IM004322.jpg
    IM004322.jpg
    311.2 KB · Views: 357
Last edited:
wired, save for spark plug wires and mounting the tail light. all hidden by the tank. decided to skip the rear turn signals since they vibrate to death anyway. they are required in NY but i rarely have my bikes inspected or ride at night.

some finicky throttle cable mods and an exhaust system to go...
 

Attachments

  • IM004325.jpg
    IM004325.jpg
    214.7 KB · Views: 281
  • IM004324.jpg
    IM004324.jpg
    220 KB · Views: 268
  • IM004323.jpg
    IM004323.jpg
    237.7 KB · Views: 305
Looks clean...wish mine was that clean. :)

Is there enough airflow for the reg/rec on the frame? Might get a bit hot I think...perhaps not?
 
Brass- thanks. plenty of airflow over the reg, it's practically ram air under the back of the tank tunnel.

my plan for the exhaust is a bit unorthodox so stay tuned...
 
Last edited:
one of the trickiest processes in this type of build is modding the throttle and cables for VM carbs. it can all be done with stock parts.

the compression release lever boss has to be cut and ground off, then i use a Dremel to grind about 1/8" off the aluminum throttle tube stop to give the throttle enough lift range for the VM's. i do not trust the curved cable adjusters since one failed on me on the road once. made a couple press fit ferrules that act as cable stops. there is no adjust at the handlebars but i use long-ish adjusters at carb tops adapted from some snowmobile cables.

the cable end stops must be cut off, cables pulled, and housings are then carefully routed and cut to length- being sure to test for adequate steering lock-to-lock length. the cables are then lightly greased and fully assembled in the throttle, inserted back in the housings and adjuster added. this is a one-way deal (new end stops will not thread through afterward).

chuck a piece of 16P nail in a lathe and drill with #52 drill to produce two 3/16" sections. measure exactly 3 3/16" from the cable housing end to near side of new end stop. cut cables to leave 1/8" excess, clamp assembly on table and TIG with 15A. the extra cable is the filler.
 

Attachments

  • IM004327.jpg
    IM004327.jpg
    248.6 KB · Views: 245
  • IM004328.jpg
    IM004328.jpg
    271.1 KB · Views: 264
  • IM004329.jpg
    IM004329.jpg
    270 KB · Views: 290
Hey, Barncat looks good I'm doin mine with the same tank , wondered if you had to mod the front tank mounts , I'm using a Omar's cafe narrow seat gotta do a little mod on the front of it but I think it will work I'll post a couple pics but really like yours thanks for any help. By the way what size is your rear tire
 
TwoMany- i suppose TIG welding those end stops could be overkill but it's the strongest way to do it... all the work is in the setup.

mddawg- thanks. yes i recall you have a nice RD tank for your project. check that thread you started a while back for pics i posted. the front tank mounts need to be moved a bit and i had to make two new ones. hard or impossible to get old ones off intact. rear tire is 130/90-16, anything wider would rub the chain.

got started on the exhaust. all those parts will be turned into a high mount 2-2. i was going to experiment with an unusual 2-1 setup but decided not to.

i cut the flanges and exhaust collars off the old headers to reuse. modifying the flanges to match 1-1/2" OD exhaust tubing is very difficult. they are concentric tubes 1 1-4", 1 3-8", and 1-1/2". after grinding the end weld off, the inner tube can be driven out with the proper OD steel rod, but the 2nd 1-3/8" layer is spot welded in place. they can't be bored out on a lathe because they are not plumb to the flange. ya gotta cut through it lengthwise with a hacksaw blade in a low profile blade holder and pry/bend it out with channel locks...
 

Attachments

  • IM004331.jpg
    IM004331.jpg
    182.9 KB · Views: 227
Last edited:
exhaust is basically done. cans are shown temporarily clamped in place.

i often build my own performance mufflers. all sealed TIG welded aluminum, these weigh about 1-1/2lbs each.

i slot the cores rather than drill them (much faster and very effective) with a Dewalt chop saw with a custom 12" carbide blade for aluminum. blade is about 20 years old and is still like new- one of the best tools in the shop :thumbsup:

the cores are then wrapped with a double layer of aluminum window screen wired in place, and then a suitable layer of ordinary pink fiberglass insulation that will insert into the outer housings without being stuffed too tight. it's a labor intensive process...

the cans are loud enough to hear what the motor is doing through earplugs and can be tuned for max power. way better than straight pipes.
 

Attachments

  • IM004339.jpg
    IM004339.jpg
    218.3 KB · Views: 283
  • IM004337.jpg
    IM004337.jpg
    238.7 KB · Views: 384
  • IM004334.jpg
    IM004334.jpg
    202.1 KB · Views: 264
  • IM004332.jpg
    IM004332.jpg
    200.1 KB · Views: 268
first of all, pay no attention to the god awful temporary seat, zip tied on...

have been delayed some by cold weather and other life tasks, but rolled her out of the shop the other day and it started first kick. pleased to report that the carb jetting is nailed right out of the box. 22.5 pilots air screws out 1 turn, 180 mains, etc... had to mod the slides on the recycled carbs from 1.5 to 2.5 cutaway. this thing pulls- hard. a backstop on the seat may even be required to stay put. riding position is very well balanced too and should corner great, but it's not registered or insured yet so no major road testing.

i like the way the coil and plug wire arrangement turned out, very short wire runs, and they are 8GA Monster Cable speaker wire, btw... lotsa stranded copper.

i don't care for the flimsy stock shift levers, so made a beefy one to match the brake pedal.

got sidetracked for several hours making a key for the gas cap lock, original key was AWOL. finally figured that out by trial and error- regrinding an old key from a Ford Focus i once owned.

really wish i could have made the lightweight FZR front brake rotor work that i tried out. would have been a real aesthetic upgrade, and would have shed close to three critical lbs. there was no way to get adequate clearance between the caliper and spokes...

still need to make a seat, and slap an LED tail light on it.

Brassneck- i'd have to learn how to post video. not sure when i'll get to that but it's an important skill these days...
 

Attachments

  • IM004347.jpg
    IM004347.jpg
    294.4 KB · Views: 457
  • IM004349.jpg
    IM004349.jpg
    189.6 KB · Views: 276
  • IM004350.jpg
    IM004350.jpg
    233.4 KB · Views: 289
Last edited:
Monster speaker cable for plug wires, huh? Interesting, but how well does the insulation hold up to heat? I looked it up on eBay and it is reasonably priced, comes in many colors as well.
 
i've had Monster cable wires on my TX500 for two seasons with no problems, and on the 650 all summer. needless to say you don't really want it touching the head or exhaust, and you could also sleeve it with something heat resistant when you put the wires together.

super low resistance and it works well with either crimped or screw-on terminals, though for the latter you need to wrap a bit of electrical tape at the end to increase the diameter into, say, a spark plug boot/cap.

i just had some lying around and figured why not try it...
 
With the lower insulation resistance of Monster Cables, I would think that you'd get a bluish corona discharge from them on a moist night.

That'd be cool...
 
except that i never ride in the rain (not fun) or at night (too many deer). yep, i admit it- just a fair weather daytime backroad racer...
 
Unfortunately, the weather here in WNY can change rather quickly, or it can be sunny and nice at your point of origin, raining just a few miles down the road. I try not to ride in the rain too if I can help it, but it seems to get me at least once a season, lol.
 
ah- a fellow crappy weather NYer... though September was fantastic this year. i lived in Rochester and then the Bristol Hills above Honeoye for 25 years.

anyway, gotta go unload the trailer, scored a $200 '78 GS750 with the good carbs and 4 into 1 this AM, and a rare '83 Suzuki GR650 (twin), Titled, $300 from a friend yesterday. neither running, but they never are... two more '73 TX's on hand to build also. lots of projects :thumbsup:
 
Back
Top